EZTR40 START-UP GUIDE VENT KIT FOR TANKLESS WATER HEATER 1-866-766-7489 WWW.NORITZ.COM EZTR ikea.
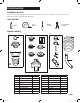
PRE-INSTALLATION PLANNING INSTALLATION Compare all parts with the Package Contents list. If any part appears missing or damaged, do not install this kit. Contact Customer Service immediately at 1-866-766-7489.
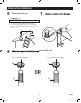
INSTALLATION 1 1 3 Measure the vent length from the 2 bottom of the B-Vent to the roof Remove the B-vent (from the ceiling down and the tank. termination. 2 1 Determine the size of your venting. Is it 3” or 4”? 3 EZTR ikea.
INSTALLATION (CONTINUED) 4 Install the base junction support based on the 3” or 4” venting structure. OR 3” B-vent Termination 4A 4B 4C If no B-vent is protruding, install the base junction adapter. 4A1 4” B-vent Termination 4D If B-vent is protruding, install the base junction adapter. 1 Install the base junction support onto the B-vent. M If no B-vent is protruding, install the base junction adapter. C 4B1 2 Place the base junction adapter gasket.
INSTALLATION (CONTINUED) 5 □ the B-vent to the rain cap 2 . Mark and tighten 3 . 1 2 B A Q 3 B Do not cut the flex vent yet Q 5 EZTR ikea.
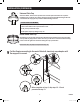
INSTALLATION (CONTINUED) 6 7 Remove the rain cap. WARNING Use extreme caution when working on rooftops. □ Climb up to the roof, remove the rain cap and place it in parts bag #2, ensuring it will not fall off. Clean any debris from the inside of the rain cap and B-vent. Q Bag 2 Bag 2 8 press into B-vent. For 4” B-vent termination For 3” B-vent termination H I OR Q Q 6 EZTR ikea.
INSTALLATION (CONTINUED) J Universal Rain Cap This is the default, universal rain cap that can be used to replace the former rain cap at the installation site. It enables you to easily cut the flex pipe and install without having to take into consideration the varying rain caps and their different fittings and sizes. PLEASE PAUSE FOR A MOMENT Please verify if the installation of a rain cap of different appearance will conflict with Home Owners Associations rules to prevent future issues.
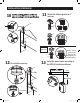
INSTALLATION (CONTINUED) 11 10 Attach the diffuser gasket for 3” rain cap. F M Good E Q Too Short D D For 4” Rain Cap G D D G F Q 12 Too Long 13 Re-install the rain cap. F Install 4” diffuser gasket over the diffuser. Insure both gaskets are completely touching. Install the water heater according to the EZTR40 Installation Manual. L (Max. 5 feet) Ceiling H M (Min. 2 feet) 4” installation M EZTR ikea.
INSTALLATION (CONTINUED) 14 Attach the 45° elbow to the connector pipe until fully seated. 15 length (longer length better than short). Flex vent cannot be lengthened after this point! P 3" 16 required. 17 B R 10 EZTR ikea.
INSTALLATION (CONTINUED) 18 Attach O-ring and coupler retainer. Ensure there is no space between the O-ring and coupler. 19 Remove elbow assembly from the top of the heater and attach to the K Q L Q K L L L 20 M K P Re-connect the elbow assembly to the heater. 21 Test the system for carbon monoxide leaks. 3" P 10 EZTR ikea.
INSTALLATION (CONTINUED) 22 the heater. Secure and tape. 23 Calculate total vent length and adjust dip switch on the heater if required. Refer to EZTR40 Installation Manual. X R Y N O 11 EZTR ikea.
1-866-766-7489 www.noritz.com 9 EZTR ikea.