
Install Manual

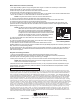

Water Drain Valve
Gas Inlet
11160 Grace Avenue, Fountain Valley, CA 92708 • Phone: (866)7-NORITZ (866-766-7489)
Fax: (714) 241-1196 • www.noritz.com
Rev. 9/10
IS-IK-WV-200
EDP #2915854
Water Heater Flush Procedure (Continued)
7. Pour approximately 5 gallons of virgin food grade white vinegar or a solution of Lime Away or CLR and water
(diluted 3 parts water to 1 part Lime Way or CLR) into a bucket.
8. Place both the pump inlet hose and the drain outlet hose into the bucket.
9. Open both drain valve lever handles on the service valves.
10. Turn the pump on. The unit will attempt to ignite and a number 11 should flash on the remote controller after about
1 minute. Do not reset the unit. Allow the solution to circulate for 45 minutes.
1. The full port characteristics of the service valves allow full diagnostic testing of your system.
2. Be certain that the drain valve lever handle of the hot water valve is closed (the lever will be perpendicular
to the drain portion of the body) before you begin to avoid injury or damage.
3. Slowly remove the drain cap. You may now connect a hose to the drain valve and begin testing of the system.
NOTE: It may take a few minutes to clear air out of the heater and hoses.
11. Turn the pump off and close the cold water drain valve of the service valve.
12. Remove the hose from the cold water drain valve and replace the drain cap onto the drain valve outlet.
13. Remove the pump and hose from the bucket and empty the solution.
14. Put the ho
t water drain hose end back into the empty bucket and open the cold water main valve handle. This
procedure will flush out the heater with fresh cold water. Flush for at least 5 minutes or until 20 gallons of water has
passed through the heater.
Diagnostic and Testing Procedures:
NOTE: Water discharged from the drain valve can be at high temperatures. Use caution when draining
water out of a hose and into an open area.
4. Because of the full flow characteristics of the service valve, you may now perform flow rate, temperature, and gas
pressure testing. This should be done by either the installer or an authorized Noritz service representative. Contact
Noritz for further information.
Noritz America Corporation (”the Company”) warrants each product to be free from defects in material and workmanship under normal
usage for a period of one year from the date of original shipment. In the event of such defects within the warranty period, Noritz America
will, at its option, replace or recondition the product without charge. THE WARRANTY SET FORTH HEREIN IS GIVEN EXPRESSLY
AND IS THE ONLY WARRANTY GIVEN BY THE COMPANY WITH RESPECT TO THE PRODUCT. THE COMPANY MAKES NO
OTHER WARRANTIES, EXPRESS OR IMPLIED. THE COMPANY HEREBY SPECIFICALLY DISCLAIMS ALL OTHER WARRANTIES,
EXPRESS OR IMPLIED, INCLUDING BUT NOT LIMITED TO THE IMPLIED WARRANTIES OF MERCHANTABILITY AND FITNESS
FOR A PARTICULAR PURPOSE. The remedy described in the first paragraph of this warranty shall constitute the sole and exclusive
remedy for breach of warranty, and the Company shall not be responsible for any incidental, special or consequential damages, including
without limitation, lost profits or the cost of repairing or replacing other property which is damaged if this product does not work properly,
other costs resulting from labor charges, delays, vandalism, negligence, fouling caused by foreign material, damage from adverse water
conditions, chemical, or any other circumstances over which the Company has no control. This warranty shall be invalidated by any
abuse, misuse, misapplication, improper installation or improper maintenance or alteration of the product. Some States do not allow
limitations on how long an implied warranty lasts, and some States do not allow the exclusion or limitation of incidental or consequential
damages. Therefore the above limitations may not apply to you. This Limited Warranty gives you specific legal rights, and you may
have other rights that vary from State to State. You should consult applicable state laws to determine your rights. SO FAR AS IS
CONSISTENT WITH APPLICABLE STATE LAW, ANY IMPLIED WARRANTIES THAT MAY NOT BE DISCLAIMED, INCLUDING THE
IMPLIED WARRANTIES OF MERCHANTABILITY AND FITNESS FOR A PARTICULAR PURPOSE, ARE LIMITED IN DURATION TO
ONE YEAR FROM THE DATE OF ORIGINAL SHIPMENT.
LIMITED WARRANTY AND DISCLAIMER
NOTE: For NRC and NCC Series condensing models, carefully unscrew the
water drain valve from the bottom of the water heater near the gas
inlet to flush any residual solution from the system (see Figure 4).
The system will be under pressure and the drain valve will only require
a couple of turns to allow sufficient flow from the drain. Place a bucket
under the unit and flush for about 10 seconds. Attempting to remove
the drain valve completely could result in an excessive leak.
15. Close the cold water main valve handle and clean the water inlet filter. Place the
filter back into the unit.
16. Close the hot water drain valve lever handle, remove the drain hose and replace
the drain cap onto the hot water drain valve outlet.
17. Open both the hot and cold water main valve handles. Handles should now be
(OPEN) parallel to the m
ain valve body and lever handles should be (CLOSED) perpendicular to the drain portion of the
body, which is the normal operating position.
18. Open the gas supply valve and reset the unit by turning the power off and then on again using the Power Button on
the Remote Controller. If no Remote Controller is installed, disconnect, then reconnect electrical power to the unit in
order to reset the system.
Figure 4. Water Drain Valve
on Condensing Models