
Use and Care Manual

4) Install the recess box.
• Attach the recess box to the framing using
suitable screws on all 4 sides of the box.
5) Install the heater.
• First, install one of the supplied mounting screws
in the top recess box bracket leaving about 1/4”
clearance between the bracket and screw.
• Second, insert the water heater into the box
by sliding the top heater bracket over the previously
installed mounitng screw as shown in Figure 3.
• Finally, install the 2 remaing mounting screws
in the lower recess box brackets and tighten all 3
screws to secure the heater (see Figure 4).
6) Make connections.
• Connect water, gas, and electrical
connections as outlined in the
Installation Manual.
8) Replace the Recess Box Cover.
• After confirming the heater is operating
correctly, replace the front cover of the recess
box as shown in Figure 5.
NORITZ AMERICA CORPORATION
11160 GRACE AVENUE, FOUNTAIN VALLEY, CA 92708 TEL: 1-866-7NORITZ www.noritz.com
Rev. 10/17
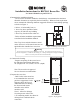
Figure 3: Location of
top mounting bracket.
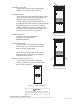
Figure 5: Completed installation.
7) Seal the Recess Box.
• Using silicone, seal around the outer edges
of the box as well as around any penetrations
made to prevent water leakage.
Note: The lower, inner edges of the box have
been pre-sealed. If these seals are damaged,
reseal them using silicone.
Warning
Do not use the recess box for storage. Using the box
for other than its intended use can pose a fire hazard.
Figure 4: Location of
lower mounting brackets.