Sandwich Prep Table User’s Manual ℃ ℃ ℃ Model NP1R-SW / NP2R-SW / NP2R-SW36 / NP2R-SW60 / NP3R-SW NP1R-SWMT / NP2R-SWMT / NP2R-SWMT36 / NP2R-SWMT60 / NP3R-SWMT READ THIS MANUAL CAREFULLY BEFORE USING YOUR Sandwich prep table AND KEEP IT FOR FUTURE REFERENCE.
Product Registration Thank you for purchasing a Norpole® product. The first step to protect your new product is to complete the product registration on our website: www.mcappliance.com/register. The benefits of registering your product include the following: 1. Registering your product will allow us to contact you regarding a safety notification or product update. 2. Registering your product will allow for more efficient warranty service processing when warranty service is required. 3.
CONTENTS PRODUCT REGISTRATION . . . . . . . . . . . . . . . . . . . . . . . . . . . . . . . . . . . . . . . .2 IMPORTANT SAFETY INSTRUCTIONS. . . . . . . . . . . . . . . . . . . . . . . . . . . . . . . 4 INSTALLATION INSTRUCTIONS. . . . . . . . . . . . . . . . . . . . . . . . . . . . . . . . . . . . 5 OPERATING INSTRUCTIONS. . . . . . . . . . . . . . . . . . . . . . . . . . . . . . . . . . . . . . 6 CARE AND MAINTENANCE . . . . . . . . . . . . . . . . . . . . . . . . . . . . . . . . . . . . . . . .
IMPORTANT SAFETY INSTRUCTIONS WARNING: Hazards or unsafe practices which COULD result in severe personal injury or death. CAUTION: Hazards or unsafe practices which COULD result in minor personal injury or property damage. 1. Read all instructions before using the appliance. 2. CAUTION: Installation and maintenance should only be performed by certified professionals. Improper installation could result in serious harm or death and may void your warranty. 3.
Installation Instructions CAUTION: Read all instructions before installing. • Allow the unit to stand in place at least 24 hours after transporting or moving before plugging it in. • Make sure that the unit has reached the desired operating temperature before loading product into it. • Make sure that there is proper ventilation around the unit and in the space in which it will be used. • Verify that all accessories (shelf clips, shelves, casters, etc.
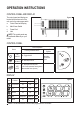
operation instructions CONTROL PANEL AND DISPLAY The control panel and display are located at the bottom rear of the unit, next to the main power switch. a. Control Panel and Display b. Main Power Switch c. Power Cord d. Vent Figure 1 a b NOTE: The control panel may be positioned differently on your model.
NOTE: It is not recommended to change the default operating parameters for the temperature and defrost settings, or other advanced settings within the controller. If adjustments to these settings are needed, please contact customer service or a qualified service technician. TURNING THE UNIT ON AND OFF Make sure that the main power switch next to the control panel is in the On position, then press and hold the Up-On/Off button ( ) for 3 seconds to turn on or off.
FOOD PANS The prep table is designed to be used with all the food pans in place, even if some are not being used and empty. It is recommended to only fill them with the amount of food expected to be used within a given period, and always close the lid when not actively using. NOTE: After unplugging the unit, ALWAYS wait at least 10 minutes before plugging it back in. Failure to do so could result in damage to the compressor.
care and Maintenance CLEANING THE CONDENSER COIL For efficient operation, it is important that the condenser surface be kept free of dust, dirt, and lint. It is recommended to clean the condenser coil and the fins at least once per month. Figure 4 Remove the screws holding the vent cover on the bottom rear of the unit to access the condenser. (See Figure 4.) Removing all screws and both panels will allow for the condenser to be partially pulled out for cleaning.
Troubleshooting Before requesting any service on your unit, please check the following points. Please note that this guide serves only as a reference for solutions to common problems. Symptom Possible Cause Compressor not running. Fuse blown or circuit breaker tripped. Replace fuse or reset circuit breaker. Power cord unplugged. Plug in power cord. Thermostat set too high. Set thermostat to lower temperature. Cabinet in defrost cycle. Wait for defrost cycle to finish.
LIMITED WARRANTY Norpole, Inc. warrants each new Prep Table to be free from defects in material and workmanship and agrees to remedy any such defect or to furnish a new part(s) (at the company’s option) for any part(s) of the unit that has failed during the warranty period. Parts and labor expenses are covered on this unit for a period of three years from the date of purchase. In addition, Norpole, Inc.