Operation Manual 10.2 inch portable DVD player Model no.
Important Safety Instructions CAUTION: TO REDUCE THE RISK OF ELECTRIC SHOCK, DO NOT REMOVE COVER (OR BACK). NO USE-SERVICEABLE PARTS INSIDE. REFER SERVICING TO QUALIFIED SERVICE PERSONNEL. The lightning flash with arrowhead symbol, within an equilateral triangle, is intended to alert the user to the presence of uninsulated “dangerous voltage” within the product’s enclosure that may be of sufficient magnitude to constitute a risk of electric to persons.
Important Safety Instructions CAUTION: These servicing instructions are for use by qualified service personnel only. To reduce the risk of electric shock, do not perform any servicing other than that contained in the operating instructions unless you are qualified to do so. Refer to service manual for servicing instructions. IMPORTANT FOR LASER PRODUCTS 1. CLASS 1 LASER PRODUCT 2. DANGER: Visible laser radiation when open and interlock failed or defeated. Avoid direct exposure to beam. 3.
Features High-quality Audio and Video Excellent Sound: Dolby delivers great sound. AV In: External Audio, Video input can be connected to most external AV sources. AV Out: Analog Audio output and video output. Decoder Advanced Playing Functions Compatibility: Compatible with DVD, CD and JPEG discs, etc. On-Screen Display: You can choose from English, Spanish, French, etc. for the On-screen Display language.
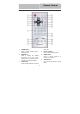
Parts Part List Picture Part No.
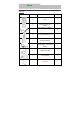
Contents ……….……………………………………1 Important Safety Instructions Features ………………….…………………………3 Accessories ………………….………………………....4 Contents ………………….………………………....5 View of Front Unit ………………….…………………………6 View of Side Panels ………………….…………………………8 Remote Control …………………..………………...……...9 System Connections ……………………….…………………..12 Power Supply Preparation ……………………….…………………..14 Rechargeable Battery ……………………….…………………..15 Notes on Discs ……………………….…………………..18 Playback Operation ………………………….………………..
View of Front Unit Front View / : direction button and button for 1. TFT LCD searching disc forward. 2. Speaker The speaker outputs high quality stereo 4. / Button and / Button sound. / : direction button and button for play the previous track. 3. / Button, / Button / : direction button and button for play / : direction button and button for the next track. searching disc backward.
View of Front Unit 5. ENT Button 13. Remote Control Sensor Press to access playback or confirm your Receive signal from the remote control selection. for operation. 6. (Stop) Button 14. Power Indicator Press to stop playback. Then press Light green when the player is on work; It button to resume playback from the turns red when the player is in standby stopped spot. Press this button twice to mode. stop playback completely. 15. Charge Indicator 7.
View of Side Panels Right Side View 1. VOLUME Control Used for adjusting the sound level of speakers and headphones. 2. Headphone Jack When headphones are plugged in, the speakers automatically turn off. You may also use this jack to connect to an external amplifier or audio source. 3. AUDIO Input/Output Jack Used for connecting to an external amplifier or audio source. 4. VIDEO Input/Output Jack Used for connecting to an external monitor or video source. 5.
Remote Control 1. 2. 3. POWER Button Press to access standby mode or playback mode. INFO Button Press to display the detailed information of the disc during playing. Press this button again to exit from the information display. TITLE Button Press to display title menu if it exists 4. in the disc. Direction Buttons Press to select different options. 5. ENTER Button Press to access playback, or confirm your selection. 6. SETUP Button Press to enter the player’s system setup.
Remote Control 7. 8. 9. 10. 11. 12. 13. 14. 0-9 Number Buttons Press to select an option in the menu. PREV Button Press to return to the previous list or the previous track or chapter. If it is a DVD disc, it needs to press this button twice to return to the previous track. NEXT Button Press to skip to the next list, track or chapter. SUBT Button Press to select different subtitle languages if there are multiple subtitle languages existing in the disc.
Remote Control Installation Steps Follow the steps below to install the battery. Step1: Pull the battery holder out from the remote control in the direction of the arrow. Step2: Load a new battery properly with the (+) sided up. Step3: Insert the battery holder back into the original position. Battery Property Battery Type: CR2025 3V Battery Life: Approximately 1 year under normal use (at room temperature). Caution 1.
System Connections z z Always ensure that the DVD player, TV and any other electrical equipment to be connected with are switched off and unplugged from the power supply. Ensure that you observe the color coding when connecting audio and video cables. Connecting to TV Audio/Video connections Follow the drawings below to connect the DVD player to TV's Audio/Video inputs with Audio/Video cables. Connecting to Amplifier Refer to your Audio equipment's manual before connection.
System Connections Connecting to External AV Source The player supports AV signal input function. Use the audio/video cable to connect the unit to an external AV signal source such as a DVD, VCR etc. After connecting, push AV IN/OUT switch on the right panel to switch to AV IN. NOTE: Noise may occur in speakers when there is an external audio signal input while playing a DVD disc. Unplug the audio cord to clear the noise.
Power Supply Preparation Using the AC Adapter The player is supplied with an AC adapter for powering the unit and charging the battery. 1. Connect AC adapter to the right side of the DVD player in the jack marked “DC 9.5V IN”, as shown on the right. 2. Plug the two-prong end of the power cord into a grounded electrical outlet. The power indicator will turn red. NOTE: Please turn the player's power off before unplugging.
Rechargeable Battery About Rechargeable Battery Pack Your portable DVD player comes with a lithium ion rechargeable battery that attaches to the rear of the DVD player. Charge the battery fully before initial use. Charging time is normally about 5 hours. A fully charged battery delivers about 3 hours of use, but playing time varies from disc to disc. If the battery will not be used for a long period of time, fully charge the battery prior to storage.
Rechargeable Battery Attaching the Battery Pack Refer to the following steps for attaching the Battery Pack: 1. Make sure the player is off and the AC or car adapter is disconnected. 2. Place the DVD player on a soft and smooth surface. 3. With one hand on the DVD player to prevent it from moving, take the battery and align the plastic tabs on the battery pack with holes on the player, and push the battery pack into the DVD player. 4. The battery pack will click into place.
Rechargeable Battery Detaching the Battery Pack If the DVD Player is not going to be used for long periods of time, the battery pack should first be fully charged and then detached. When the DVD Player is turned OFF, the DVD player is still consuming some power in STANDBY mode. This will eventually discharge the battery. Make sure the power is turned OFF and the AC or Car Adapter is disconnected before detaching the Battery Pack. To detach the Battery Pack: 1.
Notes on Discs Compatible Disc Formats COMPATIBLE FORMAT DISC LOGO DIAMETER 12cm DVD 8cm PLAYBACK TIME/ PLAYABLE SIDES 133 min (SS-SL) 242 min (SS-DL) 266 min (DS-SL) 484 min (DS-DL) 41 min (SS-SL) 75 min (SS-DL) 82 min (DS-SL) 150 min (DS-DL) 12cm 74 min 8cm 20 min CD 12cm JPEG Operation methods of some DVD discs are specified by the software manufacturer. Please follow the instructions of the disc. Care of Discs Holding Discs Do not touch the playing surfaces when loading or removing discs.
Playback Operation PLEASE READ THE FOLLOWING INSTRUCTIONS CAREFULLY BEFORE USING YOUR DVD PLAYER FOR THE FIRST TIME. WARNING: Only use high quality discs, poor quality discs could damage the player’s lens. Pre-operation 1. Connect the unit to power supply through the provided AC adaptor. 2. Switch “POWER ON/OFF” to “ON” on the left panel to turn on the DVD player. The main unit power indicator light is green and screen displays an initial image. 3.
Playback Operation Basic Operation (continued) ZOOM Button A-B Button For DVD disc, press ZOOM button to display the image as 2x-3x-4x-1/2-1/3-1/4-normal size in sequence. For JPEG disc, press ZOOM button first, then press button to zoom in the picture in proportion of: 125%-150%-200%; press button to zoom out the picture in proportion of: 75%-50%. This function is not available for CD disc. During disc playback, press A-B button to select the segment that you want to play repeatedly.
Playback Operation DVD Playback (continued) MENU Button Press MENU button during playing, the root menu will appear on the TFT screen. Press (direction buttons) to select the title or disc menu item you wish to play, then press ENTER button or ENT (on the front panel) to confirm. Or press 0-9 number buttons to select the item you prefer directly, then press ENTER or ENT button to confirm. Press MENU again to resume the normal playback.
Playback Operation DVD Playback (continued) When a DVD is playing, press SUBT button to select a subtitle language or to turn subtitle off. A DVD disc can be recorded with at most 32 subtitles. Press SUBT button repeatedly, the mode of subtitles will recycle as follows: SUBT Button SUBTITLE 1/N: Subtitle 1 appears on the screen. SUBTITLE 2/N: Subtitle 2 appears on the screen. SUBTITLE */N: Subtitle * appears on the screen SUBTITLE OFF: No subtitle.
Playback Operation DVD Playback (continued) INFO Button Press INFO button for detailed information on the disc playing. Press it repeatedly to display as follows: Title Elapsed Title Remain Chapter Elapsed Chapter Remain Display Off SLOW Button Press SLOW button to activate slow forward and slow backward playback in order of:s.f.1/2 - s.f.1/4 - s.f.1/8 s.f.1/16 - s.r.1/2 - s.r.1/4 - s.r.1/8 - s.r.1/16 - normal play. (s.f.:slow forward, s.r.: slow rewind).
Playback Operation CD Playback Buttons Operation PAUSE / Button STOP/ Button Press PAUSE button to pause during play, and press it again to resume normal play. Press button to pause during play, then press it again to resume normal play. During playback, press STOP button once to stop playing, then press PLAY button to resume normal playback from the place where STOP button is pressed. Press it twice repeatedly to stop playback completely.
Playback Operation CD Playback (continued) GOTO Button Press GOTO button to select desired disc starting time, track starting time or track. During CD playback, press it repeatedly to display as follows: Disc Go To:--:-- Track Go To:--:-- Select Track:--/N N refers to the total track number of the disc. Use 0-9 buttons on the remote control to select directly. Press INFO button for detailed information on the disc playing.
Playback Operation Picture CD Playback Pre-operation 1. Load a Picture CD disc in the disc tray, the player will read the disc automatically. 2. The screen displays the Root Folder with several subdirectories/subfolders. Use , direction buttons to select a desired folder. (See page 36). Then you can press any of the following button to confirm your selection: , ENTER, PLAY (on the remote control), , ENT, (on the front panel), 3. The screen enters the selected subfolder with several files.
Playback Operation Picture CD Playback (continued) MENU Button REP Button GOTO Button Press MENU button during play to return to root folder. Press PLAY button or (on the front panel) to resume normal play. Press REP button to repeat a file, folder in sequence. Press it repeatedly, the display will be as follows: Random Single Repeat One Shuffle Repeat All Repeat Off Shuffle refers to repeat files of current folder randomly without obeying the original order.
Playback Operation Picture CD Playback (continued) Picture Rotate While viewing a picture, use direction buttons , , , to rotate the picture.
System Setup You can change the default settings of this unit to customize its performance to your own preference. NOTE: Set up the system while playing is stopped or there is no disc in the player. To set up your system: 1. Press the SETUP button on the remote control. 2.The setup menu will appear on the screen. It includes General Setup Page, Speaker Setup page, Dolby Digital Setup, Video Setup Page and Preference Page.
System Setup General Setup Page 2.Angle Mark This item is used to turn the Angle Mark on or off. Press or button to highlight this item. Press ENTER or to enter the setup of this item. Press or button to choose turn angle mark On or Off. Press ENTER to confirm your selection. Press to exit from this item. 3.OSD Language This item is used to set the OSD (on-screen display) language. Press or button to highlight this item. Press ENTER or to enter the setup of this item.
System Setup General Setup Page 6. Last Memory This item is used to set last memory state. NOTE: The last memory is referred to the state that if you stop watching a program on DVD and go back to it later, the program begins playing from where you are left off. Press or button to highlight this item. Press ENTER or button to enter the setup of this item.. Press or button to choose On or Off. Press ENTER to confirm your selection. Press to exit from this item.
System Setup Dolby Digital Setup The items included in this sub-menu are shown as the left. 1. Dual Mono This item is used to set the output mode of channel. Press or button to highlight this item. Press ENTER or to enter the setup of this item. It includes Stereo, L-Mono, R-Mono and Mix-Mono. Press or button to choose the proper one. Press ENTER to confirm your selection. Press to exit from this item. 2.
System Setup Video Setup Page 1. Sharpness This item is used to adjust the sharpness of the screen. Press or button to highlight this item. Press ENTER or to enter the setup of this item. It included High, Medium and Low. Press or button to choose the proper one. Press ENTER to confirm your selection. Press to exit from this item. 2. Brightness This item is used to adjust brightness level of the screen. Press or button to highlight this item. Press ENTER or to enter the setup of this item.
System Setup Preference Page 1. Audio This item is used to set the audio output language. Press or button to highlight this item. Press ENT or to enter the setup of this item. The available languages are English, French, Spanish, etc. Press or button to choose the preferred Language. Press ENT to confirm your selection. Press to exit from this item. 2. Subtitle This item is used to set the language of subtitle. Press or button to highlight this item.
System Setup Preference Page 4.Parental DVD discs are rated according to their contents, and their settings vary from disc to disc. The function of this item is to set parental control. You can lock out certain scenes of the discs, or lock out the ,whole disc depending on the contents of the disc after setting this item. Press or button to highlight this item. Press ENTER or to enter the setup of this item. Then the item will show as the left. Press the or button to choose the proper one.
Definitions Letterbox Screen This refers to a screen on which the playback picture of wide-screen DVDs appears with black bands running along the top and bottom. Pan & Scan Screen This refers to a screen on which the playback picture of wide-screen DVDs is cut off at the left and right sides. Title, Chapter (DVD) DVDs are divided into some large sections (titles) or some small sections (chapters). Each section is numbered: these numbers are called "Title number" or "Chapter number".
Troubleshooting If you suspect there is something wrong with the DVD player, immediately turn the power off. Disconnect the power connector and check that there is no smoke or excessive heat coming from the unit. Never open or try to repair the unit yourself. There are no user serviceable parts inside. PROBLEM POSSIBLE CAUSE POSSIBLE SOLUTION The disc cover may not be closed. The player cannot play. There may not be any discs in the DVD drive. Put a disc in to the DVD drive.
Troubleshooting PROBLEM There is no picture. Poor AV performance. The remote control does not work POSSIBLE CAUSE POSSIBLE SOLUTION The LCD may be off or not be in correct video mode. Turn on the LCD and choose the correct video mode. The system connection may be not correct. Connect correctly. The unit may be not in AV out mode. Switch AV tab on the bottom of the unit to out. The disc may be dirty or warped. Clean or change the disc.
Specifications TFT Screen Size 10.2 inches Video System NTSC 20Hz~20kHz Frequency Response ±2.5dB Audio Signal-to-Noise Rate ≥85dB Audio Distortion + Noise ≤-65dB (1kHz) Channel Separation ≥70dB (1kHz) Dynamic Range ≥80dB (1kHz) Audio Out Video Out Analog Audio Out Out level: 1.5V±0.2 1.0 , Video Out AC 100-240V ~ Power Load: 10kΩ Out Level:1V p-p±0.
Warranty Thank you for purchasing Ferro works Nortech Media products. Ferro works (Hereinafter called the company) will provide 90 days of guarantee from the date of purchase, please read the following terms and conditions: (Please keep this warranty certificate and purchase receipt properly, they must be present when enjoying guarantee). 1) If any defect appears within 7 days from the date of purchase, you can go to retail store for replacement.