
User's Manual


the table stand into the back housing. Then apply pressure to the bottom tabs until the bottom tabs can be
inserted into the bottom housing.
For wall mount, first consider whether you plan on using the AC power adaptor. If using the AC power
adaptor, next consider how you plan to route the cord. It may be routed through the wall or hang down the
wall.
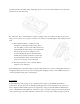
(a) If through the wall, the cord must be routed
through the opening in the back housing. In this
case, first make your hole in the wall at the desired
height. Mount the back housing to the wall with the
tabs up and the snap down, using the screws
provided, aligning the holes in the wall and the
back housing. (figure 4). Route the cord through
the wall and back housing, and insert the power
connector into the plug on rear of Keypad.
(b) If down the wall, the cord is routed through the
channel on rear of Keypad.
Next attach Keypad to the back housing by first inserting the tabs at top of the mounting plate and then re-
snapping the Keypad to the bottom of the mounting plate. Snapping is easier if you simultaneously press
on the snap while pressing down on the Keypad.
Programming
Your LifeShield system can support up to [4] Keypads in a single system. Each Keypad must be
registered into the system before use. The Keypad shipped with your Security Base was pre-registered
before shipment. Additional Keypads may be registered by using your Security Tablet, LifeShield web
portal, or LifeShield mobile application (collectively “apps”). To register a Keypad, enter the Settings tab
of the respective apps, and select Add Device. Follow the on-screen prompts. When prompted, press the