
User's Manual
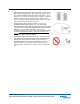
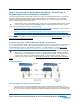
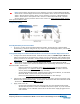
Table Of Contents
- External-Antenna Nortel Networks WLAN - Access Point Quick Installation Guide
- ATTENTION!
- Overview
- Step 1: Collecting Required Tools and Supplies
- Step 2: Configuring the Nortel Networks WLAN - Access Point or Remote Edge Access Point Before Installation
- Step 3: Preparing Mounting Locations
- Step 4: Mounting the Nortel Networks WLAN - Access Points
- Step 5: Returning MAC Information
- Planning Notes
- Safety Considerations

March 16, 2004 6
Step 2: Configuring the Nortel Networks WLAN - Access Point or Remote Edge Access Point Before Installation
be reconfigured back and forth between Layer 2 and Layer 3 operation, refer to RMA Proce-
dures later in this document to RMA your version 1.2 Nortel Networks WLAN - Access Points.
• Alternatively, you may have a version 2.0 Nortel Networks WLAN - Wireless Security Switch
that is part of a mobility group that can be reconfigured back and forth between Layer 2 and
Layer 3 operation. If you do not have a mobility group of Nortel Networks WLAN - Wireless
Security Switches that can be reconfigured back and forth between Layer 2 and Layer 3
operation, refer to RMA Procedures later in this document to RMA your version 1.2 Nortel
Networks WLAN - Access Points.
• If your version 1.2 Nortel Networks WLAN - Access Point(s) cannot be configured for any other
reason using the following procedure, refer to RMA Procedures in the Nortel Networks Product
Documentation.
Configuration Steps for an Nortel Networks WLAN - Access PointConfiguration Ste ps for an Nortel Networks WLAN - Access Point
1. Configure the Nortel Networks WLAN - Wireless Security Switch in LWAPP Layer 2 Mode and
make sure its DS Port is connected to the network. Use CLI, Web Browser and/or WLAN Control
System procedures as described in the Nortel Networks WLAN - Wireless Security Switch Quick
Install Guide and the Nortel Networks Product Documentation.
- Make sure AP ports are available (either Direct-Connect Mode or Appliance Mode).
- Set the Nortel Networks WLAN - Wireless Security Switch as the Master, so new Nortel
Networks WLAN - Access Points always associate with it.
- Refer to the Nortel Networks Product Documentation for other settings.
(Note that Layer 3 and Layer 2 LWAPP operation can be switched back and forth as described in
the Solutions section of the Nortel Networks Product Documentation.)
2. Take the AP out of the box and plug it into a front-panel 10Base-T connector on the Master
Switch (Direct-Connect mode), or through the same subnet that Nortel Networks WLAN -
Wireless Security Switch is on (Appliance Mode
).
3. Apply power to the AP:
- Use 802.3af-compliant Power Over Ethernet (PoE) from the (UNUSED PRODUCT) or
from an orderable inline power injector. If you do not have PoE available, use an
orderable external AC-to-48 VDC Power Supply plugged into the side of the AP.
- After powering up the AP, the RED Alarm LED comes on for a short period (about 15-20
seconds) and then all the LEDs blink sequentially back and forth, indicating that the AP
is trying to find a Nortel Networks WLAN - Wireless Security Switch to connect to. This
can continue for up to five minutes. If the AP remains in this mode for more than five
minutes, the AP is unable to find the Master Nortel Networks WLAN - Wireless Security
Switch. Check the connection between the AP and the Nortel Networks WLAN - Wireless
Security Switch and make sure the AP and the Nortel Networks WLAN - Wireless
Security Switch are on the same subnet.
- If the power light does not come on, check the power (it can be powered either with
Power over Ethernet or a from an orderable AP External Power Supply.
- Make sure that a DHCP server is configured in the Nortel Networks WLAN - Wireless
Security Switch for the Management Interface using the CLI, Web Browser, or WLAN
Control System interface, and that the DHCP server is operating correctly.
- Once the AP finds the Nortel Networks WLAN - Wireless Security Switch, it attempts to
download the new Operating System code if the AP code version differs from the Nortel
Networks WLAN - Wireless Security Switch code version. While this is happening, the
LEDs on the top of the AP blink on and off together.