
User's Manual
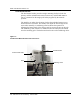
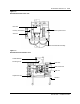
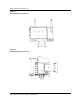
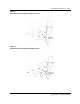
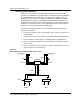
Table Of Contents
- Publication history
- BTR 38 GHz Release 1.2
- Grounding and Surge Protection
- List of terms

BTR 38 GHz Release 1.2 1-13
BTR 38 GHz Installation Guide
Installing the Dual Mount Bracket
Installation involves five separate operations:
• installing the stabilizing collar
• mounting the RPE to the dual mount bracket
• mounting the dual mount bracket to the mounting pole
• mounting radios to the bracket
• mounting the adjustment arm to the dual mount bracket
Installing the Stabilizing Collar
Bolt the saddle bracket and clamp to the mounting pole. Refer to Figure 1-2.
Mount the stabilizing collar first to provide support for the dual mount
bracket.
Installing the RPE
Mount the RPE 9000 between the two transceivers. The front plate faces
frontward and the back plate faces backward. Refer to Figures 1-3 and 1-4.
Place the RPE flush against the inside back panel of the dual mount bracket.
Align the holes.
Insert the screws into the holes and secure the RPE to the dual mount bracket.
Use four 1/4" by 1" long bolts, as well as four hex nuts, four lock washers and
four flat washers.
Installing Dual Mount Bracket
Mount the dual mount bracket (base assembly A0765861) to the mounting
pole using the supplied clamps and bolts.
Attach the two clamps (P0887173) onto the base assembly/dual mount
bracket using four 1/2" bolts, four 1/2" lock washers and four 1/2" flat
washers.
Screw two 1/2" by 6 1/4" long threaded rods into each clamp.
Position the clamps close to the mounting pole, with the rods straddling the
pole.
Place the saddle supports (P0890191) on the opposite side of pole and screw
the threaded rods through them. Secure them with flat and lock washers and
hex nuts.
Sit dual mount bracket onto stabilizing collar for support.