Return to Menu C4010/C4010Ex/C4020 Cordless Handset User Guide
Introduction 2
T a b le o f c o nt e nt s About this User Guide . . . . . . . . . . . . . . . . . . . . . . . . . . . . . . . . . . . . . . . 5 The C4010 handset ............................................................................................. 5 the C4010 Ex handset ......................................................................................... 5 The C4020 handset ............................................................................................. 6 Safety . . . . . . . . . . . . . . . . .
T a b le o f c o nt e nt s Auto answer ....................................................................................................... 38 Speed key .......................................................................................................... 39 Range test .......................................................................................................... 40 Environment .......................................................................................................
A bo u t t h is U s e r gu i de About this User Guide This guide includes user information for the C4010 handset, the C4010 Ex handset, and the C4020 handset. The C4010 handset The C4010 is the basic model. The C4010 Ex and C4020 handsets have additional features or features that are different from the C4010 model. the C4010 Ex handset ••••• •••••• ••••••• ••••••• ••••••• •••••• ••••• The C4010 Ex functions identical to the C4010. However, the C4010 Ex can operate safely in an explosive atmosphere.
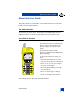
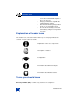
A b ou t t hi s U s e r g u id e The C4020 handset ••••• •••••• ••••••• ••••••• ••••••• •••••• ••••• The C4020 functions identical to the C4010. However, the C4020 can accept a headset and has a vibrate alert feature. MEL BROOKS LNR Headset port Menu C 1; 2 ABC 3 DEF 4 GHI 5 6 MNO 7 PQ RS X 6 JKL 8 TUV 0 9 WX YZ # Standard 2.
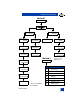
N a v i ga t in g t h e m e n u Method 1 Menu Select base Language Personalise Last number Ring volume Delete 12345678 Francais English Melody Last number 1 Handset name Last number 2 Key sound Last number 3 Deutsch Espanol Last number 4 Italiano Headset* Auto answer Last number 5 Method 2 Vibrator* Nederlands See Table 4 and Table 5 for full language list Menu Backlight** Speed key Range test Environment Declare base Voice Mail * Only on the C4020 ** Not available Standard 2.
N a v i ga t in g t h e m e nu 8 Standard 2.
Int rod uc ti on Safety Never use your cordless handset: • • • • N441 in the area of electrical detonators in shielded rooms in areas where radio transmission is forbidden in aircraft Check for small metal objects in DECT Handset earpiece/mouthpiece before using the handset Do not store or locate flammable liquids, gases or explosive materials in the same compartment or vicinity as the cordless handset, its parts or accessories Note: For C4010Ex safety precautions see “the C4010 Ex handset” on page 5.
I nt r od u c t i on • • • rooms where inflammable liquids or gases are present charge your batteries only with the supplied battery charger disconnect the battery charger when not in use for extended periods do not leave the battery connected to the battery charger for longer than one week Explanation of header icons The header icons, next to the banner at the top of each page indicate the contents of each section as follows: Explanation of the set's components Description of features Configuration I
Int rod uc ti on Meridian PBX Flexible Feature Codes (FFC) — you can dial an FFC code to access some of your handset’s features. As the FFC’s are distinct to your system, a table on page 25 identifies the FFC or SPRE codes. Meridian PBX Special Prefix Codes (SPRE) — you can dial a SPRE code plus a one or two digit number to access some of your handset’s features. The SPRE codes are distinct to your system. However, the digits following the SPRE are fixed.
I nt r od u c t i on 12 Standard 2.
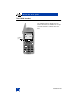
Y o ur c o r d l e s s t e l e ph o ne Your cordless handset Your handset 1. Volume Up/Down (loudspeaker/ringing) 1 2 2. Ear speaker 3. Display 3 • • • •• • • • ••• • • • •••• • • • •••• • • • •••• • • • ••• • • • •• 4. Menu item selection 5. Message waiting 4 6. Initialize key 7. Microphone KEN SPINK LNR Menu 5 6 8. Key pad locked 9. Ringer off 10. Display functions C 11. Three lines of text (each 12 characters) 7 16 12. Battery charge indication 1; 2 ABC 3 DEF 13.
Y o ur c or dl e s s t e l e p ho n e Handset function key icons Menu item selection or confirmation Menu scroll Menu item selection or confirmation C Off/Standby/Cancel Message waiting lamp Re-initialize key Off hook/On hook 14 Standard 2.
Y o ur c o r d l e s s t e l e ph o ne Phone book directory Handsfree* 1/:/space Volume Up/Down * For safety reasons, the Handsfree key does not operate on the C4010Ex handset. Standard 2.
Y o ur c or dl e s s t e l e p ho n e 16 Standard 2.
Fe at ures Handset features Turn the handset on Method 1. Press the Standby key. C KENT 5409 Menu LNR The handset displays the name and number programmed when the handset was subscribed. Turn the handset off Method 1 Press the power off key for at least five seconds. C Method 2 KENT 5409 Off Press the Cancel key and press the Off key. Locked Standard 2.
F e a t u re s Answering a call You can receive a call when the antenna icon is visible in the upper right corner of the display. You are out of radio range of a DECT system when the antenna icon disappears. Your display can show the caller name, up to 12 characters, or the caller number or both, depending on the Meridian 1 PBX feature setting. On M6500 systems, the display shows the caller name by default. If the name is not available, the display shows the caller number.
Fe at ures To stop handset ringing or vibrating without answering a call You can stop the handset from ringing or vibrating, if activated, by pressing either the volume up key or volume down key. However, pressing these keys does not answer the call. After stopping the ringing or vibrating you can decide to answer the call or ignore it. Volume up/down The loudspeaker volume has two levels. The ear piece volume has five levels. Turn the volume up by pressing the plus key.
F e a t u re s Pre-dialing on hook This mode allows you to enter and edit a number before dialing. Enter a DN on the keypad. 9Pause Call Press the Pause key to insert a three second pause in the DN. Pause changes to Erase two seconds after you enter the digit. To delete the last digit 9-1234567890 Press Erase to delete the last number. Press Call to place the call. Erase Call Last number redial LNR stores the last five numbers that you dialled.
Fe at ures 8962 The called number is displayed for 10 seconds. R Mute 01 Mn 42s Mute The display tracks the call time in minutes and seconds. R Ending a call Method 1. Press the on hook key. Method 2. Place the handset in the battery charger. Duration 02 Mn 25 s Ok The display shows the call duration time for 10 seconds, then returns to the idle display. Press the Ok key to clear the display quickly. Conference This mode allows you to conference a third party during a call. Standard 2.
F e a t u re s 02 Mn 45s R Polanski Mute While talking to party A, you need to conference party B into the conversation. R R Mute R R Mute Press the Recall key. Enter party B’s DN on the keypad. You connect to party B. Press the Recall key to conference. R Transfer a call This mode allows you to transfer a call to a third party during a call. 01 Mn 43s D Spragg Mute 22 While talking to party A, you need to transfer the call to party B. R Standard 2.
Fe at ures R Mute Press the Recall key. Enter party Bs DN on the keypad. R You can press the on hook key to transfer the call before or after party B answers. You receive ring-back from party A if party B does not answer the call. Dialing directory numbers/names Press the directory key. Method 1 Access the directory names. Press the Search key and scroll through the names listed in the directory. Private dir. Search Add Method 2 Access the directory names.
F e a t u re s Mem 3 THIBODEAU Change Press the Call key to place the call or press the Change key to change the directory entry. Call Message waiting key The message waiting key light flashes when there is a message in the BCM voice mailbox, Meridian Mail voice mailbox, or Call Pilot voice mailbox. To configure the speed key as a one-touch access to your voice mail, see page 43. Note: Not all Nortel Networks DECT systems support Message Waiting. 24 Standard 2.
Fe at ures Meridian PBX features Ask your system administrator for the FFC of SPRE codes. You can enter the access codes applicable to your system in the FFC or SPRE + column for quick reference.
F e a t u re s Table 1 Meridian PBX feature access codes (Part 2 of 2) Fe at ure FFC or SPR E + Not for sale Passed inspection Permanent hold Ring again Ringing number pickup Ringing number, DN pickup Ringing number, group pickup Room status Stored number re-dial, to store Stored number redeal, to re-dial System speed call, to use Trunk Answer From Any Station -TAFAS Trunk verification from station Unassigned (ACD activate/deactivate) Unassigned (ACD login/log out) 26 Standard 2.
Fe at ures Succession Communication Server for Enterprise (CSE 6500) features Note: The features in Table 2 also apply to the M6500 PBX. Use the interactive keys to access features, or dial the access codes in the following table. System features can vary, based on markets and customized numbering plans. If the following feature access codes in Table 2 do not operate as indicated, contact your system administrator.
F e a t u re s Table 2 Mercator PBX feature access codes (Part 2 of 2) Fe ature Dia l ac c es s c ode Cancellation of call forwarding # 2 0 Immediate call forwarding to a voice mailbox X 2 5 voice mail number Override call forwarding and DND functions X 2 8 external number Cancellation of abbreviated number # 5 1 from 0 to 9 Cancellation of all appointment reminders # 5 5 9999 Cancellation of appointment reminder # 5 5 hr hr mn mn Program an abbreviated number X 5 1 from 0 to 9 Record an
Fe at ures Business Communications Manager features Use the interactive keys to access features, or dial the access codes in the following table. System features can vary, based on markets and customized numbering plans. If the following feature access codes in Table 3 do not operate as indicated, contact your system administrator.
F e a t u re s 3-way conference call during a call If you want to conference the calls together, press R. When the dial tone is heard, call the third party. To conference the parties together, press R3. Toggle between two parties during a call If you want to put the second call on hold and re-connect to the original call, press R2. If you press R2 again you can toggle between the original and second calls.
C o nf i g ur in g t h e ha nd s e t Configuring the handset You can configure some of the handset menu attributes to meet your requirements. Store numbers and names in the directory You can store up to 20 names and numbers in the directory. Press the Directory key. Private dir. Search Press the Add key. Add Choose mem. 0 to 9 : Ok Standard 2.00 You can use the suggested memory location number or select a different memory location number (0 to 9) and (*0 to *9).
C o nf i g ur i ng t he h a n ds e t Mem Press the Ok key. Enter up to 18 digits for the DN. 10 • To store a Recall number, press the R key. Enter number R Ok Mem 10 Enter number 1234567 Erase Mem To correct an error. Press the Erase key or select the digit and enter another digit. Ok 10 Enter number 123456789 Erase Mem • To store a pause in the number, press the Pause key. The Pause option expires after two seconds. Press the Ok key after entering the DN. Ok 10 The name is optional.
C o nf i g ur in g t h e ha nd s e t Enter up to 10 characters for a name on the keypad. To enter a character, press a keypad key 0 to 9 as shown in Table 4. For example, press the keypad key 3 twice to enter character E. Table 4 Southern handset keypad alphabet equivalent for: • English • French • German • Dutch • Spanish • Italian K ey 1 2 3 4 5 6 7 8 0 0 1 – / space 1 , .
C o nf i g ur i ng t he h a n ds e t Table 5 Northern handset keypad alphabet equivalent for: • English • Portuguese • Swedish • Norwegian • Finnish • Danish K ey 1 2 3 4 5 6 7 8 0 0 1 – / space 1 , . : , 2 A B C 2 Å Ä Ã Á 3 D E F 3 Ê 4 G H I 4 5 J K L 5 6 M N O 6 Ö Ó Ô 7 P Q R S 7 8 T U V 8 Ú 9 W X Y Z 9 Mem Æ 10 Enter name HERNANDE Erase 34 9 Three seconds after entering a character, the cursor moves to the next position.
C o nf i g ur in g t h e ha nd s e t Locate numbers and names in the directory Press the directory key. Private dir. Search Press the Search key. Add Private dir. HERNANDZ The handset displays the first two directory entries. Jones Press the scroll keys to search for names and numbers in the directory. Standard 2.
C o nf i g ur i ng t he h a n ds e t Change numbers and names in the directory To change a number Mem 6 Change no. 5677 Ok Erase Locate the name in the directory. Press the key next to the name. Press the Change key. Press the Erase key to erase the number. Enter the new number. Press the OK key after entering the number. To change a name Mem 6 Change name FAWCETT Ok Erase Locate the name in the directory. Press the key next to the name. Press the Change key. Press the OK key.
C o nf i g ur in g t h e ha nd s e t Ring volume Adjust the ringing volume by two methods. 1. With the volume +/- keys when the handset is ringing. 2. From the menu as described below. Menu 87 Ring volume 0 1 2 3 4 Ok Press the Menu key. Dial 87, or scroll through the menu options. Select the number and press the OK key or dial the number 0 to 4 to select the volume level. Select the level 0 and press the OK key or dial the number 0 to turn off the ringer.
C o nf i g ur i ng t he h a n ds e t Key sound Menu 28 Key sound No Yes Press the Menu key. Dial 28, or scroll through the menu options. Press the No key to turn the key sound off. Press the Yes key to turn the key sound on. Auto answer Note: Only use the auto answer feature with a headset connected to the handset. The handset will automatically answer 10 seconds after receiving a call. Auto. answer No 38 Yes Press the Menu key. Press the Personalise key. Press the scroll keys to access Auto.
C o nf i g ur in g t h e ha nd s e t Speed key The speed key replaces the LNR (last number redial) key on the handset display. CAUTION: If you program the speed key as an emergency telephone number, pressing this key by accident automatically dials the emergency number. Speed key SOS key Direct menu No. to dial Ok R Title Erase Standard 2.00 Ok Press Press Press Press Press the Menu key. the Personalise key. the scroll keys to access Speed key. the Speed key. the SOS key.
C o nf i g ur i ng t he h a n ds e t Return the speed key to LNR Direct Menu Menu code: 24 Ok Press the Menu key. Press the Personalise key. Press the scroll keys to access Speed key. Press the Speed key. Press the Direct Menu key. Dial 24. Press the OK key after entering 24. Erase the speed key title. Enter LNR. Press the OK key after entering the title. Range test Menu 76 Range test 0 1 2 3 4 Ok Press the Menu key. Dial 76, or scroll through the menu options.
C o nf i g ur in g t h e ha nd s e t Declare base Declare base allows you to subscribe your handset to another DECT system. Declare base number ? 12345678 Ok Enter code Press the Menu key. Press the Personalise key. Press the scroll keys to access Declare base. Press the Declare base keys. Press the OK key after selecting the base. Enter the PIN code. Press the OK key after entering the code. Ok Please wait working... Declare base Ok Standard 2.00 The display shows Please wait.
C o nf i g ur i ng t he h a n ds e t Select language Language Francais English Press the Menu key. Press the scroll keys to access Language. Press the Language key. Select the language. Press the OK key after selecting the language. Lock and unlock the keypad Locking the keypad prevents making calls in the standby mode. You can receive calls with the keypad locked. Press the Standby key. C M KELLY Off Press the Locked key to lock the keys.
C o nf i g ur in g t h e ha nd s e t Voice mailbox one-touch access For one-touch access to your voice mailbox you can program the Voice Mail key. Note 1: The early C4010 models do not have the Voice Mail feature. Note 2: On BCM systems, press the Voice Mail key for automatic access to BCM voicemail. Enter your password. No handset programming is necessary for BCM voicemail access. On Meridian Mail or Call Pilot voicemail systems: Press the Menu key. Press the Personalise key.
C o nf i g ur i ng t he h a n ds e t Access Nr 6245-#123456# Erase Ok Enter your password followed by #. Press the OK key after entering the password and #. To change the password entry When you change your voice mail password, you can change the handset password entry to automatically access your mail box. Access Nr 6245-#******# Erase Ok Press Press Press Press Note: The password displays as 44 ******. Select the character and enter another, or press Erase and enter another character.
C o nf i g ur in g t h e ha nd s e t To delete the Voice Mail entry Access Nr 6245#******# Erase Delete Voice Mail No Standard 2.00 Ok Press the Menu key. Press the Personalise key. Press the scroll keys to access Voice Mail. Press the Ok key to display Access Nr. Press and hold the Erase key to display Delete Voice Mail. Press the Yes key to delete the Voice Mail entry.
C o nf i g ur i ng t he h a n ds e t 46 Standard 2.
U s e f ul i nf o rm a t io n Useful information Batteries Battery indicator LAURIDSEN LNR Menu The battery icon, made up of three parts each indicates approximately 1/3 of the charge level. The battery icon flashes when the handset is placed in the battery charger. Low battery indicators when the handset is in standby mode Recharge the battery When discharged, the handset displays Recharge the battery. Low battery indicators when the handset is in use Bat. The handset displays Bat.
U s e f u l i nf o rm a t i on Change batteries 1. Pull the battery cover towards the bottom of the handset to open. 2. Carefully release the battery connector. 3. Remove the old battery. 4. Put the new battery into the handset. 5. Carefully connect the battery. 6. Close the cover. Other battery information Note: Do not remove the battery to re-initialize the handset. Use the reinitialize key. To keep the battery completely charged, replace the handset in the battery charger often.
U s e f ul i nf o rm a t io n Use the belt clip To attach the belt clip, slide the belt clip into the clip button on the handset and attach to your belt. To remove the belt clip, press the top of the clip and slide it out of the clip button. Handset advice Re-initialization If your handset display freezes or the handset does not operate correctly, reinitialize. The re-initialize key is located above the handsfree key.
U s e f u l i nf o rm a t i on 50 Standard 2.
March 2002 Standard 2.