Return to Menu Part No. P0919417 02.
CallPilot Reference Guide Copyright © 2001 Nortel Networks All rights reserved. 2001. The information in this document is subject to change without notice. The statements, configurations, technical data, and recommendations in this document are believed to be accurate and reliable, but are presented without express or implied warranty. Users must take full responsibility for their applications of any products specified in this document.
Contents Chapter 1 How to use this guide . . . . . . . . . . . . . . . . . . . . . . . . . . . . . . . . . . . . . . . . . . . 7 Conventions and symbols used in this guide . . . . . . . . . . . . . . . . . . . . . . . . . . . . . . . . . 7 Chapter 2 Using CallPilot . . . . . . . . . . . . . . . . . . . . . . . . . . . . . . . . . . . . . . . . . . . . . . . . . 9 How CallPilot works . . . . . . . . . . . . . . . . . . . . . . . . . . . . . . . . . . . . . . . . . . . . . . . . . . . .
Contents Chapter 4 Feature codes and mailbox options. . . . . . . . . . . . . . . . . . . . . . . . . . . . . . . 23 Feature codes . . . . . . . . . . . . . . . . . . . . . . . . . . . . . . . . . . . . . . . . . . . . . . . . . . . . . . . 23 Programming a memory button with a feature code . . . . . . . . . . . . . . . . . . . . . . . . . . 24 CallPilot mailbox options . . . . . . . . . . . . . . . . . . . . . . . . . . . . . . . . . . . . . . . . . . . . . . . 25 Norstar Voice Mail mailbox options . .
Contents 5 Chapter 8 Call Forwarding your calls . . . . . . . . . . . . . . . . . . . . . . . . . . . . . . . . . . . . . . 59 Call Forwarding your calls to your mailbox . . . . . . . . . . . . . . . . . . . . . . . . . . . . . . . . . 59 Setting up Call Forward remotely . . . . . . . . . . . . . . . . . . . . . . . . . . . . . . . . . . . . . . . 60 . Call Forward with Caller ID . . . . . . . . . . . . . . . . . . . . . . . . . . . . . . . . . . . . . . . . . . . . .
Contents Chapter 13 CallPilot tips . . . . . . . . . . . . . . . . . . . . . . . . . . . . . . . . . . . . . . . . . . . . . . . . . . 99 Chapter 14 Troubleshooting . . . . . . . . . . . . . . . . . . . . . . . . . . . . . . . . . . . . . . . . . . . . . . 101 Glossary . . . . . . . . . . . . . . . . . . . . . . . . . . . . . . . . . . . . . . . . . . . . . . . . . . . . 105 Index . . . . . . . . . . . . . . . . . . . . . . . . . . . . . . . . . . . . . . . . . . . . . . . . . . . . . . .
Chapter 1 How to use this guide This guide gives you detailed information about using CallPilot features on CallPilot 150 and Business Communications Manager 2.5 systems. To use this guide, you must determine which phone interface you use, and follow the procedures for that interface. For information about determining which interface you use, refer to “Checking which mailbox interface you use” on page 18. Some procedures apply to both interfaces.
Chapter 1 How to use this guide P0919417 02.
Chapter 2 Using CallPilot How CallPilot works CallPilot works with the telephone system to provide an automated receptionist service. CallPilot answers incoming calls, routes them to extensions and mailboxes in the system, and provides message taking capability. About display phones One line display phones You can use one line display phones for most CallPilot sessions. If you use a one line display phone, the display shows the CallPilot display command line.
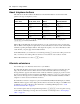
Chapter 2 Using CallPilot About telephone buttons This table shows the Nortel Networks Business Series Terminal buttons. Use the buttons that pertain to the type of telephone you use. Button name T7100, T7208, T7316 M7100, M7208, M7310, M7324 M7100N, M7208N, M7310N, M7324N Feature ≤ ƒ ƒ Handsfree Bottom right-hand button © © Hold ≥ ˙ ˙ Volume Control √ √ √ Release ® ® ® You can enter ≤, ƒ or ƒ and the code to use a feature. For example, press ≤·°⁄ to access your mailbox.
Chapter 2 Using CallPilot 11 Using CallPilot with an analog terminal adapter or an analog station module One or more analog single-line sets can be connected to telephone system using an Analog Terminal Adapter (ATA) or an Analog Station Module (ASM). This type of set works with Dual-Tone MultiFrequency (DTMF) tones to allow access to CallPilot options through the dialpad only. Rotary dials cannot be used internally with CallPilot.
Chapter 2 Using CallPilot An example of a display with fewer than 16 characters, where the command line prompt remains on the display is the Pswd: command line prompt. Pswd: OTHR RETRY OK The prompt disappears for these command line prompts: • • • Name: Log: Dest ph: This display shows the Name: command line prompt: Name: RETRY BKSP OK When you begin to enter the last name, the Name: command line prompt disappears.
Chapter 2 Using CallPilot 13 Automated Attendant The Automated Attendant acts as a receptionist for incoming calls. When it is enabled, the Automated Attendant answers your company’s incoming phone lines depending on the time of day. If callers know which option they want, they can interrupt the Automated Attendant by entering their selection on the dialpad of any tone-dial phone.
Chapter 2 Using CallPilot Types of mailboxes A mailbox is a storage place for messages. There are three types of mailboxes: • • • Subscriber mailboxes, which include Guest mailboxes Information mailboxes Special mailboxes, which include the General Delivery Mailbox and the System Administrator Mailbox Other types of mailboxes are available on your system if you have the Network Messaging or the Fax option installed. Subscriber mailbox Most users have Subscriber mailboxes.
Chapter 2 Using CallPilot 15 Special mailboxes Special mailboxes are set up automatically when CallPilot is initialized.
Chapter 2 Using CallPilot P0919417 02.
Chapter 3 Setting up your mailbox This chapter describes how to set up your mailbox and explains: • • • • • • Initializing your mailbox Checking which mailbox interface you use Opening your mailbox Changing your mailbox password Recording your name in the Company Directory Assigning a Target Attendant Initializing your mailbox Initializing your mailbox prepares your mailbox to receive messages. Your mailbox cannot receive and store messages until it is initialized.
Chapter 3 Setting up your mailbox Accept name? RETRY PLAY OK 7 Press OK or £ to accept the recording or press PLAY or ⁄ to listen to the recording or press RETRY or ¤ to re-record your name. 8 Press ® to end the session. After you initialize your mailbox, record your mailbox greetings. Refer to “Recording a Primary or Alternate mailbox greeting” on page 29 for more information. If you do not record a Personal greeting, your Company Directory name plays to callers who reach your mailbox.
Chapter 3 Setting up your mailbox 19 Opening your mailbox After you initialize your mailbox you can open it from: • • • your own extension another CallPilot extension an outside tone dial phone To open an initialized mailbox - Norstar Voice Mail Pswd: OTHR RETRY OK 1 Press ≤·°⁄. 2 Enter your mailbox password and press OK or £ or if you are at another extension, or if you are using a Guest mailbox, press OTHR or • to display the Log: prompt.
Chapter 3 Setting up your mailbox Changing your mailbox password You can change your mailbox password at any time. A password must be from four to eight digits long and cannot start with zero. It is recommended that you change your password every 30 days. Keep your mailbox secure by choosing an uncommon password, not a predictable password like 1234 or 1111. Avoid giving your password to your co-workers.
Chapter 3 Setting up your mailbox 21 Recording your name in the Company Directory The Company Directory is a list of mailbox users on the CallPilot system. Before you can use your mailbox to receive messages, you must record your spoken name in the Company Directory. It is a good idea to include your mailbox number in your Company Directory recording. For example “Pat Smith, mailbox 5813”.
Chapter 3 Setting up your mailbox Assigning a Target Attendant You can assign a Target Attendant to answer calls transferred from your mailbox. The default Target Attendant for your mailbox is the CallPilot Operator. The Target Attendant can be assigned to any valid extension. After you assign your Target Attendant, a caller who reaches your mailbox can press ‚ to speak with the Target Attendant.
Chapter 4 Feature codes and mailbox options Feature codes Feature code name Dialpad buttons Description Leave Message ≤·°‚ Leaves a message in a mailbox. No password is required. ≤·°⁄ Opens your mailbox to play your messages and to access mailbox options. ≤·°› Forwards incoming calls to your mailbox. Open Mailbox Call Forward CallPilot extension ≤·°fi Displays the CallPilot extension number on your phone. Transfer ≤·°fl Transfers calls to a mailbox on the CallPilot system.
Chapter 4 Feature codes and mailbox options Programming a memory button with a feature code Each CallPilot feature code can be programmed to a single memory button. 1 Press ≤·•‹. Do not lift your handset. Program Features 2 The display shows Program Features. Press a button QUIT 3 Press a memory button with an LCD indicator. Feature Code: QUIT 4 Press ≤. F__ QUIT 5 Enter the feature code number that you want to program. For example, enter ·°‡ to program the Leave Message feature code.
Chapter 4 Feature codes and mailbox options 25 CallPilot mailbox options Mailbox option Display Dialpad button buttons Description Page Greetings GRTG °¤ Record and select personal mailbox greetings. 43 Password Change PSWD °› Change your mailbox password. 20 Off-premise Notification NOTIF °fi¤ Set up Off-premise Notification parameters for 73 Goto Message GOTO °fl Personal Verification NAME °¤· Record your name in the Company Directory.
Chapter 4 Feature codes and mailbox options Change Password PSWD °› Change your mailbox password. 20 Target Attendant -- °fi Assign a Target Attendant to answer calls transferred from your mailbox. 22 Listen to saved Messages -- °fl Play any saved messages in your mailbox. -- Outbound Transfer -- °° Set up Outbound Transfer to transfer callers from your 66 mailbox to an internal extension or to an external telephone number.
Chapter 5 Greetings This chapter describes mailbox greetings and how to record them. This chapter includes: • • • • Types of mailbox greetings Recording a Primary or Alternate mailbox greeting Recording a Personalized mailbox greeting Deleting a Personalized mailbox greeting Types of mailbox greetings Mailbox greetings play to callers who reach your mailbox. Greetings inform callers that they have reached the correct mailbox and give callers any necessary information or instructions.
Chapter 5 Greetings Personalized mailbox greeting Personalized mailbox greetings are available only if your company subscribes to Caller ID (CLID) service from your local telephone company. For more information about CLID, ask your System Administrator. A Personalized mailbox greeting plays to callers based on the caller’s telephone number. CallPilot recognizes the assigned incoming telephone number and plays the Personalized mailbox greeting. For example, “Hi Susan.
Chapter 5 Greetings 29 Recording a Primary or Alternate mailbox greeting Only a Primary mailbox greeting is necessary, but you can record an Alternate mailbox greeting for times when you are out of the office, such as vacations. If you do not record any mailbox greetings, your Company Directory name recording plays to callers who reach your mailbox. If you record both Primary and Alternate mailbox greetings, you must choose which greeting plays.
Chapter 5 Greetings Choosing a Primary or Alternate mailbox greeting If you record a Primary and an Alternate mailbox greeting, you must choose which greeting plays. If you do not choose a greeting, the Primary mailbox greeting plays automatically. If you choose the Alternate mailbox greeting, you must set whether the mailbox accepts messages. If you choose Yes your mailbox receives messages in the normal way. If you choose No: • • • • Messages cannot be left in the mailbox.
Chapter 5 Greetings Accept msgs:Y CHNG OK 5 If you choose the Alternate mailbox greeting, you are asked whether the mailbox can accept messages. Press CHNG or ⁄ to toggle from yes to no or press OK or £ to accept. 6 Press ® to end the session. 31 Note: If you choose a greeting that is not yet recorded, you are transferred back to the Greeting Options menu to record the greeting.
Chapter 5 Greetings Recording a Personalized mailbox greeting If your company subscribes to a CLID service, you can record a Personalized mailbox greeting. For more information about CLID, ask your System Administrator. A Personalized mailbox greeting plays only for a person calling from the telephone number that you designate. For the Personalized mailbox greeting to play, the telephone number you enter must match the caller’s phone number exactly.
Chapter 5 Greetings Record greeting: RETRY OK 8 At the tone, record the greeting and press OK or £ to end the recording. Accept greeting? RETRY PLAY OK 9 Press OK or £ to accept the recording or press PLAY or ⁄ to listen to the greeting or press RETRY or ¤ to rerecord the greeting. 33 10 Press ® to end the session. Deleting a Personalized mailbox greeting If you no longer need a Personalized mailbox greeting, you can delete it. To delete a Personalized mailbox greeting 1 Press ≤·°⁄.
Chapter 5 Greetings P0919417 02.
Chapter 6 Accessing your messages This chapter describes how to access your messages and explains: • • • • • • Receiving calls Never Full mailbox feature Playing your messages Retrieving erased messages Screening your calls Interrupting a caller Receiving calls CallPilot can be used by outside callers and other mailbox owners in your company. When you are away from the office, you can use CallPilot with any tone dial telephone.
Chapter 6 Accessing your messages Playing your messages Use the procedure for playing your messages that corresponds to the interface you use: • • “To play your messages - NorstarVoice Mail ” on page 36 “To play your messages - CallPilot” on page 38 To play your messages - Norstar Voice Mail Use this procedure if you use the Norstar Voice Mail interface. 2 new 0 saved PLAY REC ADMIN 1 Press ≤·°⁄. Follow the voice prompts or the display button options on your telephone, to open your mailbox.
Chapter 6 Accessing your messages 37 Playing your messages - Norstar Voice Mail Option Button Forward ‹ or > >> Next Available Available Description while after playing playing ✔ Advances the message nine seconds and continues playing from that point. A message can be forwarded as many times as required. ✔ Plays the next message in the skillset mailbox. If you use this while a message is playing, it stops playing the current message and plays the next message in your mailbox.
Chapter 6 Accessing your messages 3 Applies only if the Reply feature is enabled. 4 You can reply to an outside caller by dialing them back if your company subscribes to Caller ID (CLID) service. For further information about replying to an outside caller refer to “Replying to an external caller” on page 56. To play your messages - CallPilot 1 Press ≤·°⁄. Follow the voice prompts or the display button options to open your mailbox.
Chapter 6 Accessing your messages 39 Playing your messages - CallPilot Option Button Available during and after playing Description Forward Message ‡‹ ✔ Forwards the message to one or more mailboxes.You can record an introduction to the forwarded message. Reply All ‡› ✔ Replies to a message and all other recipients of the message. (Refer to Note 3 on page 38.) ‡fl ✔ Deletes the current message. Deleted messages remain in your mailbox until the session ends. (Refer to Notes1 and 2 on page 38.
Chapter 6 Accessing your messages Retrieving erased messages You can retrieve an erased message if you are still in the CallPilot session. An erased message remains in your mailbox until you end the current CallPilot session. After you play your messages and exit CallPilot, any messages that you do not erase are saved. Since message storage space is limited, we recommend that you erase messages that you no longer need.
Chapter 6 Accessing your messages 41 Screening your calls With Call Screening you can determine who is calling before you accept the call. Call Screening applies only to external calls transferred from the Automated Attendant or from Custom Call Routing (CCR). See your System Administrator for information on CCR.
Chapter 6 Accessing your messages Interrupting a caller With the Interrupt feature (≤·°‡) you can intercept a caller who is listening to your mailbox greeting or leaving a message. You can program the Interrupt feature to a memory button with an indicator on your Nortel Networks telephone. For more information about programming a feature to a memory button, refer to “Programming a memory button with a feature code” on page 24.
Chapter 7 Sending messages This chapter describes how to send messages and explains: • • • • • • Recording and sending messages Searching the Company Directory Assigning message delivery options Sending a message to more than one recipient Replying to messages Placing a call with Thru-Dial Recording and sending messages The messages you record must be longer than three seconds. The system times out after five seconds of silence.
Chapter 7 Sending messages To record and send a message using the Open Mailbox feature Norstar Voice Mail 1 Press ≤·°⁄. Follow the voice prompts or the display button options on your telephone to open your mailbox. 0 new 0 saved ADMIN PLAY REC 2 Press REC or ‹ and record your message at the tone. Record message RETRY PAUSE 3 Record your message. OK Press PAUSE or ¤ to pause your message. When you wish to resume recording, press CONT or ¤ to continue recording your message.
Chapter 7 Sending messages 45 To record and send a message using the Open Mailbox feature CallPilot To: NAME SPEC To: XXXX RETRY To: NAME SPEC DONE OK DONE EMPTY REC Recording.... REREC Rec stopped PLAY DEL OK SEND 1 Press ≤·°⁄. Follow the voice prompts or display options to open your mailbox. 2 Press COMP or ‡fi to enter the Compose Message option. 3 Enter the mailbox number or Group List address and press £ or press NAME or ⁄⁄ to search the Company Directory and go to step 5.
Chapter 7 Sending messages To record and send a message using the Leave Message feature Norstar Voice Mail 1 Press ≤·°‚. 2 Enter the mailbox number or Group List number. If you do not know the mailbox number, press DIR or £ to use the Company Directory. Record message: RETRY PAUSE OK 3 When you hear the tone, record your message. You can press PAUSE or ¤ to stop your recording and press CONT or ¤ to continue recording your message or press RETRY to erase and re-record your message.
Chapter 7 Sending messages Rec stopped PLAY DEL SEND 6 47 Press PLAY or ¤ to listen to your message or press SEND or ‡· to send the message now with the Normal delivery option or press DEL or ‡fl to erase and re-record your message.
Chapter 7 Sending messages Searching the Company Directory If you know the name but not the mailbox number of someone you want to send a message to, you can search the Company Directory. You can find any initialized mailbox by searching the Company Directory. By default, you can press ⁄⁄ to search the Company Directory, but the System Administrator can change the dialpad buttons.
Chapter 7 Sending messages 49 Assigning message delivery options Use the procedure for the interface you use: • • “To assign message delivery options - NorstarVoice Mail” on page 50 “To assign message delivery options - CallPilot” on page 51 Message delivery options Option Display button Normal SEND Certified/ Acknowledge CERT or Norstar Voice Mail dialpad button £® ⁄ CallPilot dialpad button Description ‡· Sends a message with a Normal delivery option.
Chapter 7 Sending messages To assign message delivery options - Norstar Voice Mail wayne, Pat CC OPTS SEND Delivery options CERT URGENT OTHR 1 Record your message using “To record and send a message using the Open Mailbox feature Norstar Voice Mail” on page 44 or “To record and send a message using the Leave Message feature Norstar Voice Mail” on page 46. 2 Press OPTS for delivery options.
Chapter 7 Sending messages Wayne, Pat OPTS CC SEND 0 new 8 saved PLAY REC ADMIN 9 51 Press SEND or £ to send the message now or press • to cancel all delivery options. 10 Press ® to end the session. For more information about the message delivery refer to “Message delivery options” on page 49.
Chapter 7 Sending messages hh:mm am/pm RETRY OK Tu mm dd CHNG NXTDAY OK 7 Press OK or £ to accept the time you entered or press RETRY or • to change the time. 8 Press CHNG or ⁄ to change the date shown to a different date. Press NXTDAY to change the date to the next day (the day after the date that is shown). Press OK or £ to accept the date shown, which defaults to today or tomorrow, and select the one that corresponds to the next occurrence of the specified time.
Chapter 7 Sending messages 53 Sending a message to more than one recipient Sending a message to a Group List A Group List is a list of mailbox owners. If you have a group of people that you frequently send messages to, you can send the message to a Group List. When you send a message to a Group List, each mailbox owner in the Group List receives the same message. If you are a member of the group you are addressing, you do not receive a copy of the message.
Chapter 7 Sending messages Replying to messages You can reply to internal and external callers. You can reply to a message from an external caller if your company subscribes to CLID.
Chapter 7 Sending messages 55 To reply to an internal caller - CallPilot 1 Press ≤·°⁄ Follow the voice prompts or the display button options on your telephone to open your mailbox. 2 A mailbox summary is announced. While you are in your message list, you can play any message. 3 Press ¤ to play the current message. 4 Press · to call the caller or press ‡⁄ to record and send a reply.
Chapter 7 Sending messages Replying to an external caller You can reply to a message from an external caller if your company subscribes to CLID. Before using the Reply option you must play the message. Use the procedure that applies to the interface you use: • • “To reply to an external caller - Norstar Voice Mail” on page 56 “To reply to an external caller - CallPilot” on page 56 To reply to an external caller - Norstar Voice Mail 1 Press ≤·°⁄.
Chapter 7 Sending messages 57 Placing a call with Thru-Dial With Thru-Dial you can call another number while you are logged on to your mailbox, or if you call someone's extension and reach their voicemail. Note: Thru-Dial is available only if you use the CallPilot interface. If you use the Norstar Voice Mail interface, Thru-Dial is not available. The System Administrator can restrict the numbers that you can dial, so ask your System Administrator if you can use Thru-Dial.
Chapter 7 Sending messages To search the Company Directory while placing a Thru-Dial call If you enter a name instead of a number with Thru-Dial, CallPilot places the call as soon as it finds a match for the name. 1 Open your mailbox: • If you are calling remotely press •• during your greeting to open your mailbox. If you are in Europe or Australia press °°. Follow the voice prompts to enter your mailbox number and password. • If you are calling from your Nortel Networks phone press ≤·°⁄.
Chapter 8 Call Forwarding your calls You can call forward your calls if you do want your calls to go to CallPilot immediately, without ringing at your extension. For example, you can set up Call Forwarding if you are not going to be in the office and you do not want your ringing phone to disturb your colleagues, or if you do not want to take calls while you are working. While Call Forward is on, callers can leave a message for you without having to wait for the phone to ring several times.
Chapter 8 Call Forwarding your calls Setting up Call Forward remotely When you are away from the office you can forward your calls to your mailbox by using the dialpad of any tone dial telephone. Note: You can set up Call Forward remotely only if you use the NorstarVoice Mail interface. You cannot set up Call Forward remotely if you use the CallPilot interface. To set up Call Forward remotely 1 Call the Automated Attendant or your business telephone from any tone dial telephone.
Chapter 8 Call Forwarding your calls 61 Call Forward with Caller ID The Call Forward with Caller ID (CLID) feature is available only if your company subscribes to a CLID service. If you are not sure whether your company subscribes to a CLID service, ask your System Administrator. CLID does not appear if the caller has a private or unknown telephone number. You can set up Call Forward with CLID to screen calls forwarded to your mailbox.
Chapter 8 Call Forwarding your calls P0919417 02.
Chapter 9 Transferring calls This chapter describes transferring calls and explains: • • • • • • • • • Transferring calls to a CallPilot mailbox Transferring a mailbox owner’s call to their mailbox Transferring a call to Custom Call Routing (CCR) About Outbound Transfer Setting up Outbound Transfer Adding special characters to a destination number Setting up Outbound Transfer Turning Outbound Transfer on or off Optimizing Outbound Transfer Transferring calls to a CallPilot mailbox With the Transfer fe
Chapter 9 Transferring calls Transferring a mailbox owner’s call to their mailbox You can transfer a mailbox owner’s call to their CallPilot mailbox so that they can change their greetings or retrieve their messages. To transfer a mailbox owner’s call to their mailbox 1 Press ≤·°fl. Do not press Hold ≥ because the call is put on hold automatically. 2 Enter the mailbox owner’s mailbox number. 3 Wait until the display shows Call transferred before you attempt any other telephone features.
Chapter 9 Transferring calls 65 Transferring a call to Custom Call Routing (CCR) CCR is a single-digit application that provides callers with a more sophisticated menu and a wider range of options than the Automated Attendant. Callers can use CCR to: • • • • listen to the Home menu and make a selection listen to a pre-recorded CCR Information message leave a message in a mailbox transfer to another extension or an external number For more information about CCR, ask your System Administrator.
Chapter 9 Transferring calls About Outbound Transfer You can set up Outbound Transfer to transfer a caller who reaches your mailbox to a number that you assign. A caller can use Outbound Transfer from any tone dial telephone, and you can direct your Outbound Transfer calls to any telephone. You can tell callers about this feature in your personal greeting.
Chapter 9 Transferring calls 67 Adding special characters to a destination number Press Description ¤ or DIGS to resume adding digits to the destination phone number ‹or PAUS to enter a timed pause that appears as P on the display. Pauses are four seconds long. › to recognize dial tone (behind PBX). The Recognize Dial Tone special character appears as D on the display. fior OTHR # to enter a # flor OTHR * to enter a * TONE to recognize dial tone (behind PBX).
Chapter 9 Transferring calls ADD OK Transfer: off CHNG QUIT Transfer: on CHNG QUIT 6 Press OK or £ to accept the destination number, represented by or press ADD or ¤ to add special characters. For information, refer to “Adding special characters to a destination number” on page 66. After you add special characters, press OK or £ to accept the destination number. 7 Press CHNG or ⁄ to turn Outbound Transfer on. 8 Press QUIT or •. 9 Press ® to end the session.
Chapter 9 Transferring calls 69 Turning Outbound Transfer on or off You can turn Outbound Transfer on or off at any time after you set it up. Turning Outbound Transfer off does not affect any of its assigned parameters. To turn Outbound Transfer on or off 1 Press ≤·°⁄. Follow the voice prompts or the display button options on your telephone to open your mailbox.
Chapter 9 Transferring calls Optimizing Outbound Transfer When CallPilot transfers a call to an external telephone number using Outbound Transfer, two lines are used. An incoming line connects a caller to a mailbox and an outgoing line transfers a caller to an Outbound Transfer telephone number. Both lines remain in use while the caller connects to the Outbound Transfer telephone number.
Chapter 10 Off-premise Message Notification This chapter describes how to set up and change Off-premise Message Notification and explains: • • • • • • About Off-premise Message Notification Setting up Off-premise Message Notification Changing Off-premise Message Notification Deleting a destination number Adding a destination number Turning Off-premise Message Notification on or off About Off-premise Message Notification You can program CallPilot to call you at a phone number, an extension, or a pager
Chapter 10 Off-premise Message Notification Off-premise Message Notification parameters You can set up the parameters for Off-premise Message Notification from any tone dial phone. The parameters are: • • • • destination type (phone, extension or pager) destination number (phone, extension or pager) time range for receiving calls at phone numbers or extensions. Pagers are notified any time there is a qualifying message.
Chapter 10 Off-premise Message Notification 73 Setting up Off-premise Message Notification Follow these instructions if you are setting up Off-premise Message Notification for the first time. If you have already set up Off-premise Message Notification, refer to the section “Changing Off-premise Message Notification” on page 83.
Chapter 10 Off-premise Message Notification ADD OK 6 Press OK or £ to accept the destination phone number represented by or press ADD or ¤ to add special characters and use your dialpad or follow the voice prompts to add characters. After you add special characters, press OK or £ to accept the destination number. Start hhmm: RETRY OK 7 Enter the start time for Off-premise Message Notification. This is a four-digit field. You must precede a single-digit hour and minute with a zero.
Chapter 10 Off-premise Message Notification Msg type: new CHNG Msg notify ADMIN SELECT OK 75 16 Press OK or £ if you want to be notified when you receive a new message or press CHNG or ⁄ if you want to be notified only when you receive an urgent message. 17 Press ® to end the session.
Chapter 10 Off-premise Message Notification To set up Off-premise Message Notification to an extension 1 Press ≤·°⁄. Follow the voice prompts or the display button options to open your mailbox.
Chapter 10 Off-premise Message Notification RETRY AM PM RETRY OK 77 11 Press AM or ⁄ or PM or ¤. 12 Press OK or £ to accept the stop time. More dest? YES NO 13 Press YES or ⁄ if you want to set up another destination number or press NO or £ if you do not want to set up another destination number. Start: CHNG NEXT 14 Press NEXT or £ to accept the start time that you entered or press CHNG or ⁄ to change the start time.
Chapter 10 Off-premise Message Notification Setting up Off-premise Message Notification to a pager number Example of a destination pager number If you are assigning a pager destination number from behind a PBX, remember to insert a · (depending on your system) before the £ to access an outside line. There is a combined limit of 30 characters for the pager phone number and the pager message.
Chapter 10 Off-premise Message Notification 79 Destination: PHONE EXT PAGER 4 Press PAGER or ‹ to select a pager number destination. Pager: RETRY OK 5 Enter the destination pager number and press OK or £. ADD OK 6 Press OK or £ to accept the destination pager number represented by or press ADD or ¤ to add special characters and use your dialpad or follow the voice prompts to add characters. After you add special characters, press OK or £.
Chapter 10 Off-premise Message Notification To set up Off-premise Message Notification to more than one destination You can receive notification of a message at a maximum of five different destination numbers. The following steps show you how to enter a phone number destination and then add a pager destination for the first time. 1 Press ≤·°⁄. Follow the voice prompts or the display button options to open your mailbox.
Chapter 10 Off-premise Message Notification RETRY OK Stop hhmm: RETRY OK RETRY AM PM RETRY OK 9 81 Press OK or £ to accept the start time. 10 Enter the time when Off-premise Message Notification is to stop. This is a four digit field. You must precede a single-digit hour and minute with a zero. 11 Press AM or ⁄ or PM or ¤. 12 Press OK or £ to accept the stop time. More dest? YES NO 13 Press YES or ⁄ to set up another destination number.
Chapter 10 Off-premise Message Notification Start: CHNG NEXT 21 Press NEXT or £ to accept the start time that you entered or press CHNG or ⁄ to change the start time. Stop: CHNG NEXT 22 Press NEXT or £ to accept the stop time that you entered or press CHNG or ⁄ to change the stop time. Msg type: new CHNG 23 Press OK or £ to be notified when you receive a new message or press CHNG or ⁄ to be notified only when you receive an urgent message.
Chapter 10 Off-premise Message Notification 83 Changing Off-premise Message Notification You can change the parameters and destinations for Off-Premise Message Notification. Refer to “Off-premise Message Notification parameters” on page 72 for more information about parameters.
Chapter 10 Off-premise Message Notification Start: CHNG NEXT 6 Press CHNG or ⁄ to change the start time or press NEXT or £ to accept the start time. Stop: CHNG NEXT 7 Press CHNG or ⁄ to change the stop time or press NEXT or £ to accept the stop time. Msg type: new CHNG 8 Press CHNG or ⁄ to change the message type to urgent. Press OK or £ to accept the new default message. You can choose to be notified of all new messages or urgent messages only.
Chapter 10 Off-premise Message Notification 85 To change the destination from phone to another destination 1 Press ≤·°⁄. Follow the voice prompts or the display button options to open your mailbox.
Chapter 10 Off-premise Message Notification Start: CHNG NEXT 10 Press CHNG or ⁄ to change the start time or press NEXT or £ to accept the start time. Stop: CHNG NEXT 11 Press CHNG or ⁄ to change the stop time or press NEXT or £ to accept the stop time. Msg type:new CHNG 12 If you want to change message notification, press CHNG or ⁄ if you want to be notified only when you receive an urgent message. Press OK or £. Msg notify ADMIN SELECT P0919417 02.
Chapter 10 Off-premise Message Notification 87 To change the destination from pager to phone or extension 1 Press ≤·°⁄. Follow the voice prompts or the display button options to open your mailbox.
Chapter 10 Off-premise Message Notification Start: CHNG NEXT 9 Stop: CHNG NEXT 10 Press CHNG or ⁄ to change the stop time or press NEXT or £ to accept the stop time. Msg type:new CHNG 11 If you want to change message notification, press CHNG or ⁄ if you want to be notified only when you receive an urgent message. Press OK or £. Msg notify ADMIN SELECT P0919417 02.2 OK Press CHNG or ⁄ to change the start time or press NEXT or £ to accept the start time.
Chapter 10 Off-premise Message Notification 89 To change the destination from phone or extension to pager 1 Press ≤·°⁄. Follow the voice prompts or the display button options to open your mailbox.
Chapter 10 Off-premise Message Notification 8 Press NEXT or £ to accept the default pager message represented by . The default pager message that CallPilot sends is the CallPilot extension. This is the sequence of digits that is sent after the pager service is dialed, to notify you of who is paging you or press CHNG or ⁄ to change the pager message. The combined limit is 30 characters for the pager phone number and the pager message.
Chapter 10 Off-premise Message Notification 91 Deleting a destination number If you have more than one destination number for Off-premise Message Notification, you can delete a destination. To delete a destination number 1 Press ≤·°⁄. Follow the voice prompts or the display button options to open your mailbox.
Chapter 10 Off-premise Message Notification Adding a destination number Use this procedure if you have set up Off-premise Message Notification and you want to add another destination number. You can have up to five destination numbers. To add a destination number 1 Press ≤·°⁄. Follow the voice prompts or the display button options to open your mailbox.
Chapter 10 Off-premise Message Notification 93 Turning Off-premise Message Notification on or off You can turn Off-premise Message Notification on or off at any time. If you turn Off-premise Message Notification off, you do not affect any of the assigned parameters. To turn Off-premise Message Notification on or off 1 Press ≤·°⁄. Follow the voice prompts or the display button options to open your mailbox.
Chapter 10 Off-premise Message Notification P0919417 02.
Chapter 11 Recording a call About Call Record With Call Record ≤·°· you can record an active telephone call and put the resulting message in your mailbox. Before you activate Call Record, ask the parties on the call for permission to record the call. The maximum length of the Call Record message is determined by the Class of Service setting for your incoming message length. If the mailbox message length is reached, you hear the voice prompt “Recording stopped.
Chapter 11 Recording a call P0919417 02.
Chapter 12 Broadcast and Information messages About Broadcast messages You can ask the System Administrator to send a Broadcast message if you need to send a message to every initialized mailbox on your phone system. You can ask the System Administrator to send a Broadcast message to announce meetings, special company events, and reminders. Sending a Broadcast message eliminates recording and sending the same message several times. Broadcast messages play on all mailboxes initialized with CallPilot.
Chapter 12 Broadcast and Information messages Recording an Information mailbox greeting Before you record an Information mailbox greeting, you must determine what the greeting includes. Be sure to include important times and dates. For example: “Paddy’s Dance Studio proudly presents an extravaganza of dance. The entertainment begins at 8:00 pm on the fourth of July. Toddlers tap is in the White Room. Folk dance is in the Green Room. Classical ballet is in the Pink Room.
Chapter 13 CallPilot tips This chapter contains tips on how to optimize your use of CallPilot. Listen to your messages frequently. Answer your messages promptly to encourage callers to use CallPilot and reassure them that it is as reliable as speaking with you personally. You do not have to be at your desk to play your messages. When you are away from your desk, you can play your messages from any tone dial phone. Clean up your mailbox. There is limited storage in your mailbox and within CallPilot.
Chapter 13 CallPilot tips Record your greetings and messages clearly. For a better quality recording, speak directly into the handset. Do not use the Handsfree feature. Remember to speak clearly in a pleasant voice at a pace that is easy to understand. Do not speak too softly or loudly or make the greeting or message too lengthy. After you record a greeting or message play it back. Make sure that your greeting or message sounds the way you want it to before you accept it.
Chapter 14 Troubleshooting This chapter describes some problems that can occur when you use CallPilot. Some typical problems are listed and what to do if they occur. The Automated Attendant transfers some callers to the General Delivery Mailbox CallPilot requires a tone signal and a minimum voice level. If CallPilot does not receive a response, the caller is automatically transferred by the Automated Attendant to the CallPilot operator.
Chapter 14 Troubleshooting I forgot my mailbox password A forgotten password cannot be recovered. Your old password must be reset to the default password of four zeroes (0000). After the System Administrator resets your password, you must open your mailbox and change the default password. My mailbox is locked Your mailbox is locked if you attempt to access your mailbox and you hear the recording: “This mailbox has been locked to prevent unauthorized access.
Chapter 14 Troubleshooting 103 Ensure that the destination number you enter is not restricted. For example, if you cannot call long distance numbers from your phone, you cannot set up Outbound Transfer to a long distance number. Check to see if Outbound Transfer is turned on. Refer to “Turning Outbound Transfer on or off” on page 69 for more information.
Chapter 14 Troubleshooting P0919417 02.
Glossary Administration The tasks involved in maintaining CallPilot mailboxes, greetings and set up configuration. Alternate greeting A greeting recorded for a Personal mailbox and played on occasions such as absence, illness, or vacation. Attendant sign On/Off The task performed by a company receptionist or Operator that indicates to CallPilot when an Operator is available to answer calls.
Glossary Display buttons The three buttons on a two line display telephone. Users press these buttons to select the specified CallPilot option. Display options The choices available to a user that appear on a two line display telephone. Options shown on the display can be selected using the display or dialpad buttons DTMF Dual-Tone MultiFrequency. The type of audio signals that are generated when you press the buttons on a touch-tone telephone.
Glossary 107 Initializing a mailbox Preparing a mailbox to receive messages, which includes changing a mailbox default password and recording a Company Directory name. Leave Message The feature code used to leave messages in CallPilot mailboxes. Mailbox A storage place for voice messages on the CallPilot system. Mailbox number length The number of digits allowed in a mailbox number. Mailbox properties Mailbox properties are optional parameters in addition to the Class of Service values.
Glossary Option A CallPilot choice that is given to a user through voice or display prompts. Password A four- to eight-digit number that is entered on the dialpad. A password is used to open mailboxes or perform configuration tasks. Pause You use pauses when you set up pager notification. Each pause character that you enter makes the system wait four seconds before sending out the tones for the digits that follow.
Index A Company Directory name 27, 29 Alert tone 61 Alternate greeting 27, 99 Alternate Language 13 Analog station module (ASM) 11 Analog terminal adapter (ATA) 11 Automated Attendant 41, 101 Copying a message 36 B Deleting messages 36, 39 Broadcast message about 97 recording 97 Destination number character limit 79, 81, 90 for pagers 78 when CallPilot is behind PBX or Centrex 78 C Call Forward canceling 59 remote, setting up 60 setting up 59 with CLID, setting up 61 Call Forward on Busy overri
Index assigning 32 available with Caller ID 28 deleting 33 recording 32 Primary 27, 99 example 27 purpose 27 recording Alternate 29 Primary 29 recording technique 28 Group List name 53 Guest mailboxes 14 no operating extension for 14 H Hold tone 41 Home menu 65 I Information mailbox greeting recording 97 Information message CCR 65 Initializing your mailbox 17 Internal messages, replying to 54 Interrupting a caller 42 Interrupting calls 61 Interrupting voice prompts 9, 12 L Language, Alternate 13 Le
Index Off-premise Message Notification parameters destination telephone number 72 destination type 72 time range 72 types of message 72 Open Mailbox feature 11 Opening your mailbox remotely 19 111 Replaying messages 37 Reply feature 38 Replying to an external message sender 56 to an internal message sender 54 to messages 37, 39 Retrieving deleted messages 37 Rewinding messages 36, 38 Operator 13 Optimizing Outbound Transfer 67 S Outbound Transfer activating 69 canceling 69 destination telephone number