
Digital Camera User Manual

163
Using the projector
Using the projector
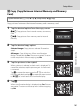
Displaying Pictures with the Projector (Projector Mode)
The COOLPIX S1100pj is equipped with a
built-in projector. The ability to project
pictures and movies with simple operation
makes for a convenient way of enjoying
photos at gatherings of family and friends.
Projecting Pictures
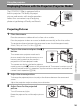
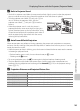
1 Place the camera.
Place the camera on a stable and level surface such as a table.
Point the projector window at a screen (available commercially) or flat white surface.
The projection distance between the camera and screen should be approximately
26 cm (10 in.) to 2.4 m (7 ft. 10 in.) (A 165).
2 Turn on the camera and press the P
button.
The camera enters projector mode and a
picture stored in the internal memory or on a
memory card inserted into the camera is
projected in full-frame playback mode.
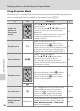
The camera can also be switched to projector
mode by pressing the P button on the remote control. The camera’s monitor turns off
when the remote control is in operation. Tap the monitor to reactivate it and enable the
camera’s touch operation (A 166).
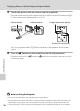
3 Adjust the camera position.
To change the projected picture size, adjust the distance between the camera and
screen.
Adjust the projection angle to reduce picture distortion.
4 Adjust focus for the projected
picture.
Turn off unnecessary lights.
Rotate the projector focus dial to adjust picture
focus.