Title page Meridian 1, Succession 1000, Succession 1000M Succession 3.
Revision history Revision history October 2003 Standard 2.00. This document is up-issued to support Succession 3.0 Software. November 2002 Standard 1.00. This document is issued to support Meridian 1 Release 25.40 and Succession Communication Server for Enterprise 1000, Release 2.0.
Contents Contents i2002 Internet Telephone 7 Features ................................................................................................ 7 Your i2002 Internet Telephone’s controls 8 i2002 Internet Telephone display 11 Install your i2002 Internet Telephone 12 Your i2002 Telephone Option menu 14 Adjust volume...................................................................................... Adjust Screen contrast.....................................................................
Contents Make a System Speed Call ................................................................... 32 Use Hot Line........................................................................................ 32 Make an Intercom call.......................................................................... 33 Answer a call 34 While on an active call 35 Place a call on hold ............................................................................. Transfer a call .......................................
Contents Additional call features Auto Dial Transfer feature .................................................................... Use the Buzz signal.............................................................................. Use Call Page Connect to make an announcement ................................. Use Centrex/Exchange Switchhook Flash .............................................. Charge a call or Charge a Forced call...................................................
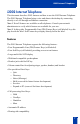
i2002 Internet Telephone i2002 Internet Telephone This document describes i2002 features and how to use the i2002 Internet Telephone. The i2002 Internet Telephone brings voice and data to the desktop by connecting directly to a LAN through an Ethernet connection. Note 1: Not all features are available on all telephones. Consult your network administrator to verify which features are available for your use.
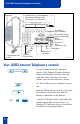
Your i2002 Internet Telephone’s controls Speaker Programmable Line (DN)/ Feature Keys (self-labeled) Message Waiting Light/ Incoming Call Indicator Soft Keys (self-labeled) Navigation Keys Inbox (Message) Shift Directory Services Quit Expand to PC Handsfree Key LED LED Mute LED Volume Control Bar Goodbye Hold Headset 552-ITG0010 Your i2002 Internet Telephone’s controls Use the Volume Control to adjust the volume of the Handset, Headset, Speaker, Ringer, and Handsfree features.
Your i2002 Internet Telephone’s controls Press the Hold key to put an active call on hold. Press the Line (DN) key beside the flashing to return to the caller on hold. Press the Speaker key to activate handsfree. The speaker LED lights to indicate when handsfree is active. The Expand to PC key is a fixed key that is reserved for future development. Press the Inbox (Message) key to access your voice mailbox. Note: On the 3900 telephone series, the Messages key corresponds to the Inbox (Message) key.
Your i2002 Internet Telephone’s controls Press the Services key to access the following items: • Telephone Option: - Volume Adjustment - Contrast Adjustment - Language - Date/Time Format - Display diagnostics - Local Dialpad Tone - Ring type - OnHook Default Path - Change Feature key Label - Set Information • Virtual Office Login and Virtual Office Logout (if Virtual Office is configured) • Test Local Mode and Resume Local Mode (if Branch Office is configured) The Primary Directory Number (DN) keys a
i2002 Internet Telephone display i2002 Internet Telephone display This section summarizes the display features of the i2002 Internet Telephone. The Idle display is shown in the figure below. The i2002 telephone has two display areas: • The upper display area provides line and feature key status and contains single line information for items such as party and set information. • The lower display area provides feature key labels.
Install your i2002 Internet Telephone Install your i2002 Internet Telephone Connect the i2002 telephone components CAUTION Damage to Equipment Do not plug the i2002 Internet telephone into an ISDN connection. This results in severe damage to the i2002 telephone. Consult your system administrator to ensure that you plug your set into a 10/100BaseT Ethernet jack. 12 1.
Install your i2002 Internet Telephone i2002 Ethernet port connections Network Ethernet PC Ethernet 13
Your i2002 Telephone Option menu Your i2002 Telephone Option menu The i2002 Internet Telephone Services menu lists the following menus: • The Telephone Option menu enables you or your Network Administrator to configure telephone preferences. • The Virtual Office Login and Test Local Mode (for Branch Office) menus are listed when an i2002 Internet Telephone class of service is set for Virtual Office and Branch Office. The Telephone Option menu offers the following options: Volume adjustment...
Your i2002 Telephone Option menu Select 6. Press the Select key. The display provides information required to adjust your selection. Select 7. Choose one of the following: a. Press the Select key to save changes and return to the Telephone Option menu. b. Press the Quit key to keep existing settings. or Quit Adjust volume After selecting Volume adjustment... from the Telephone Option menu, choose Ringer, Handset, or Handsfree for volume adjustment.
Your i2002 Telephone Option menu To adjust Handset listen volume: Handset listen Lower or Higher 1. Select Handset listen from the Volume menu. 2. Press Lower to decrease volume, Higher to increase volume. 3. Choose one of the following: a. Press the Select key to save the volume level and return to the Telephone Option menu. b. Press the Quit key to keep existing settings. To adjust the Handsfree listen volume: Handsfree listen Lower or Higher 1.
Your i2002 Telephone Option menu b. Press the Quit key to keep existing settings. To adjust the Buzzer volume: Buzzer Lower or Higher 1. Select Buzzer from the Volume menu. 2. Press Lower to decrease volume, Higher to increase volume. 3. Choose one of the following: a. Press the Select key to save the volume level and return to the Telephone Option menu. b. Press the Quit key to keep existing settings. Adjust Screen contrast The Screen contrast option adjusts the telephone’s display contrast.
Your i2002 Telephone Option menu Select a language The display is available in multiple languages. After selecting Language... from the Telephone Option menu: 1. Using the Navigation keys, highlight the desired language (for example, German [Deutsche]). 2. Choose one of the following: Deutsche Select a. Press the Select key to save the language and return to the Telephone Option menu. b. Press the Quit key to keep existing settings. Select Date/Time format There are several Date/Time formats.
Your i2002 Telephone Option menu Display diagnostics The Display diagnostics option tests the telephone’s display screen and indicator lights. After selecting Display Diagnostics from the Telephone Option menu: 1. Using the Navigation keys, scroll through the list to view display capabilities. 2. Press the Quit key to return to the Telephone Option menu.
Your i2002 Telephone Option menu Choose Ring type The Ring type option sets the telephone’s ring tone. After selecting Ring Type... from the Telephone Option menu: 1. Using the Navigation keys, highlight one of the ring types. 2. Press the Play key to sample the ring tone. 3. Choose one of the following: Ring type 3 Play Select a. Press the Select key to save the ring type and return to the Telephone Option menu. b. Press the Quit key to keep existing settings.
Your i2002 Telephone Option menu Change Feature Key Label The Change Feature Key Label option renames the label displayed next to each feature key or restores the default labels to the keys. After selecting Change Feature Key Label from the Telephone Option menu, choose one of the following: To Change the labels: Select a Feature key Quit Edit the Feature key label 1. From the Change Feature Key Label screen, press Select key. 2.
Your i2002 Telephone Option menu d. Select Yes to change the selected feature label key to the default value. Set Information The Set Information option displays the following set-specific information: • IP address • Hardware ID of the Internet Telephone • Current firmware version • TN programmed on set • Node ID and IP address • The Voice Gateway Media Card on which the Internet Telephone is registered After selecting Set Information from the Telephone Option menu: 22 1.
Call features Call features System administration is required for Call features. Contact your system administrator to configure these features and codes on your telephone. The Call features and Flexible Feature Codes (FFC) described in the following sections must be assigned to your telephone and supported by system software. To access a feature, press a Feature key or enter a Flexible Feature Code.
Make a call Make a call This section describes features associated with making a call. There are several ways to make a call from an i2002 telephone. To make a call: 1. 2498 Do one of the following: a. Press the Line (DN) key. b. Lift the Handset. c. Press the Handsfree key. d. If a Headset is connected, press the Headset key. 2. Dial the number. 1. Leave the Handset in the cradle. 2. Press a Line (DN) key. 3. Dial the number when dial tone sounds. 4.
Make a call Use Handsfree calling Use Handsfree calling to operate a built-in microphone and speaker instead of the handset. While on an active call, you can switch between Handset and Handsfree mode. To answer a call in Handsfree mode: Press the Handsfree key. To discontinue a Handsfree call: Press the Goodbye key. To mute a Handsfree call: 1. Press the Mute key. The LED indicator flashes. 2. Press the Mute key again to return to a two-way handsfree conversation. 1. Lift the Handset. 2.
Make a call To use a Headset: 1. Connect the Headset to the headset jack or the handset jack depending on the headset type and telephone. 2. Press the Headset key. Note: Amplified and unamplified headsets are compatible with the i2002 Internet Telephone. 3. Adjust your Headset volume by using Volume adjustment... in the Telephone Option menu. 1. Connect the Headset and put the headset on. 2. Press the Headset key.
Make a call To search for a specific number: Search 1. When prompted, use the keypad to enter the desired name in the format, “Last, First”. 2. To edit the entry, select from the following: 3. a. To toggle letters, use the 1-9 number keys. b. For upper case letters, use the second level of feature keys and press the Case key. c. For special characters, use the up and down Navigation keys (a Choose key appears for selecting the characters). d.
Make a call To scroll to a specific number: Dial 1. Using the Navigation keys, scroll through the names in the Corporate Directory. 2. Press the Dial key to dial the resulting number. Use Predial Use the Predial feature to enter, preview, and edit numbers before dialing. To use Predial: 2498 1. Without selecting a Line key, dial the number. 2. Press a Line key to dial the number. 3. Lift the Handset when the called party answers or, if in Handsfree mode, begin to talk. 1.
Make a call Use Auto Dial Use the Auto Dial feature to display, store, and automatically dial telephone numbers. To use Auto Dial: 1. Lift the Handset. 2. Selecting an associated Auto Dial key from the upper display area, press to dial the number. Display 1. Press the Display key. AutoDial 2. Selecting from the upper display area, press the configured Auto Dial key. 1. Without lifting the handset, press the appropriate Auto Dial key.
Make a call Activate Ring Again Use the Ring Again feature if a busy tone sounds or when there is no answer after placing a call. Ring Again activates an audible tone notification that you receive when the person you tried calling is available or has used their telephone. Ring Again also automatically redials the number. To use Ring Again: RngAgn 1. Dial a number and receive a busy tone or no answer. 2. Choose one of the following: a. Press the Ring Again key. b. Enter the Ring Again Activate FFC.
Make a call Redial last number called Use the Last Number Redial feature to automatically redial the last dialed number. To use Last Number Redial: Choose one of the following 1. 2498 To redial using the Handset: a. Lift the Handset. b. Press the Line (DN) key. or 2. 2498 Without lifting the Handset, press the Line (DN) key twice (the last number dialed is automatically redialed).
Make a call To make a Speed Call: SpcCtl 1. Lift the Handset. 2. Press the Speed Call Controller key. 3. Dial the Speed Call code to automatically dial the number. Make a System Speed Call Use the System Speed Call feature to dial Speed Call codes that override all restrictions on a call. To make a System Speed Call: SScUsr or SScCtl 1. Lift the Handset. 2. Press the System Speed Call key or the System Speed Call Controller (SScCtl) key. 3.
Make a call Make an Intercom call Use the Intercom feature to call a member of your intercom group by pressing the code assigned to each member. To make an Intercom call: Intrcm 1. Lift the Handset. 2. Press the Intercom key. 3. Dial the one- or two-digit code for the desired intercom group member. 1. Press one of the following keys: To answer an Intercom call while on a line other than your Intercom group line: or Intrcm 2. a. The Hold key to put the current call on hold. b.
Answer a call Answer a call Each incoming call causes the telephone to ring and the LCD indicator to flash. To answer a call: 1. Choose one of the following: a. Lift the Handset. b. Press the Handfree button located on the left side of the handset. or Note: The Handsfree feature may not be available on your telephone. or 2498 c. Press the Line (DN) key beside the LCD indicator as it flashes. d. Press the Headset key if a headset is connected to your telephone.
While on an active call While on an active call This section describes features available during an active call. Place a call on hold Use the Hold feature when talking on one line and another call arrives on a second line. Retain the original call by putting it on hold and then answer the second call. To place a call on hold: Press the Hold key. The LCD indicator flashes beside the line on hold.
While on an active call To go back to the original call, if the transfer is incomplete: If the person called is not available, press the Line (DN) key (next to the LCD indicator) to reconnect to the original call. 2498 Use Timed Reminder Recall Use the Timed Reminder Recall feature to receive a reminder tone when a transferred call is not answered. To use Timed Reminder Recall: TRANSF TRANSF 1. Press the Transfer key. The call is put on hold. 2.
While on an active call Use Attendant Recall Use the Attendant Recall feature to contact an attendant during a call and to connect the call to the attendant. To contact the attendant while on a call: AttRcl 1. Press the Attendant Recall key and stay on the line until the attendant answers. 2. Press the Goodbye key. The caller remains connected to the attendant. Use Call Park Use the Call Park feature to hold temporarily (parked) and retrieve a call from any telephone.
While on an active call To park a call using the SPRE code or FFC: TRANSF or TRANSF or Conf Conf 1. Press the Transfer key or the Conference key. 2. Dial the Call Park FFC. 3. To use an alternate DN from the System Park DN or your own DN, dial the DN where you want to park the call. 4. Press the Transfer key or the Conference key. 1. Lift the Handset. 2. Press the Park key. 3. Dial the Call Park FFC. 4. Dial the DN where you parked the call.
While on an active call Record a Calling Party Number Use the Calling Party Number feature to record a caller’s number or charge a call to an account number for accounting purposes during an established call. To record a caller’s number for accounting purposes: CParty 1. Press the Call Party key, the caller is placed on hold. The Entered number displays. 2. Dial a charge account number or the caller’s number.
While on an active call Trace a Malicious call Use the Malicious Call Trace feature to trace nuisance calls within your system. To use Call Trace while on a call: Press the Call Trace key. CallTrace To use Call Trace without a Call Trace key: TRANSF or p 40 Conf 1. Press the Transfer key or the Conference key. 2. Dial the SPRE code followed by 83 or dial the Call Trace FFC to automatically reconnect.
Incoming calls Incoming calls This section describes features that are used with incoming calls. Activate Automatic Answerback When the Automatic Answerback feature is active, your set automatically answers in handsfree mode after one ring; however, calls are not forwarded to the voice message service. To activate Automatic Answerback: Press the Automatic Answerback key. AtoAns To deactivate Automatic Answerback: Press the Automatic Answerback key again.
Incoming calls 3. Dial the pickup group number of the ringing telephone. 1. Lift the Handset. 2. Press the DN Pickup key, or enter the Pickup Directory Number FFC. 3. Dial the DN of the telephone that is ringing (in your call pickup group). To answer a call at a specific extension in any pickup group: DNPickup If the pickup DN or group number is invalid (an overflow burst tone sounds and the screen displays Goodbye and try again), press the Goodbye key.
Incoming calls 2498 2. Press the Line (DN) key associated with the first call. 1. Press the Goodbye key to end the current call and answer the incoming call. 2. Press the Line (DN) key beside the flashing status icon to answer the incoming call.
While you are away from your desk While you are away from your desk This section describes features that are used when you are away from your desk. Use Call Forward Use the Call Forward feature to direct incoming calls to ring at another Line (DN). If the telephone is in the process of ringing, that call cannot be forwarded. To forward your calls or change the forward number: CFWD CFWD 1. Press the Forward key or lift the Handset and enter the Call Forward All Calls Activate FFC. 2.
While you are away from your desk Use Internal Call Forward Use the Internal Call Forward to accept only calls originating at internal DNs to ring at another DN. Calls originating outside your telephone system still ring at your telephone. Current incoming calls cannot be forwarded. To forward internal calls: IntForward IntForward 1. Press the Internal Call Forward key or lift the Handset and enter the Internal Call Forward Activate FFC. 2. Dial the DN to which your internal calls will be forwarded.
While you are away from your desk # 4. Dial your Station Control Password. A dial tone sounds. 5. Choose one of the following: a. Dial your DN. b. To forward calls to the previous call forward telephone number, press the # key. (Do not perform steps 6 and 7). 6. Dial the number to which calls are being forwarded. If calls are forwarded to an invalid number, a fast busy signal sounds. 7. Press the # key. 1. Lift the Handset. 2.
While you are away from your desk Secure your telephone Use the Electronic Lock feature to prevent others from making calls from your telephone. The lock consists of a password that you can change. To lock your telephone: 1. Lift the Handset. 2. Dial the Electronic Lock Activate FFC. 3. Dial your Station Control Password. 4. Choose one of the following: a. If dialing locally, press the Goodbye key. b. If dialing FFC remotely, dial your DN. To unlock your telephone: 1. Lift the Handset. 2.
While you are away from your desk To change your password (must be done from your telephone): 48 1. Lift the Handset. 2. Dial the Station Control Password Change FFC. 3. Dial the current password for your telephone. 4. Dial the new password. 5. Dial the new password again. 6. Press the Goodbye key.
Talk with more than one person Talk with more than one person This section describes features that enable conversations between more than two people. Use the Call Join feature Use the Call Join feature to connect a call to a current active call. This creates a conference between the two callers and yourself. To connect a call on hold (on a different line) to your current call: Conf 2498 Conf 1. Press the Conference key. 2.
Talk with more than one person If the person you attempt to add to the conference is unavailable: 2498 1. Press the Goodbye key. 2. Press the Line (DN) key with the flashing icon to return to your original call. Use the Conferee selectable display and disconnect feature Use the Conferee Selectable Display feature to list active conferees and disconnect a conferee from the conference call. To view active conferees: ConfDsp 1.
Talk with more than one person The LCD indicator turns off. b. For multiple conferees, repeat steps 1 and 2 until all conferees are disconnected. Then press the Goodbye key. Use Group Call Use the Group Call feature to automatically call members of a predefined group, one at a time, until they all answer. To call group members: GrpCl 1. Lift the Handset. 2. Press the Group Call key or enter the Group Call FFC. The feature automatically calls all group members.
Talk with more than one person b. If you are on a call on another line on your telephone when a group call is made, you receive a long tone through the handset or speaker. c. If you are already on a conference call or another group call, you do not receive notification of a group call. To end a Group Call: Press the Goodbye key. Note: When the person who made the group call disconnects, the call terminates for all members of the group.
Work without interruption Work without interruption This section describes features that provide uninterrupted work time. Activate Make Set Busy Use the Make Set Busy feature to make your telephone appear busy to all callers. To activate Make Set Busy: MakeSetBsy Press the Make Set Busy key, or lift the Handset and enter the Make Set Busy Activate FFC.
Additional call features Additional call features Auto Dial Transfer feature Use the Auto Dial Transfer feature to transmit digits through your Auto Dial key to the central office after a Trunk Switchhook Flash. You must be on a Central Office/Exchange (CO) trunk call from or to a CO that offers Centrex or exchange line-type features. To use Auto Dial Transfer when picking up an incoming trunk call: CentrexSHF 1. Press the Centrex Switchhook Flash key and wait for interrupted dial tone. AutoDial 2.
Additional call features Use Call Page Connect to make an announcement Use the Call Page Connect feature to make an announcement over a paging system. Note: A Page key on an attendant console overrides and disconnects the telephones. The telephones must re-access the page trunk. To connect to Call Page: 1. Lift the Handset. 2. Dial the Page Trunk Access Code to complete the connection to the page system. 3. Make your announcement. 4. Press the Goodbye key.
Additional call features Charge a call or Charge a Forced call Use the Call Charge feature to charge a call to a specific account. The Forced Charge feature charges long-distance calls from a telephone restricted to local calls. To charge a local or long-distance call to an account before you dial: Charge 1. Lift the Handset. 2. Press the Charge key or dial the Call Detail Recording FFC. 3. Dial the charge account number. 4. When the dial tone sounds, dial the number. 1.
Additional call features To charge a call to an account when you transfer a call: TRANSF 1. Press the Transfer key. The call is on hold. Charge 2. Press the Charge key or dial the Call Detail Recording FFC. 3. Dial the charge account number. 4. After the dial tone, dial the number to where the call is to be transferred. 5. Press the Transfer key when you hear the telephone ring. TRANSF Note: You can talk privately to the person at the transfer number before you press the Transfer key.
Additional call features Use Enhanced Override feature Use the Enhanced Override feature to override an active call after you have attempted a Forced Camp-on. Use Enhanced Override to make a simple call or a consultation call, such as placing a call on hold and calling another party. To use Enhanced Override: You receive a busy signal after dialing a telephone number. EnhOvr 1. Press the Override key or enter the Override FFC to initiate a Forced Camp-on.
Additional call features Note: The person you called receives a tone, and you receive a ring/ringback signal or a busy/engaged signal, depending on the options chosen. You are now camped-on to the number you dialed. 2. When the person you called finishes their call, your telephone automatically dials the number. Your and their telephones ring. To answer a call camped-on to your extension: When the telephone rings, lift the Handset.
Additional call features Use Privacy Release Use the Privacy Release feature to enable one or more people who share your DN to join a call. To use Privacy Goodbye in an established state: PrivRls Press the Privacy Release key during a call. A person joins the call by pressing the shared number (DN) key on their telephone (Multiple Appearance DN feature). Use Radio Page Use an on-site Radio Page system feature to page a person and stay on the line until they answer.
Additional call features To use Automatic Post selection: The called party is either busy on the telephone or away from the desk. To page the called party, there is no need to redial the number of the called party. RadPag 1. Press the Radio Page key. A special dial tone sounds. 2. Dial the Radio Paging Access FFC. The ringback tone sounds. Note: The paged person can use any telephone to enter a Radio Paging Answer FFC, plus their own DN number. 3.
Additional call features Use Voice Call Use the Voice Call feature to page another person or make an announcement through someone else’s telephone speaker. To make a voice call: VceCal 1. Lift the Handset. 2. Press the Voice Call key and make the announcement. 3. Press the Goodbye key. To respond to a voice call: Your telephone rings once and the caller's voice transmits through your speaker. Lift the Handset.
Additional features Additional features Virtual Office When you are away from your office telephone, use the Virtual Office feature to transfer calls and all of it’s features to a remote telephone. When designated as the office telephone, the i2002 can be activated for Virtual Office by an i2004, i2050, or an i2002 Internet Telephone. A Virtual Office login from an i2002 Internet Telephone to an i2004 or i2050 might be blocked in certain situations. Consult your local network administrator.
Additional features Virtual Office on your Remote Telephone A successful login transfers all the features, time, date, and tones to your remote telephone from your office telephone. Logged on to i2002 Figure 1: Logged on using an i2002 Figure 2: Logged on using an i2004 Figure 3: Logged on using an i2050 On the i2004 and i2050 displays, the two top left feature keys always remain empty (as your i2002 supports only four keys).
Additional features Virtual Office on your Office Telephone When activated for Virtual Office by a remote telephone, your office telephone is logged out and no longer operational. A Logged Out message displays on your telephone alerting you that it is being used for Virtual Office. To regain operation of a telephone being used for Virtual Office: To regain operation of your telephone from Virtual Office, choose one of the following: 1.
Additional features Troubleshoot Virtual Office When using Virtual Office you may encounter error messages displayed on your screen. The following table lists error messages and actions to correct the causes. Table 1: Troubleshoot Virtual Office (Part 1 of 3) Displayed Message Probable Cause Actions Busy, try again Remote Internet Telephone is active (not idle). Wait for remote Internet Telephone to become idle and try again. ACD is logged in.
Additional features Table 1: Troubleshoot Virtual Office (Part 2 of 3) Displayed Message Probable Cause Actions Permission Denied (1) Remote telephone has no Station Control Password. Notify local network administrator. Permission Denied (3) Incorrect User ID entered. Enter correct User ID. Remote telephone has no Station Control Password. Notify local network administrator. Incorrect User ID entered. Enter correct User ID.
Additional features Table 1: Troubleshoot Virtual Office (Part 3 of 3) Displayed Message Probable Cause Actions Server Unreachable (2) Network problem. Notify network administrator if problem persists. Succession Branch Office The Branch Office telephone can operate in the Normal or the Local mode. Normal Mode The telephone registers with the Main Office and receives telephone services from the Main Office.
Additional features Resume Normal Mode Use the Resume Normal Mode command to return to Normal Mode after testing survival functionality. Note: If the Resume Normal Mode command is not performed after testing, the telephone automatically returns to Normal Mode in ten minutes. Resume Normal Mode Select 1. Press the Services key to access the Services menu. 2. Using the Navigation key, highlight Resume Normal Mode. 3. Press the Select key (the telephone registers back to the Main Office).
Hospitality features Hospitality features The hospitality features in this section are intended for hotel operations. Set Automatic Wake-Up Use the Automatic Wake-Up feature to receive a timed reminder call. From your telephone, you can program the Meridian 1, Succession 1000, or Succession 1000M to automatically place a call to yourself at a predetermined time. When you answer the call, recorded music plays for up to 30 seconds, followed by a prerecorded announcement or the attendant.
Hospitality features To verify the time for the Automatic Wake-Up call: 1. Lift the Handset. 2. Dial the Automatic Wake-Up Verify FFC. 3. Dial the Automatic Wake-Up time in a 24-hour time format (hhmm). If your query matches the preset time, a confirmation tone sounds. Note: In a 24-hour time format, 7:30 a.m. is entered as 0730; 9:45 p.m. is 2145. 4. Press the Goodbye key.
Hospitality features * MRK 4. Press the * key. 5. Press the Message Registration key. 1. Press the Message Registration key. 2. Dial the room Directory Number (DN). 3. Press the * key. 4. Press the Message Registration key. To reset a meter to zero: MRK * MRK Use Maid Identification Use the Maid Identification feature to track the cleaning status of rooms. The maid enters the information from the telephone in each room. To enter cleaning status: RMK 1. Press the Room Status key. 2.
Hospitality features * RMK 4. Press the * key. 5. Dial the Maid ID. If you dial the wrong Maid ID, press the * key and redial the ID. 6. Press the Room Status key. Display Room Status Use the Room Status feature to print the status of a room using the Display Module. To read the status of a room: RMK 1. Press the Room Status key. 2. Dial the Directory Number (DN) for the room. The DN displays followed by a two-digit code. a.
Hospitality features To change the status of a room: RMK 1. Press the Room Status key. 2. Dial the Directory Number (DN) for the room. The DN displays followed by a two-digit code. a. The second digit indicates the occupancy status: 0 = Room vacant 1 = Room occupied b. The second digit indicates the cleaning status of the room: 1 = Cleaning requested 2 = Cleaning in progress 3 = Room cleaned 4 = Room passed inspection 5 = Room failed inspection 6 = Cleaning skipped 7 = Not for sale RMK 74 3.
Flexible Feature Codes (FFCs) Flexible Feature Codes (FFCs) Use this table to keep track of the FFCs assigned by your system administrator.
Terms you should know Terms you should know Attendant A telephone operator in your organization. Auto Dial A telephone number programmed on the AutoDial key for one touch dialing. Call party information The display showing Call Party Name Display (CPND) information including the telephone number and name of the incoming call. The system must have CPND enabled. Date/time display The current date and time when the telephone is in an idle state. Directory key Enables access to the Corporate Directory.
Terms you should know FFCs See Flexible Feature Codes. Fixed key The hard labeled keys on your telephone. Flexible Feature Codes (FFCs) Specialized codes entered using the dial pad that enable features, for example Automatic Wake-Up call. Handsfree A method of conversing with the party on the other end of the line without lifting your handset. Inbox (Message) A Fixed key on the i2002 telephone that connects to your voice messaging system when the key is pressed.
Terms you should know More... An option allowing access to the multiple layers of the Soft keys. These keys are the four keys located directly below the display area. Off-hook Any line that is selected to either make a call or receive an incoming call. The term off-hook is applied, regardless of whether the end-user actually lifts up the handset, or presses a line key, or is automatically answered at the set, or a line is automatically selected for an outgoing call.
Terms you should know Secondary Directory Number A second incoming/outgoing line for your telephone. Shared Directory Number A DN (extension) that is shared by two or more persons. Soft Keys (self-labeled) A set of keys programmed by your system administrator. These four keys located directly below the display area have four programmable layers. The layers are accessed through the More... key. These keys are also used to configure parameters in the Telephone Option menu.
Index Index A Directory Key 26, 76 Application Key 10 Directory Number 76 Attendant 76 Display 17, 18 Attendant Recall 37 Display Diagnostics 10, 19 Auto Dial 29, 76 Display incoming calls 39 Auto Dial Transfer 54 Display Key 39 Automatic Answerback 41 DN 76 Automatic Wake-Up 70 E B Electronic Lock 47 Buzz signal 54 Enhanced Override Feature 58 C F Call Charge 39 Fastbusy 76 Call Forward 44 Feature display 76 Call Forward - Internal 45 Fixed key 77 Call Join 49 Flexible Feature
Index Information display 77 Predial Recall 28 Information line 77 Primary Directory Number 10, 78 Intercom call 33 Privacy Release 60 Internal Call Forward 45 Private Line 78 Interrupted dial tone 77 Programmable Line (DN) /Feature Keys (self-labeled) 78 J Join a call 49 Q Quit Key 9, 78 L Language 10, 18 R Last Number Redial 31 Radio Page 60 Line (DN) Key 8 Record a Caller’s Number 39 Local Dialpad Tone 10, 19 Redial last number called 31 Remote Call Forward 45 M Ring Again 30 Maid
Index Succession 1000M 79 Succession Branch Office 68 Switchhook 79 System or Switch 79 System Speed Call 32 T Telephone Option 10 Timed Reminder Recall 36 Transfer a call 35 U User Interface 79 V Virtual Office 10, 63 Voice Call 62 Volume adjustment 10, 15 Volume Control 8 82
Meridian 1, Succession 1000, Succession 1000M i2002 Internet Telephone User Guide Copyright © 2002 – 2003 Nortel Networks All Rights Reserved Information is subject to change without notice. Nortel Networks reserves the right to make changes in design or components as progress in engineering and manufacturing warrant.