
Switch User Manual


IP routing configuration using the Java Device Manager 275
3
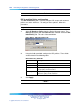
The Insert OSPF Accept dialog opens. This dialog is illustrated
below.
Insert OSPF Accept dialog
4
Using the fields provided, create the new accept policy. These fields
are described in the following table.
Insert OSPF Accept fields
Field Description
AdvertisingRtr The advertising router associated with the accept
policy.
Enable Indicates whether the policy is enabled.
MetricType Indicates the metric type associated with the
policy. Available options are: type 1, type 2, and
any.
PolicyName Indicates the name associated with the policy.
5
Click Insert.
—End—
OSPF Accept Policy deletion
To delete an OSPF accept policy, use the following procedure.
Deleting an OSPF accept policy
Step Action
1
From the Device Manager main menu, select IP Routing. The IP
Routing menu appears.
2 Select Policy. The Policy dialog appears.
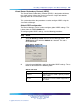
3
Select the OSPF Accept tab. The OSPF Accept window opens.
4
Select an AdvertisingRtr to delete.
5
Click Delete.
Nortel Ethernet Routing Switch 5500 Series
Configuration-IP Routing Protocols
NN47200-503 03.01 Standard
5.1 27 August 2007
Copyright © 2005-2007, Nortel Networks
.