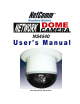
NS4540 Your Eye Online, All the time.
Contents WARNING & CAUTION ................................................................................................................. 4 1. Introduction .......................................................................................................................... 5 1-1 What is the NETCOMM Network Dome Camera? ............................................................ 5 1-2 Advantage Features .................................................................................................
6-2 Network Setting ............................................................................................................ 37 6-2-1 Network General Settings .................................................................................... 37 6-2-2 SMTP Settings ..................................................................................................... 38 6-2-3 DHCP Settings .....................................................................................................
WARNING & CAUTION Please read the manual before attempting installation or operation Please be aware of the following: 1. Don't use any chemical detergent to clean the machine surface, use a damp cotton cloth only. Regularly clean the dome cover to assure the device lens can properly focus. 2. Please install the NETCOMM NS4540 in a dry area, water and high humidity may cause damage to internal parts. An external housing must be used for outdoor installation. 3.
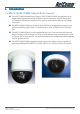
1. Introduction 1-1 What is the NETCOMM Network Dome Camera? ■ The NETCOMM Network Dome Camera ("NETCOMM NS4540" here and after) is an Internet-based digital Network Speed Dome Camera with built in Pan/Tilt/Zoom and a CCD module to distribute compressed live video on to the Intranet/Internet via Ethernet connection. ■ The NETCOMM NS4540 can be moved (Pan/Tilt/Zoom) changing the view point to get the best monitoring angle easily via standard browser such as Explore TM or Netscape TM.
1-2 Advantage Features ■ 22X Auto Focus Lens (NETCOMM -261) ■ Built-in 22X optical zoom lens with focal length 3.9~85.4mm ■ Automatic/Manual Iris Control ■ 360° continuous rotation ■ Up to 128 programmable preset positions ■ Preset positions auto scanning ■ High speed rotation and tilt, speed range varies from 0.
1-3 Package Contents YML7** Rev1 www.netcomm.com.
2. Hardware 2-1 Structural Elements 1. Dome Cover 2. Camera Case 3. Decoration Ring 4. RS-485 In/Out Jack 5. Alarm In / Out Jack 6. Video In / Out Jack 7. Power In Jack 8. Ethernet / Power / Status / Network LED 9. Camera Base NetComm NS4540 Dome Camera User Guide 8 YML7** Rev1 www.netcomm.com.
2-2 Connection Jack and Cable Requirement ■ Power In Jack : DC12V Input Voltage, Power Consumption 1.2Adc, Center Pin 2.0mm Requires Cable: 18 AWG x 2C ■ Video Out BNC Jack : Video Signal Output CVBS 1.0Vpp 75? BNC Recommend Data Cable:5C2V ■ Alarm In/Out Jack : Each NETCOMM NS4540 contains 6 alarm inputs and 1 alarm output - Alarm Input Voltage 5.6V max, Output 0.
■ Ethernet: Standard IEEE802.3 10 Base T port ■ POWER/STATUS LED: Power On: constant red. - Emergency factory default (appendix C): Blinking orange (i.e. red mix with green). ■ NETWORK LED: Network Link (connected): Constant red. - Networks have activities: Blink red. - Data sent out from server: Blink green. - Network disconnected: Constant slow blinking green. Upgrading software (appendix A): Constant slow to fast blinking of orange. NetComm NS4540 Dome Camera User Guide 10 YML7** Rev1 www.netcomm.com.
2-3 DIP Switch Setting ■ Fan Power Switch Turn the number 2 switch to ON position to activate the internal fan. This will maintain the temperature inside. ■ Alarm Mode Switch Alarm Mode can be set as Lock or Release mode. Turn number 1 switch to ON position to choose Release mode. Turn number 1 switch to OFF position to choose Lock mode. NETCOMM NS4540 has 6 alarm inputs and 1 output, which can be set either NC (normally close) or NO (normally open) mode.
2-4 NETCOMM NS4540 ID Address Setting Refer Chart Up to 64 NETCOMM NS4540 can be serially linked in one system. Therefore each dome is addressed by ID switch located at the base of the NETCOMM NS4540. Below is the address settings for camera 1~64: NetComm NS4540 Dome Camera User Guide 12 YML7** Rev1 www.netcomm.com.
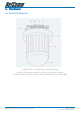
3. Installation 3-1 Indoor Installation Structural Drawing YML7** Rev1 www.netcomm.com.
3-2 Outdoor Installation Structural Drawing (Pendant Mounting) NetComm NS4540 Dome Camera User Guide 14 YML7** Rev1 www.netcomm.com.
3-3 Embedded Mounting (False Ceiling) Note: After dome cover is attached, use glass-cleaning cloth to clean dome cover. An unclean dome cover may affect camera performance. YML7** Rev1 www.netcomm.com.
NetComm NS4540 Dome Camera User Guide 16 YML7** Rev1 www.netcomm.com.
YML7** Rev1 www.netcomm.com.
3-4 Attached Mounting (Fixed Ceiling) NetComm NS4540 Dome Camera User Guide 18 YML7** Rev1 www.netcomm.com.
YML7** Rev1 www.netcomm.com.
NetComm NS4540 Dome Camera User Guide 20 YML7** Rev1 www.netcomm.com.
YML7** Rev1 www.netcomm.com.
NetComm NS4540 Dome Camera User Guide 22 YML7** Rev1 www.netcomm.com.
3-5 Pendant Mounting (External Housing) Note: When NETCOMM NS4540 is installed inside outdoor housing, please don't attach dome cover; doing so may affect camera performance. YML7** Rev1 www.netcomm.com.
NetComm NS4540 Dome Camera User Guide 24 YML7** Rev1 www.netcomm.com.
4. Configuring your Camera 4-1 Preparation before IP Assignment: Always consult your network administrator before assigning an IP address from your server. Make sure the NETCOMM NS4540 is powered on and correctly connected to the network. Obtain an IP address not used yet from your network administrator. MAC Address: Each NETCOMM NS4540 has a unique Ethernet address (MAC address) shown on the bottom of the NETCOMM NS4540 as the serial number (S/N) with 12 digits (e.g. 000429-XXXXXX).
3. Enter command shall get constant reply after 3~4 timeouts, then press CTRL-C to exit pinging. ■ In DOS, enter "ping -t 192.168.0.200" ■ C:\>arp -s 192.168.0.200 00-04-29-00-01-50 C:\>ping -t 192.168.0.200 Pinging 192.168.0.200 with 32 bytes of data: Request timed out. Request timed out. Request timed out. Reply from 192.168.0.
4-3 Assign IP by IP Installer NETCOMM IP Installer is a Windows 98/ME/NT/2000 program. It is the software application that proves an easier way for the setting of IP address and network configuration of NETCOMM 's NDC. By using this tool, you can easily set multiple NETCOMM NS4540s at the same time with the batch setting function. By utilizing the IP Installer, the setting process is largely simplified and the setting time is effectively shortened.
4-3-3 Assign an IP Address to NETCOMM NS4540 Select the MAC Address of your NETCOMM NS4540 in the list. The MAC Address is identical to the unit's S/N (Serial Number). And click the menu bar View/Property to open the Property Page for the selected item. After filling in the properties, click the OK button to submit the settings for the unit and the settings will be activated immediately. NetComm NS4540 Dome Camera User Guide 28 YML7** Rev1 www.netcomm.com.
4-4 Verify the IP Address and Open the Home Page To access the Home Page of the selected unit, run the View/Open Web on the menu bar. If you find your browser is opened and automatically connected to the NETCOMM NS4540 Home Page, it means you've assigned an IP Address to the unit successfully. Now you can close the IP Installer and start to use your NETCOMM NS4540.
The NETCOMM NS4540 can support Microsoft Internet Explorer and Netscape. But the voice feature can only be run under Microsoft Internet Explorer. When browsing the Home Page the first time with Microsoft Internet Explorer, you must temporarily lower your security settings to perform a one-time-only installation of NETCOMM 's ActiveX component onto your workstation, as described below.
5. NETCOMM NS4540 Homepages' Usage Overview 5-1 To Browse NETCOMM NS4540 Live Video From Homepage Start your Web browser and enter the URL?e.g.,"http://61.220.235.172"? in the Address field. The Home page of the NETCOMM NS4540 is now displayed: ■ Video Size - You can adjust the video size and appearance on the screen with the following sizes.
5-2 Configuration Page The Configurations of the NETCOMM NS4540 are now presented as links in the margin of the Configuration Page. Simply click the relevant link for the settings you want to configure. Server Configurations Functions Description General Set various information about the server name and the language type, etc. User Create and delete users and passwords. Clock Set the product Date and Time.
I/O Configurations Functions Description GPIO General Purpose Input / Output. These are for event triggers and actions PTZ Device To control the PTZ device and set the preset points. Video Configurations Functions Description Time Stamp Show time and text on the video. Quality Adjust the video quality and compression level. Event Configurations Functions Description Motion Create and enable in-picture motion detection windows.
6. NETCOMM NS4540 Configurations Setting 6-1. Server Configuration 6-1-1 Server General Settings Owner: Specify server owner. Owner Email: IF Return mail address when using SMTP mail delivery is not specified correctly, some security SMTP servers may reject the delivery of this mail. MAC Address: Display MAC addresses information for this NETCOMM NS4540. It's read only. Firmware Version: Display firmware version information. Language: Alternative language option.
■ "Restricted User" is the user in User Configuration without administration permission. The user can be configured to have limited permission to see video, for example, "capable of changing video size, etc". ■ "Administrator User" is the user in User Configuration with administration permission. The user has all permission to operate the NETCOMM NS4540, such as managing, configuring, and upgrading the software.
6-1-3 Clock Setting The built-in real-time clock of NETCOMM NS4540 provides accurate date/time for the system even when the power is off. For different time zones or long periods of operation, you may need to adjust the clock --- simply enter Time and Date information then click Submit. Click "Set as PC clock" button to set the date/time of the NETCOMM NS4540 as your PC's. Click "Save Changes" button to save data changes in NETCOMM NS4540 before power off.
6-2 Network Setting 6-2-1 Network General Settings IP Address: NETCOMM NS4540 IP address Subnet Mask: Subnet mask of your LAN. Note that the IP Address above and Gateway IP Address below should be in the same subnet. DNS IP Address: Domain name server information is to allow NETCOMM NS4540 to contact an external server with mnemonic domain name (e.g. ftp.NETCOMM.com) instead of numeric IP address (e.g. 168.95.1.1).
6-2-2 SMTP Settings Sender's Email Address: Your E-mail address. SMTP Server Address: SMTP server IP address. Authentication: If the SMTP Server has enabled authentication function. You have to fill in the User Name and Password to pass through the authentication. 6-2-3 DHCP Settings DHCP Settings: If there is a DHCP server installed on your LAN, you can enable DHCP to automatically obtain network settings such as IP address, subnet mask, default gateway, and DNS servers.
Upload Path: Path to put the file. IP Notification by E-mail: With this option enabled, your NETCOMM NS4540 will send Email to you as soon as it obtains the IP address from the DHCP server. Recipient: Your E-mail address. Message subject: Subject of this E-mail. 6-2-4 DDNS Setting The DDNS (Dynamic Domain Name Service) is used when users want to access NETCOMM NS4540 with an easy memorized name such as http://demo.ddns.NetComm .com instead of http://61.220.235.172.
Note: The NETCOMM DDNS service is proprietary, which only works with NETCOMM DDNS server and NETCOMM brands o f products. Dynamic DNS Activate: Click on to activate NETCOMM DDNS service. Dynamic DNS Address: Specify address of NETCOMM DDNS server, and the default is "ddns.NetComm .com" Dynamic DNS Port: Specify NETCOMM DDNS server listen port, and the default is "80" Router Incoming Port: Specify your router listen port for NETCOMM DDNS server to redirect.
6-3 I / O Configuration 6-3-1 GPIO Input Status Display the GPIO (General Purpose Input) status. The GPIO Terminal Block / MINI DIN provide control signal input, which includes four GPIO inputs as Relay function. 6-3-2 PTZ Settings YML7** Rev1 www.netcomm.com.
6-4 Video Setting 6-4-1 Time Stamp Display Time Stamp & Text over the video just click on these check boxes. Display Time check box: Display the Time Stamp. Display Text check box: Display text block. Fill in the text string to display. The valid characters are a - z, A - Z, 0 - 9, !, @, #, $, %, &, *, (, and ). To change the location of Time/Text, just fill in the X and Y coordinate. Note: The maximum display block area (Time + Text) are 12X4 characters.
6-4-2 Video Adjustment The NETCOMM NS4540 is capable of detecting NTSC/PAL automatically, video signal active/ lose, fully automatic (plug & see) and does not need any user configuration. Quality Adjustments: To adjust video contrast, brightness, hue, color saturation, and quality. Note that the quality level affects compression ratio and file size of video.
6-5 Event Management 6-5-1 Motion Area Selection Motion Detection Region Selection: Move the mouse to the regions in video window with white blocks to determine the motion trigger areas. After setting with clicking the left button of the mouse, the selected areas will be turned to red blocks NetComm NS4540 Dome Camera User Guide 44 YML7** Rev1 www.netcomm.com.
6-5-2 Event Edit Application developers wish to have different levels of customization within their own applications. They may build this through the event manager, the event system provides several trigger sources and action types which allow administrators to record the emergency images, such as Motion detection, IO control, FTP or EMAIL to outside world. It's easy to process --- just fill and submit a simple form.
Save Script: Command to save and parse current scripts in the "Event Script Edit" window. If any syntax errors are detected, the error message, indicating the starting position of syntax error, will be shown in the "Message" window. Event Auto Start when Power On: The flag is to set the event script auto start-up when the system is powered on. Note: Any changes in "Event Script Edit" window you must "Save Script" before "Start Script"; otherwise, the new changes will be lost and will not take effective.
Appendix A - Specifications Operational Manual Pan/ Tilt Speed 0.18~ 180 /sec (8 stages) Preset Position Pan/ Tilt Speed 1 ~255 /sec Preset Position Dwell Time 1 ~ 255 /secretary Recall Preset Position Pan/ Tilt Speed 360 /sec 180 Instant Flip Rotation Speed 360 /sec Pan Rotation 360 Continuous Tilt Rotation -5 ? ~ +95 Pan/ Tilt Accuracy ±0.
White Balance .17X / 22X : Auto / Outdoor / Indoor 25X : 2 Auto mode / Outdoor / Indoor Video Output CVBS 1.0Vpp 75? Optical Lens 22X Lens Focal Length f = 3.9~86mm 22X Lens Aperture Max F1.6 (wide) ~ F3.6 (telephoto) 22X Horizontal View Angle 50.9 (wide) / 2.4 (telephoto) Focus Control 22X : Auto / Manual Iris Control 22X : Auto / Manual Zoom In/ Out Manual Control Zoom In/ Out Accuracy .
Appendix B - Upgrading the Software NETCOMM NS4540 software is contained in Flash Memory, a silicon chip allows it to be erased and re-written. It provides an easy way to update the software without changing any parts; just simply load the newest software from the network. The following procedures are to update the software: Check software version Enter URL "http:///ver" in your web browser, which will show you the software version. Example: enter "http://192.168.0.
5. Upload the software into NETCOMM NS4540 by FTP "put" command. In FTP session window, enter "put flash.bin" In FTP session window, enter "bye" to quit FTP session. 6. FTP session may freeze for around 1 minute to transfer and automatically upgrade the software. During that time, ping the NETCOMM NS4540 until get a constant reply, which means system had completed upgrading and rebooting, then open the browser to verify the software version been updated.
Appendix C - Update custom web pages NETCOMM NS4540 has a built-in web server, so the web contents are contained in Flash Memory, the same as software parts, allowing erasure and re-write. It provides an easy way to update the web pages --- just simply load and issue command from network (FTP and Telnet). Caution: The update of content page is very sensitive to system operation; therefore, incorrect operation may cause system fail to response to any request.
4) Verify updated contents After uploading the custom pages, open browser to verify the correctness of contents. If not correct, modify the pages and return to previous step to upload again. 5) Save the changes to flash Telnet to the NETCOMM NS4540. And run command "Up -w" to write the complete web pages into flash. The detailed procedures are list as below, 1. Open DOS window 2. Enter "telnet " 3. Enter "root" and "pass" as username and password 4.
Appendix D - Emergency Factory Default In certain circumstance, to restore the server to initial factory default state may be necessary, normally processed through web page (Miscellaneous Operation). If the user can't get into web page (e.g. Missing of Username and Password information), then he/she could use Emergency Factory Default to restore the factory default. Procedures as below: 1. Turn the power off 2. Connect GPIO Input 4 to GND with small wire or switch. 3. Turn the power on.
Appendix E - Trouble Shooting Trouble Shooting 1 No Power 1.1 Check power input connection 1.2 Check fuse on the PCB 1.3 Check connection between camera body and base 2 No Video 2.1 Check camera video output on camera 2.2 Check cable (damaged cable) 2.3 Check video input connection on monitor 2.4 Check 20PIN connection between camera body and base 3 No Telemetry 3.1 Check camera ID switch setting 3.2 Check RS-485 cable IN/OUT connection on camera 3.3 Check RS-485 cable IN/OUT connection on keyboard 3.
Appendix F - Registering your NetComm Product All NetComm Limited (“NetComm”) products have a standard 12 month warranty from date of purchase against defects in manufacturing and that the products will operate in accordance with the specifications outlined in the User Guide. However some products have an extended warranty option (please refer to packaging).
Customer Information ACA (Australian Communications Authority) requires you to be aware of the following information and warnings in relation to the purchased product:“ (I) This unit shall be connected to the Telecommunication Network through a line cord which meets the requirements of the ACA TSOOS Standard.“ (2) This equipment has been tested and found to comply with the Standards for C-Tick and or A-Tick as set by the ACA.
Warranty Where the Customer (you) is a consumer as defined by any relevant law such as the Trade Practices Act 1974 (Commonwealth) and similar State laws, certain conditions and warranties (“the consumer warranties”) cannot be excluded, restricted or modified. You then have the benefit of both the consumer warranties and any other warranty that may be provided by the Company or by the manufacturer of the goods. To the extent permitted by Law, all implied warranties and conditions are excluded.
The warranty is void if: 1. You, or someone else, use the product, or attempt to use it, other than as specified by NetComm; 2. The fault or defect in your product is the result of a voltage surge subjected to the product either by the way of power supply or communication line, whether caused by thunderstorm activity or any other cause(s); 3. The fault is the result of accidental damage or damage in transit, including but not limited to liquid spillage; 4.