Enterprise Edge Attendant Console User Guide 1-800-4 NORTEL www.nortelnetworks.
Contents Chapter 1 Introduction to Enterprise Edge Attendant Console 7 About this guide 8 Conventions 8 Naming of window components 8 Using the keyboard to navigate Enterprise Edge Attendant Console 8 Processing a call with right-click capability 10 References 10 Chapter 2 Understanding Enterprise Edge Attendant Console 11 Server component 11 Attendant component 11 Reports component 12 Enterprise Edge Attendant Console features 12 Easy to use, time saving Graphical User Interface (GUI) 12 Advanced softwa
Contents Using the menu bar 28 File menu 28 Edit menu 28 View menu 29 Tools menu 29 Transfer menu 30 Caller menu 31 Target menu 32 Attendant menu 32 Help menu 33 Using the toolbar 33 Using Caller Information options 35 Using the call processing area 37 Using the Directory options 38 Search and edit functions in the Directory options 38 Directory list 41 Chapter 5 Handling calls 45 Answering calls as an attendant 45 Finding the called person’s extension and placing it in the Target list box 47 Using the
Contents 5 Chapter 6 Maintaining caller and employee information 63 Maintaining caller information 63 Creating a new caller record 63 Finding and editing caller information 66 Maintaining employee information 67 Working with the Directory list 68 Finding an employee record 68 Editing employee information 70 Chapter 7 Generating reports 75 Report types 75 Calls by Customers report 75 Calls to Employees report 75 Extension Directory report 76 Working with the Reports window 76 Database box 76 Information
Contents Enterprise Edge Attendant Console User Guide P0908544 Issue 01
Introduction to Enterprise Edge Attendant Console 1 Enterprise Edge Attendant Console is an application that provides centralized call management and call activity reporting capability to a business. Enterprise Edge Enterprise Edge Attendant Console runs on one or more Pentium® Class personal computers (PCs). You can customize the way Enterprise Edge Attendant Console is set up to suit your company’s call management requirements.
Introduction to Enterprise Edge Attendant Console About this guide This document describes how Enterprise Edge Enterprise Edge Attendant Console works and how to use it in your company. The instructions in this guide are intended for experienced PC users.
Introduction to Enterprise Edge Attendant Console 9 Access keys In Enterprise Edge Attendant Console, each menu name and each command in the menu has an underlined letter called an Access key. To use the Access keys: 1. Press and release the Alt key. This gives you access to the menu names in the menu bar. 2. Press the Access key for the menu name and release it. For example, to open the Edit menu, press Alt then E and the Edit menu is displayed. 3. Press the Access key for the desired command.
Introduction to Enterprise Edge Attendant Console Processing a call with right-click capability Right-click capability helps you process calls faster by minimizing mouse movement. You can use right-click capability for these call processing options: • • • • • • • originate a call transfer a call screened transfer transfer a call to voice message mailbox link transfer park a call and page an employee camp a call on an extension To use right-click capability: 1.
Understanding Enterprise Edge Attendant Console 2 Enterprise Edge Attendant Console is a client/Enterprise Edge server software application that consists of the following three interrelated components: • Server component. Refer to Server component on page 11 • Attendant component. Refer to Attendant component on page 11 • Reports component.
Understanding Enterprise Edge Attendant Console Reports component The Reports component provides information about incoming calls to your company. Reports can help you identify trends and find answers to questions before they become problems. You can request a report from any PC with an Attendant component and view the report in the Reports window or print it on an attached printer.
Understanding Enterprise Edge Attendant Console 13 Overflow attendant Overflow calls are transferred to an overflow attendant. Consequently, calls are not lost during busy periods. Reports Enterprise Edge Attendant Console gives you reports that help you obtain information such as the number of incoming calls and who answers the calls. This information shows the calling trends in the business and the performance of the telephone system.
Understanding Enterprise Edge Attendant Console Enterprise Edge Attendant Console User Guide P0908544 Issue 01
Getting started 3 After your Enterprise Edge Attendant Console system is set up and checked by the installer or System Administrator, you can use the Enterprise Edge Attendant Console components. Before you handle calls, make sure you know how to start and quit Enterprise Edge Attendant Console on your PC. For information on starting the components for the first time, refer to Initializing and configuring the Attendant component on page 16.
Getting started Quitting the Attendant component To quit the Attendant component: 1. On the File menu click Exit or on the title bar click the Close box. A message appears asking if you want to quit Enterprise Edge Attendant Console. 2. Click the Yes button. You can also shut down the Attendant component from the Windows taskbar by right-clicking the Enterprise Edge Attendant Console Attendant taskbar button and clicking the Close button.
Getting started 17 5. Click the Close button to see the Enterprise Edge Attendant Console Attendant window. When the setup is complete, the Directory list displays the Enterprise Edge extensions connected to the Enterprise Edge server. Types of attendant setups Each PC that has the Attendant component installed must be set up to handle calls either as a main attendant, overflow attendant, backup attendant or assistant attendant.
Getting started The Attendant component displays all incoming calls to the attendant’s telephone as a yellow Ringing Loop button on the Attendant window. If the attendant’s telephone is programmed to receive all the incoming calls for the company, (that is as a main attendant) Enterprise Edge Attendant Console Attendant displays those calls. Before the attendant can receive and make calls, you must set the attendant’s extension number through the Attendant component.
Getting started 19 To set up the backup attendant: 1. On the Tools menu click Options. The Options dialog box appears with the Options tab open. 1. In the Redirect calls to option in the Extension box, type the backup attendant’s extension number. 2. Click the OK button. The main attendant can redirect their calls to the backup attendant by clicking the Out button. The main attendant can click the In button to resume receiving calls at their PC.
Getting started Assistant attendant setup An assistant attendant provides call coverage for one or more extensions in the system. You can set up an assistant attendant to monitor incoming calls to specific extensions. Set up an assistant attendant if an employee wants an assistant attendant, such as an administrative assistant, to answer the employees’ calls. To set up an assistant attendant: 1. On the Tools menu, click Options. The Options dialog box appears with the Options tab open. 2.
Getting started 21 Setting up other attendant features Call notification There are two ways Enterprise Edge Attendant Console can notify an attendant of incoming calls: • If an attendant keeps the Attendant window minimized and works on other tasks, they are notified of incoming calls with a Call Notification dialog box. The attendant can answer the call by clicking Take on the dialog box or ignore the call and let another attendant answer it.
Getting started Automatically restoring the Attendant window when a call comes in Part-time attendants can have the Attendant window minimized or under another window. The attendant can restore the Attendant window from the taskbar by clicking the Enterprise Edge Attendant Console Attendant taskbar button. A quicker method is to set the Attendant window to restore automatically. The Attendant component can automatically restore the window when the attendant’s extension goes off-hook (“active”).
Getting started 23 Setting Transfer options for the voice message mailbox and linking If your Enterprise Edge server is not connected to a Centrex switch or is not connected to Enterprise Edge Voice Messaging, you can disable the Link Transfer or VM Transfer buttons on the Attendant window. To disable the Transfer Options: 1. On the Tools menu click Options. The Options dialog box appears with the Options tab open. The Transfer Options are in the bottom right of the dialog box. 2.
Getting started Enterprise Edge Attendant Console User Guide P0908544 Issue 01
Using the Attendant window 4 This section explains how to use the buttons and options on the Enterprise Edge Attendant Console Attendant window with the mouse and the keyboard.
Using the Attendant window Menu bar The menu bar is under the title bar and contains the File, Edit, View, Tools, Transfer, Caller, Target, Attendant and Help menus. Use these menus to access Attendant functions. Toolbar The toolbar is under the menu bar and contains several buttons that provide quick and easy access to some Enterprise Edge Attendant Console functions. Loop buttons The Loop buttons on the left of the Attendant window are labeled F1, F2 and so on, and are used to answer calls.
Using the Attendant window 27 Directory list The Directory list is at the bottom of the Attendant window and has three sections: Directory list displays the Name, Extension, Notes and Department of extensions. From the directory list you can select a name and number to appear in the Target list box. The Directory list also shows the telephone status icon and the person status icon for extensions. Note and Status list boxes let you change the status of the employee and include a note for an extension.
Using the Attendant window Using the menu bar The menu bar contains the menus on the Enterprise Edge Attendant Console Attendant window. Help tips appear in the Status bar at the bottom of the Attendant window if you move the mouse pointer over the commands in the menu. File menu The File menu contains: Exit closes the Attendant component. Edit menu The Edit menu contains: Cut cuts selected text from an editable box and moves it to the Clipboard.
Using the Attendant window 29 View menu The View menu contains: Toolbar shows/hides the toolbar. Status Bar shows/hides the Status Bar. Hide Loop Buttons shows/hides the inactive Loop buttons. When selected, only active Loop buttons appear on the Attendant window. Tools menu The Tools menu contains: Reports starts the Reports component.
Using the Attendant window Transfer menu The Transfer menu contains: 1st Contact transfers the active call to the caller’s first contact. 1st Contact is enabled if there is an active call and a contact displayed in the first box of the Contacts list. 2nd Contact transfers the active call to the caller’s second contact. 2nd Contact is enabled if there is an active call and a contact displayed in the second box of the Contacts list.
Using the Attendant window 31 Caller menu The Caller menu contains: Answer Next answers the next call in the queue. Hold places an active call on hold. The Hold button performs the same function. Refer to Parking, holding and screening calls on page 51. Release disconnects the active call. The Release button performs the same function. Park parks the active call so you can page the person whose extension is in the Target list box.
Using the Attendant window Target menu The Target menu contains: Call initiates a call from the attendant extension to the number in the Target list box. The Call button performs the same function. Voice Call places a voice call from the Attendant to the extension in the Target list box. For more information, refer to Contacting employees using Voice Call on page 55. Dial DTMF Tones dials DTMF-tone digits to the external number in the Target list box.
Using the Attendant window 33 Help menu The Help menu contains: Tip of the Day shows or hides the Tip of the Day window when Attendant starts. Attendant Help displays Help files. About Attendant displays program information, revision number, copyright information, and system information. Using the toolbar The toolbar contains several buttons that provide quick and easy access to some of the Enterprise Edge Attendant Console functions. To display the toolbar: 1.
Using the Attendant window Use the View Parked button to display the Parked dialog box, which lists any parked calls. Calls can be parked and retrieved from any Enterprise Edge telephone connected to your Enterprise Edge server. Refer to Parking calls and paging employees on page 51. Use the Voice Call to initiate a call from the attendant’s telephone to the speaker of another telephone without first causing the telephone to ring. Refer to Parking calls and paging employees on page 51.
Using the Attendant window 35 Using Caller Information options Caller Information options are in the top, center of the Attendant window. Caller Information options contain information about the caller that appears in the boxes when you answer a call.
Using the Attendant window The Edit Caller Information dialog box Use the Edit Caller Information dialog box to change or add information about callers. To access the Edit Caller Information dialog box: 1. Below the Caller Information options, click the Edit button. The Edit Caller Information dialog box contains the following boxes: Name list box contains the caller’s name. A first time caller name is the Caller ID name provided by the telephone. company.
Using the Attendant window 37 The following buttons appear in the Edit Caller Information dialog box: saves the caller record displayed in the boxes of the Edit Caller Information dialog box to the database. closes the Edit Caller Information dialog box without saving the changes to the record. opens the Find dialog box in the Edit Caller Information dialog box. creates a blank caller record that you can add information to. creates a new name caller record using an existing caller record.
Using the Attendant window The following buttons are in the call processing area: transfers the active call to the extension number in the Target list box. screens a call transfer of an active call to the extension number in the Target list box. Click the Screen button and the caller is put on hold. The caller is connected to the Target extension when you click Transfer Now in the Screen Transfer dialog box. opens the Page dialog box.
Using the Attendant window 39 changes the caller/Caller ID record to an employee record if an employee calls in from outside. This prevents an employee name from appearing in the caller record related to the Caller ID name/number. finds names of individual employees or groups of employees by department. The Find box finds employee by name. The Department box is finds employees by department. Type the first few letters of the name in the Find box and click the Find button.
Using the Attendant window The Edit Employee Information dialog box This dialog box appears when you click the Edit button in the Directory option. Use the Edit Employee dialog box to change or add information about employees. For further information, refer to Maintaining employee information on page 67.
Using the Attendant window 41 Name list box contains the employee’s name or the extension number if a name is not entered. Voice Mail box displays the voice message mailbox extension of the employee. Voice Mail Box is not editable. Contacts boxes lists the employee’s three most frequently called persons/extensions in the Company. The following buttons appear in the Edit Employee Information dialog box: saves the employee information displayed to the database.
Using the Attendant window BLF displays extensions connected to the Enterprise Edge server, including wireless Companion telephones, Enterprise Edge Voice Messaging extensions and Hunt group extensions. This view displays only the person status icon, telephone status icon and employee name. This allows more extensions to be displayed at once. Assigned displays specific extensions for which an assistant attendant is responsible.
Using the Attendant window 43 The remainder of the columns in the Directory list are labeled as follows: Name the first labeled column on the left, containing the names of employees. Ext contains telephone extensions. Notes displays additional information about the employee that the attendant enters. Notes can be edited only from the Notes list box at the top of the Directory dialog box. Department displays the name of the department to which the employee belongs.
Using the Attendant window Enterprise Edge Attendant Console User Guide P0908544 Issue 01
Handling calls 5 With Enterprise Edge Attendant Console, you can manage calls using either your PC’s mouse or the keyboard. When a call comes in, you can respond to the caller using either the telephone or a headset. Note: You can use a headset so that your hands are free to use your PC. The basic steps in processing an incoming call with Enterprise Edge Attendant Console include: • answering a call. Refer to Answering calls as an attendant on page 45.
Handling calls A new incoming call appears as yellow Loop button that displays the word Ringing. Information about the call appears beside the Loop button to assist you with personalized call processing: • the function key name above the Loop button, (F1 in the example) shows the key on the PC keyboard that relates to the ringing Loop button. • the timer above the Loop button shows in minutes and seconds how long the call is active.
Handling calls 47 2. Answer the call with your company greeting and determine from the caller to whom they wish to speak. If you are answering a call from this number or company for the first time, you can enter caller information. For further information, refer to The Edit Caller Information dialog box on page 36. If you are not, refer to Finding the called person’s extension and placing it in the Target list box on page 47. To release or hang up a call: 1. Click the Release button.
Handling calls Using the Directory tab views The tab views in the Directory dialog box contains various views of extensions. To search by Extension or Name: 1. Click the Full, BLF, Assigned or Selected tab. 2. Click the extension, the name or the department of the employee being called in the list. The name or extension number now appears in the Target list box. 3. Click the Transfer button. Using the Directory Find box Use the Directory Find box to search by name.
Handling calls 49 Using the Department list box You can search for a name by department from the Full tab using the Department list box. To search by department: 1. Click the arrow of the Department list box. A list of departments associated with extensions appears in the list. Note: Department names for each extension are created in the Edit Employee Information dialog box. 2. Click a department name from the list and the department name appears in the Department box. 3. Click the Find button.
Handling calls To transfer using the Contacts box: 1. Double-click the telephone status icon to the right of the Contacts box. The call transfers to the displayed extension. To transfer using the Target list box: 1. Make sure the extension in the Target list box is correct. Double-click the telephone status icon to the right of the Target list box or click the Transfer button. You can also click the Target list box and press the Enter key on the keyboard. The call transfers to the displayed extension.
Handling calls 51 To transfer a call to an outside number: 1. With an active incoming call on Enterprise Edge Attendant Console, in the Target list box type an outside telephone number. 2. Click the Link Transfer button. The Loop button label shows Active, and the number in the Target list box is tone dialed. 3. Click the Release button and the incoming call transfers to the outside telephone number. The Attendant disconnects from the call and the Loop button becomes idle.
Handling calls . 3. Click a call in the Parked calls list and then click the appropriate zone in the Page zones list. 4. Click the Page button. The Console Message box appears and the speakers on the telephones in the selected zone emit a low-level audible tone. 5. Speak into the headset or handset, depending on your setup. When you are finished, click the OK button.
Handling calls 53 To retrieve a parked call: 1. On the Caller menu, click View Parked Calls. The Parked Calls dialog box appears. 2. In the Parked Calls list click the parked call. 3. Click the Retrieve button. or 1. On the toolbar, click . 2. In the Parked Calls list select the parked call. 3. Click the Retrieve button. To view all parked calls that are still in park: 1. On the Caller menu, click View Parked Calls.
Handling calls Placing and retrieving calls on hold Calls can be placed on Hold and retrieved quickly. To put an incoming call on hold: 1. Click the Ringing Loop button. 2. Click the Hold button or click another Ringing Loop button. The previous call is put on hold. When the active call is placed on hold, the Loop button label changes to Hold and the Loop button color changes to blue. To place a call on Hold at an active extension: 1.
Handling calls 55 Screening calls You can screen calls by talking with the employee and asking whether they want to talk to the caller. To screen/transfer a call: 1. Click the Screen button. The active call goes on hold. The Loop button changes color to blue. The extension rings and the Screened Transfer dialog box appears. 2. Ask the person being called if they can take the call. If the answer is yes click the Transfer Now button and the call transfers. If the answer is no follow steps 3 to 5. 3.
Handling calls Linking and Joining calls Using Enterprise Edge Attendant Console, you can link calls to create conference calls or have callers join existing calls to also create conference calls. Note: Use the DTMF button to transfer or link calls on Centrex lines. To use the DTMF button with an active incoming call on a Loop button: 1. On the toolbar click . The active incoming call is placed on hold. 2. In the Target list box type an outside telephone number. 3. On the toolbar click .
Handling calls 57 Handling a callback call There are two types of calls that return to Enterprise Edge Attendant Console: • a call that is not answered at the extension to which it was transferred • a call that the called person returns to you for attendant handling Responding to a callback that an extension did not answer A callback can be a call that is sent to an extension, or a call that is not answered and returns to you.
Handling calls To respond to a Callback call that a called party returned: 1. Click the Callback button. The Caller Information list box shows the information originally displayed. 2. Advise the caller according to the pre-set message that appears. To process a hold call: 1. Advise the caller that the employee requests that they hold. 2. In the Target list box enter the employee’s extension. 3. Click the Camp On button. The call is camped to the called employee’s extension.
Handling calls 59 Making a call from the attendant’s extension As the attendant, you can call any extension in the company and any outside number. The telephone number you type in the Target list box does not require special characters such as a hyphen, a parenthesis, a blank space or a comma (special characters are ignored).
Handling calls Managing calls at the employee’s telephone Enterprise Edge Attendant Console has features that let employees manage their calls from their telephones. After a call is routed to an extension, a low-level audible tone alerts the called person they have an incoming call, even if they are on their telephone. The name of the caller appears in the display area of the called party’s telephone for a few seconds.
Handling calls 61 To send the caller to Enterprise Edge Voice Messaging: 1. Press the VM display button on the telephone. The call automatically transfers to the called person’s voice message mailbox. To join the caller with another call: 1. Press the Join display button to conference the caller in with your current call. The called person can see the caller’s name or Caller ID name in the display area of the Enterprise Edge telephone and decide whether to join the caller with the current call.
Handling calls Enterprise Edge Attendant Console User Guide P0908544 Issue 01
Maintaining caller and employee information 6 Enterprise Edge Attendant Console manages both caller and employee information. Maintaining caller information When your company is called, information about the caller from the Enterprise Edge Attendant Console database appears in the Caller Information list box of the Attendant window.
Maintaining caller and employee information To create a new caller record from an active call: 1. Click the Ringing Loop button to answer the incoming call. Information in the database about the caller appears in the Caller Information list box on the Attendant window. 2. In the Caller Information list box click Edit. The Edit Caller Information dialog box appears. 3. Click the New Caller button.
Maintaining caller and employee information 65 • transferring the call to Enterprise Edge Voice Messaging. Refer to Transferring a call on page 49. • parking the call and paging the called party. Refer to Parking calls and paging employees on page 51. To create a new name caller record from an existing caller record: 1. On the Attendant window, in the Caller Information options, click the Edit button. The Edit Caller Information dialog box appears. 2. Click the New Caller button.
Maintaining caller and employee information 3. In the Name box type the name of another caller from the same company and click the OK button. 4. Click New Name and the Name box is cleared. The other boxes are unaltered. 5. Type the new caller’s name. 6. Click the Save button. The record is now saved in the database. 7. Click the Close button. Note: If you click the Close button without first clicking the Save button, the Edit Caller Information dialog box closes without saving any changes.
Maintaining caller and employee information 67 To edit a caller’s record: 1. Make sure the caller name you want to edit appears in the Edit Caller Information dialog box. Click the box you want to edit and make the change. Repeat if needed. 2. Click the Save button to save the changes to the database. 3. Click the Close button to close the Edit Caller Information dialog box.
Maintaining caller and employee information Working with the Directory list Information in the Directory list appears in ascending order (for example, 1 to 9 or A to Z), and sorting is based on the contents of only one column at a time. If there are different forms of information in the same columns, priority is given in the following order: no information entered (blank), numeric then alphabetic.
Maintaining caller and employee information 69 To search by name: 1. In the Attendant window, in the Directory options, click the Edit button. The Edit Employee Information dialog box appears. For more information, refer to The Edit Employee Information dialog box on page 40. 2. Click the Find button. The Find dialog box appears. 3. In the Name box, type the first letter or letters of the employee’s last name.
Maintaining caller and employee information To search for an individual in a department: 1. From the Department box select a department. 2. In the Find box type the person’s name. 3. Click the Find button. Any extensions that match the name in the department appear in a list in the Full tab Directory view. Resetting the Full tab view You can reset the Full tab view to the default display. To reset the Full tab view: 1. In the Directory options, click the Show All button.
Maintaining caller and employee information 71 To change the Person status of an extension: 1. In any of the Directory views (Full, BLF, Assigned or Selected), click the extension. 2. From the Status list box select None, Not at desk or Out of office. The status you choose appears as an icon in the Directory view to the left of the extension Name. There is no icon for None. Instead, a blank space appears next to the person’s telephone status if you select it.
Maintaining caller and employee information Adding notes to employee records You can add a note to an employee record by selecting a note from a list or typing a personal note. The note appears in the Notes column under Directory in the Attendant window. To select from the list of notes: 1. Click an extension number in the Full, Assigned or Selected Directory views. 2. From the Note list box, click the applicable note. The note appears in the Directory list’s Notes column. To type a note: 1.
Maintaining caller and employee information 73 To save employee edit changes: 1. In the Edit Employee Information dialog box click the Save button. The changes made to the boxes in the Edit Employee Information dialog box for the employee highlighted in the Directory list are saved to the database. After you click the Save button, the Edit Employee Information dialog box remains open. To close the Edit Employee Information dialog box without saving changes: 1. Click the Close button.
Maintaining caller and employee information Enterprise Edge Attendant Console User Guide P0908544 Issue 01
Generating reports 7 Enterprise Edge Attendant Console automatically collects information about incoming calls and tracks how calls are processed. Use the information from the Reports component to help spot trends and prevent problems. You can use the caller-related information in Reports to: • increase sales opportunities • improve productivity • lower expenses • streamline operations For example, the report Calls by Customer shows how callers from your company’s top customers are handled.
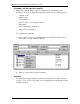
Generating reports Extension Directory report The Extension Directory report lists the employees who are in the Enterprise Edge Attendant Console database and the information in their call record. Working with the Reports window To open the Reports window: 1. On the Attendant window click Tools and then click Reports. The Reports window opens. The Reports window contains the Database, Information, Period, Employees and Customers list boxes and a report viewing area.
Generating reports 77 Period list box Note: The Period list box is active if: • you select a valid database and • you select a Report Type requires you to define a Report Period. opens the One Week dialog box from which you can specify a report period with a duration of one week (Sunday through Saturday). opens the One Month dialog box. This dialog box lets you select a one-month Report Period. shows the date of the beginning of the report period.
Generating reports Employees and Customers options Use these options to define customers or employees to generate a report for. The Employees and Customer options contain generates a report that includes data for members of the selected category (Employees or Customers). generates a report that includes data for the members in the list box. If you click the Select option, the button under the selection list box (labeled either Customer or Employee) becomes available so you can make your selection.
Generating reports 79 Creating and viewing reports Use the Reports component to generate quality reports for analyzing telephone use at your organization.
Generating reports Selecting a report type After you load a database, decide what type of report to produce. To select a report type: 1. From the Report Type list box select your report. Setting the report period Some reports require a report period. The report period defines the time span for which data is considered. If you choose a report type that does not require a report period, the Period list box is inactive. The report period begins on the From date and ends on and includes the To date.
Generating reports 81 To specify a report of one week: 1. Click the One Week button. The One Week dialog box appears. 2. In the month list box, choose the month that the desired week starts or ends. 3. In the year list box, select the year the week occurs in. You can type the year box or use the arrows. 4. In the list of weeks select a week and click the OK button, or double-click the desired week. After you select a week, the start and end dates of the week appear in the From and To boxes.
Generating reports Selecting employees and customers for the report Some report types, especially those that deal with call data, allow you to choose sets of employees, customers, or both, for which the data is summarized in the report. Reports make categories available that are appropriate to the type of report that you chose. If your Report Type does not need or allow these selections, the Employees and Customers options remain inactive and you can go to the next step.
Generating reports 83 Create Report button When all the data needed to create a report is provided in the other report controls, the Create Report button is available. To create a report: 1. Click the Create Report button. This starts the report generation process. The Reporting animated icon appears, indicating that the report is running. The icon stops when the report is complete. Note: You cannot close the application while it is running.
Generating reports Printing a report When a report is in the Report Viewing area, the Print button becomes available. To print a report: 1. Click the Print button. The report prints to the default printer. You can change default printer from the Printers folder. Access the Printers folder from the Windows Start menu or Control Panel. Refer to Enterprise Edge Attendant Console Help for further information. 2. Choose the pages and number of copies of the report to print. 3.
Glossary Assistant attendant The assistant attendant is the telephone attendant who provides call coverage for specific employees. Backup attendant The Backup attendant receives calls when the main attendant is not available. The main attendant uses the Out button on the Attendant main window to direct calls to the backup attendant. BLF (Busy Lamp Field) Busy Lamp Field is one of the Directory list tab views. It displays the phone status and extensions of employees. CF Call Forward.
Glossary Enterprise Edge server The telephone system that Enterprise Edge Attendant Console works with. External call An external call is a call that originates from outside your company’s voice message mailbox system. Hookflash This is the signal that occurs when a telephone goes on-hook followed by off-hook. Hunt Group A Hunt Group is a group of telephones that can be called by a single number. Hunt Groups are configured in your Enterprise Edge server. ID Identification.
Glossary 87 Stand-alone model A stand-alone model is a Enterprise Edge Attendant Console system in which one attendant manages a business’s incoming calls. There are no assistant attendants, backup attendants or overflow attendants in a stand-alone model. Target extension A target extension is the extension number to which you are directing a call. VM Voice mail or voice message mailbox.
Glossary Enterprise Edge Attendant Console User Guide P0908544 Issue 01
Index Numerics Backup attendant 12, 18 BLF tab view 68 Blue Loop button 34 Call Forwarded 42 Call Notification dialog box 21 Call overflow occurs 19 Call processing area 26 Call button 38 Camp On button 38 Link Transfer button 38 Page button 38 Screen button 38 Transfer button 38 using 37 VMTransfer button 38 Callback 34 Caller Information 28 Caller information finding and editing 66 Caller Information options 26 Edit button 35 Hold button 35 Park/Page button 35 Release button 35 Caller menu 31 Caller rec
Index Directory list 17, 27, 41, 68 Department column 43 employee information 42 Ext column 43 extension information 42 Name column 43 Notes column 43 sorting information 43 Directory list tab views 41, 42, 48 BLF tab view 42 Full 41 Selected 42 Disable Link Transfer 23 Disable VM Transfer 23 Do Not Disturb 42 DTMF button 33 E Edit Caller Information dialog box 36 Caller ID Name 36 Caller ID Number 36 Caller Type 36 Close button 37 Company box 36 Contacts 36 Delete Caller button 37 Find button 37 Name b
Index 91 M R Main attendant, full-time 17 Maintaining caller information 63 Maintaining employee information 67 Making a call from the attendant’s extension 59 Managing calls at the employee’s telephone 60 Managing calls using telephone display buttons 60 Menu bar 26 using 28 Menus available from the main window 26 My Extension 18 My extension rings 21 Record Number box 40 Red Loop button 34 Redirect calls to 19 Release 31 Release button 35 Reports 29 All button 78 calls by customers 75 calls to employe
Index Telephone display buttons Assist 61 Hold 60 IntAct 61 Join 61 Next 60 Talk 60 VM 61 telephone status icon call forward 42 do not disturb 42 off-hook 42 on-hook 42 Tip of the Day 33 Tip of the Day dialog box 16 Title bar 25 Toolbar 26, 29 using 33 Tools 22 Tools menu 29 Transfer menu 30 Transfer Options 23 Transfer Paste 28 Transfer to Target 30 Transfer to VMail 30 Type box 40 Types of attendant setups 17 U Using the Contacts boxes 47 Using the Department box 49 Using the Directory Find box 48 Usi