Firmware Upgrade Instructions for the BayStack 100-series Hubs Part No.
1996 by Bay Networks, Inc. All rights reserved. Trademarks Bay Networks, Bay Networks Press, BaySecure, and BayStack are trademarks of Bay Networks, Inc. Other brand and product names are registered trademarks or trademarks of their respective holders. Statement of Conditions In the interest of improving internal design, operational function, and/or reliability, Bay Networks, Inc. reserves the right to make changes to the products described in this document without notice. Bay Networks, Inc.
Introduction This publication explains how to upgrade the firmware in a BayStack 100-series hub using the BayStack 100-series Hub Revision C Firmware Upgrade Kit. Revision C firmware for the BayStack 100-series hubs was fully implemented across all BayStack 100-series hubs after November 15, 1996.
Firmware Upgrade Instructions for the BayStack 100-series Hubs Package Contents This firmware upgrade kit contains the following items: • Programmable read-only memory (PROM) chip • These upgrade instructions Required Tools and Materials To replace the 100-series hub firmware, you need the following tools: 2 • A #1 Phillips screwdriver to remove the cover from the 100-series hub • An industry-approved IC extraction tool or equivalent to extract the PROM from its socket on the 100-series hub mother
Upgrading the Firmware Upgrading the Firmware The 100-series hub firmware resides on a PROM chip located on the motherboard in the 100-series hub. Upgrading the existing firmware requires you to replace the existing PROM with the PROM in this upgrade kit.
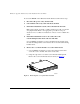
Firmware Upgrade Instructions for the BayStack 100-series Hubs To access the PROM on the 100-series hub motherboard, follow these steps: 1. Disconnect the power cord(s) from the hub. 2. Label and disconnect any cables attached to the hub. 3. If the hub is installed in a stack, remove the hub from the stack. Hubs can be placed on a shelf or a table, mounted on a wall, or located in an equipment rack.
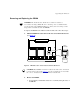
Upgrading the Firmware Removing and Replacing the PROM CAUTION: The motherboard contains devices that are sensitive to electrostatic discharge (ESD). Be sure to discharge any accumulated static electricity and to follow ESD handling procedures (such as wearing a wrist strap) when you handle boards and PROMs. To replace the PROM on the 100-series hub motherboard, follow these steps: 1. Find the PROM in location U17 on the 100-series hub motherboard (see Figure 2).
Firmware Upgrade Instructions for the BayStack 100-series Hubs CAUTION: Be careful that the extraction tool you use does not bend or put pressure on the chips adjacent to the PROM socket. b. With the extraction tool in place, pull straight up on the PROM until it disengages from its socket. NOTE: Do not force the PROM out of its socket. If the PROM is difficult to remove, gently wiggle the PROM back and forth a few times to loosen the teeth, being careful not to damage the PROM socket.
Upgrading the Firmware Verifying the Installation After you have replaced the PROM, Bay Networks recommends applying power to the hub to verify that it is operational before reinstalling the hub in the network. To verify the installation, follow these steps: 1. Connect the AC power cord to the hub, and check the Pwr and Stat LEDs on the front panel of the hub.
Firmware Upgrade Instructions for the BayStack 100-series Hubs 2. Disconnect AC power and reinstall the hub in the stack. Refer to the appropriate procedure in Using the BayStack 100-series Hubs for instructions on how to install a hub. Ordering Bay Networks Publications To purchase additional copies of this document or other Bay Networks publications, order by part number from Bay Networks Press at the following numbers: • Phone—U.S.