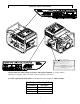
M165939M.2 ITEM NUMBER: 165939 ® SERIAL NUMBER: _____________ Owner’s Manual Instructions for Installation/Set-up, Operation, Servicing, & Storage Portable, Outdoor Use-Only, Triple Fuel Generator 10,500 Watt Continuous (13,000 Watt Surge) Capacity Can be used to power individual appliances plugged directly into the generator’s outlets, or as a back-up connection to a building’s power supply (via a professionally installed UL-approved transfer switch.
Hazard Signal Word Definitions 2
Table of Contents Hazard Signal Word Definitions ................................................................................................. 2 About Your Generator ................................................................................................................. 4 Specifications ................................................................................................................................. 6 Safety Label Locations ........................................................
About Your Generator Thank you for purchasing your NorthStar portable generator! About Your Generator This engine-driven, portable generator is designed to provide up to 8000 Watts of electrical power (10,500 watts continuous, 13,000 watts surge). It can supply power: 1. As a portable power source. You can plug appliances directly into the generator’s electrical outlets. 2. As a back up, standby power source for a building.
About Your Generator (cont’d) This generator is too heavy for one person to lift without mechanical assistance. An optional wheel kit is available from NorthStar and is recommended if you will be moving the generator unassisted. Other optional accessories available from NorthStar include a vinyl cover for storage, UL-approved transfer switches, and extension cords. Contact NorthStar Product Support at 1-800-270-0810 with questions about optional accessories or to order.
Specifications SPECIFICATIONS Item Number Maximum Output Continuous Output: Gasoline Liquid Petroleum Gas (LPG) Natural Gas (NG) Voltage Phase Frequency Regulation Voltage Regulation Power Factor Engine Engine Speed Fuel Type Pressure Range (LPG, NG) Min.
Safety Label Locations WARNING - BATTERY HAZARDS BATTERIES: 1) contain caustic acid, 2) emit explosive gases, 3) can cause electric shock ALWAYS use eye protection. Caustic acid and explosive gases can cause blindness or severe burns. NO smoking, sparks, or flames. NEVER touch both battery terminals at the same time with your hand or any non-insulated tools. FLUSH immediately with water if battery acid contacts eyes, skin, or clothing.
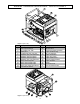
Machine Component Identification - Item #165939M.2 Figure 1 (Ref. 1-19) Ref. 1 2 3 4 5 6 7 8 9 10 11 12 13 14 Description Air Cleaner Gas Cap with Gauge 10.0 Gallon Gas Tank Battery Box LPG/NG-3/4” NPT Gas Inlet 120/240V, 50A, Circuit Breaker 120/240V, 50A Receptacle 120/240V, 30A Receptacle 120/240V, 30A, Circuit Breaker 120V, 30A Receptacle 120V, 30A Circuit Breaker 120V, 20A Circuit Breaker 120V, 20A, Duplex Receptacle Fuel Selector Switch Ref. 15 16 17 18 19 20 21 22 23 24 25 26 27 Figure 2 (Ref.
Machine Component Identification - Item #165939M.2 REFERENCE GUIDE Reference 1 – Air Cleaner Reference 2 – Gas Cap with Gauge Reference 3 – 10.
Machine Component Identification - Item #165939M.
Power Load Planning & Management WARNING NEVER exceed the rated wattage capacity of your generator. OVERLOADING may cause SERIOUS DAMAGE to the generator and attached electrical devices, and may result in fire. Your generator MUST BE SIZED PROPERLY to provide both the running and starting (surge) wattage of the devices you will be powering. Before using your generator, determine the running and starting wattage requirements of all the electrical devices you will be powering simultaneously.
Power Load Planning & Management (cont’d) Device Furnace fan (1/3 HP) Freezer Hair dryer Hand drill (1”) Hand drill (1/2”) Hand drill (3/8”) Hand drill (1/4”) Hedge trimmer Home computer Impact wrench Running Watts 1200 (a) 800 (b) 1200 1100 875 500 250 450 150 500 Device Submersible pump (1-1/2 HP) Submersible pump (1 HP) Submersible pump (1/2 HP) Sump pump Table saw Television Toaster Vacuum cleaner VCR Water Heater Weed trimmer Running Watts 2800 (a) 2000 (a) 1500 (a) 600 (a) 2000 (a) 500 1000 250 70
Installation / Initial Set-Up There are a number of important steps required to set up your generator for initial use. These steps are: Steps for Installation / Initial Set-Up 1. Unpacking & delivery inspection. 2. Planning the power load to stay within the generator’s rated capacity. 3. Getting gas hook-ups installed if natural gas or LP gas will be used as a fuel source. 4. Setting up generator for the type of power generation you need: a. portable power source, or b.
Installation / Initial Set-Up 3. Gas Hook-up Installation for Natural Gas or LPG (if needed) You can power this generator with gasoline, natural gas (NG), or propane (LP) gas. The generator is designed so that it is easy to switch between fuel sources. However, there are special initial hook-up requirements for natural gas and propane: WARNING: If you choose to operate the generator on NG or LPG, you must have the fuel line system installed by a certified gas technician.
Installation / Initial Set-Up ♦ This product is designed to operate at an LPG gas pressure range of 7” to 11” of water column and requires a minimum LPG gas flow rate of 9.33 lb/hr, 2.2 Gal/hr, or 201,718 BTU/hr. Note: All gas cylinders produce gas pressure in excess of 11” water column. Introduction of gas pressure into the generator in excess of 11” water column will permanently damage this product and void the warranty.
Installation / Initial Set-Up 4. Set-up either as a BUILDING BACK-UP or PORTABLE Power Source This generator is designed to provide up to 13,000W of electrical power. It can supply electricity in two ways: 1. As a back up, standby power source for a building. For this application, you must arrange for a licensed electrician to connect the generator to your building’s electrical system via the installation of an UL-approved transfer switch.
Installation / Initial Set-Up The generator cannot power your entire home -- you must work with the installing electrician to determine which devices/appliances you wish to power during an outage. The electrician can help you determine which circuits and devices can be powered simultaneously without overloading the generator. (See the previous section of this manual entitled “Power Load Planning & Management” for more information on load application and selection.
Installation / Initial Set-Up ♦ Extension cords may be used to power devices that are located at a distance from the generator. However, use only UL-listed, outdoor-rated, grounded extension cords of the proper size. Use Table 2 below to choose an adequately sized extension cord according to the amperage of the device being used and the length of the cord. Table 2 Current/Power Maximum Extension Cord Length Amps at Load #10 Ga. #12 Ga. #14 Ga. #16 Ga.
Installation / Initial Set-Up 5. Select a Suitable Site Before using the generator, you must select a suitable OUTDOOR location for installation and operation. This location should meet all of the criteria listed below. WARNING: You must choose a suitable site for operating your generator to avoid equipment damage and/or injury and possible death from carbon monoxide poisoning, electric shock, or fire. Choose a site that meets all of the criteria specified.
Installation / Initial Set-Up • Never place the generator immediately adjacent to a building or other structure – allow at least a 7’ clearance. • Do not run the generator in close proximity to other heat-generating equipment, such as another generator. The combined heat that is generated may raise air temperature in the immediate area and there will not be adequate cooling ventilation. • Do not allow debris to accumulate and block airflow.
Installation / Initial Set-Up 6. Grounding the generator Always ensure the generator is properly grounded to prevent electrical shock. You must always ground the generator by the following method when using the generator as a portable electrical source: 1) Drive a ¾” or 1” copper pipe or rod into the ground close to the generator. The pipe/rod must penetrate moist earth – the depth required will be dictated by local soil conditions. Consult with an electrician.
Installation / Initial Set-Up 7. Battery Installation Your generator’s engine is equipped with an electric starter which requires the installation of a 12volt lawn tractor size battery (Group U1). See the “Specifications” section of this manual for more specific battery requirements for this generator model, such as minimum amperage or CCA rating. The battery is to be supplied by the customer and should be installed in the protective battery box located near the engine.
Operation Once you have set up your generator for use, it is time to start your generator. The following are the procedures necessary for safe, successful operation of your generator. 1. 2. 3. 4. 5. 6. 7. 8.
Operation (cont’d) • • • • • • • • • • • • be done by factory-authorized personnel. External fuel sources. Never attempt to connect external gasoline/diesel sources in order to increase engine run time. Larger tank at pressure or higher elevation will cause gasoline to leak from carburetor during operation. Fire or explosion could result. Malfunction during operation.
Operation (cont’d) Static electricity and filling the gasoline tank: Static electricity can initiate from ungrounded gasoline tanks or containers, from flowing gasoline, and from persons carrying a static electric charge Static electricity can explosively ignite gasoline vapors that are present during the fueling process, resulting in serious burns to nearby persons.
Operation (cont’d) 2. Preparing for Operation Position generator Position generator in accordance with the instructions given in “Installation & Initial Set-up, Step 5: Select a Suitable Site” of this manual. Operate outside only, on dry, level ground with adequate clearance and ventilation. WARNING: Carbon monoxide poisoning hazard Generators give off carbon monoxide exhaust, a poisonous gas that can kill. You CANNOT smell it, see it, or taste it. ONLY run generator OUTDOORS and away from air intakes.
Operation (cont’d) Fill gasoline tank (if using gasoline) Check the gasoline level in the generator’s tank if you will be operating the generator on gasoline. If needed, fill tank with fresh unleaded gasoline from a portable container, after first reading the warnings and instructions below. WARNING: Gasoline fire/explosion hazard Gasoline is highly flammable and explosive. Heat, sparks, and flames can ignite gasoline vapors, which can become widespread during fueling.
Operation (cont’d) • • • generator’s tank is not grounded and high velocity flow from the pump can cause static electricity build-up. Use an approved portable container to transfer gas to the generator’s tank. Never fill the portable gas container while it is sitting inside a vehicle, trailer, trunk, or pick-up truck bed. ALWAYS place container on the ground to be filled. Keep nozzle in contact with portable container while filling.
Operation (cont’d) Inspect Fuel System / Check for Leaks Inspect fuel system & check for leaks BEFORE starting generator. Do not start generator until all needed repairs have been completed. WARNING: Fuel leak hazard Gasoline, LP gas (propane) and NG (natural gas) are highly explosive and fuel leaks can result in fire or explosions. You can be burned and seriously injured if the fuel system is not properly hooked up or there is a fuel leak when you start the engine. 1) Inspect the entire fuel system.
Operation (cont’d) 3. Starting the Engine After you have completed the pre-start checklist procedures, you are ready to start the engine. The following directions detail how to start the engine with either LP/NG or Gasoline as the fuel source: Using LP/NG To start engine using LP or Natural Gas: WARNING: DO NOT start engine if you smell gas. Exit area immediately and call gas supplier or fire department. If possible, shut off gas supply. 1) Disconnect all loads to the generator.
Operation (cont’d) 5) Under long, continuous-run operating conditions, be prepared to: a) Check engine oil level every 24 operating hours, b) Change oil after the first 20 operating hours, and at least every 100 operating hours thereafter, as directed in the engine owner’s manual. WARNING: Never open oil port while engine is running. Hot oil can spray over face and body. Using Gasoline To start engine using gasoline: 1) Disconnect all loads to the generator.
Operation (cont’d) 4. Checking Generator Output Although the speed of the engine was carefully adjusted at the factory so that the generator produces the proper voltage and frequency, output voltage should be checked periodically to ensure the generator is working properly before connecting loads to the generator. WARNING: The generator must be run at the correct speed in order to produce the proper electrical voltage and frequency.
Operation (cont’d) 5. Connecting Loads You will want to be careful when connecting loads so as not to overload the generator, especially if you are powering devices with motors that require a higher starting power load. Instructions are provided below for connecting loads when you are using the generator: o As a portable power source o Connected to a building as a back-up power source WARNING: Do not overload generator.
Operation (cont’d) 6. Switching Fuels (during operation) You can switch fuel sources (from gasoline to LP/NG, or from LP/NG to gasoline) while the generator is running. Follow the instructions below: 1. Disconnect all loads to the generator. Leave the engine running. Switching from LP/NG to Gasoline 2. Turn the gasoline line shut-off valve to ON position. 3. Flip the fuel selector switch to the GASOLINE position. Switching from Gasoline to LP/NG 1. Disconnect all loads to the generator.
Operation (cont’d) 8. Storage & Exercise When you are finished using the generator, you must: Disconnect all loads Shut off fuel supply Store the generator properly Plan on exercising the engine regularly unless the generator is prepared for long-term storage. Detailed instructions are provided below.
Operation (cont’d) Prepare engine for long term storage if needed If you will not be able to exercise the generator regularly, you must prepare the engine for long term storage to prevent gum deposits from forming and causing malfunction of the engine. Prepare engine for long term storage by: o Removing all gasoline from the tank and carburetor OR o Adding fuel stabilizer to the gasoline (following manufacturer’s instructions) Fuel stabilizer steps: 1. Ensure gasoline tank is full. 2.
Maintenance & Repair Inspect and maintain your generator as specified below in order to keep it in safe and optimal working order. Follow all safety rules and recommended maintenance steps. WARNING ALWAYS shut off the engine, disconnect the spark plug(s) and discharge the capacitor before cleaning, adjusting, or servicing the generator. Make sure all guards and shields are replaced before using. Note: The generator head is brushless and maintenance free.
Maintenance & Repair (cont’d) Inspect fuel system / check for leaks Inspect the fuel system and check for leaks on a regular basis. 1) Inspect the entire fuel system. Look for: signs of leaks or deterioration, chafed or spongy fuel hose, loose connections, loose or missing fuel hose clamps, damaged gasoline tank, or defective gasoline shut-off valve. 2) If you are using LPG or NG, test for leaks. After opening LPG/NG supply valve, apply a soap and water solution over pipes, hoses, and connections.
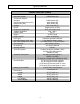
Troubleshooting TROUBLESHOOTING Problem Possible Causes Possible Remedies Engine will not start. a) Low oil level. b) Fouled spark plug. c) Out of fuel. d) Stop switch in OFF position. e) Battery disconnected or dead. f) Fuel selector switch is set to the incorrect fuel. a) Engine speed too slow. a) Fill crankcase to proper oil level. b) Clean or replace spark plug. c) Fill fuel tank. d) Place switch in ON position. e) Charge or replace battery. f) Place switch in desired location (Gasoline or LP/NG).
Summary of Importation Information for Operation This section provides a summary of the various safety procedures and measures that have been presented throughout the manual. Keep this summary handy and refer to it to refresh your memory about how to safely use your generator. WARNING Carefully read and make sure you understand the following safety information before using the generator.
Summary of Importation Information for Operation cont’d o When CONNECTING the battery, connect the RED cable to the POSITIVE terminal FIRST. o When DISCONNECTING the battery, disconnect the BLACK cable from the NEGATIVE terminal FIRST • Acid/skin contact. If battery acid contacts skin or clothing, flush immediately with water and neutralize with baking soda. Installation / Initial Set-up Safety • Dry, level surface. Situate generator on a dry, firm, level surface.
Summary of Importation Information for Operation cont’d • Spark arrestor. Equip engine with a spark arrestor if generator will be used near any ignitable forest, brush, or grassy land. See the “Specifications” section of this manual to determine if your generator is already equipped. Make sure you comply with applicable local, state and federal codes. • Fire extinguisher. Keep a fire extinguisher rated “ABC” by the National Fire Protection Association nearby.
Summary of Importation Information for Operation cont’d • Smell for gas before starting the generator: • Natural gas. Natural gas is lighter than air and tends to collect in high areas. After opening NG line supply, smell for gas BEFORE starting engine. • LP gas (propane). LP gas is heavier than air and tends to settle in low areas. After opening propane tank valve, smell next to floor for gas BEFORE starting engine. If you do smell gas, DO NOT start engine. DO NOT light a match.
Summary of Importation Information for Operation cont’d • • • • • contact with victim. Use a nonconducting implement, such as a dry rope or board, to free the victim from the live conductor. Apply first aid and get immediate medical help. Hot muffler. Never touch hot muffler, hot exhaust manifold, or engine cooling fins. Exhaust and engine parts can be very hot and will burn you. Moving parts. Keep hands, feet, and apparel away from drive belts, fans, and other moving parts.
Generator Exploded View Rev – M.
Generator Exploded View Rev – M.
Wiring Diagram Rev – M.
Wiring Diagram Rev – M.
Fuel Delivery System Rev – M.2 Diag # Part # Description Qty 1 2 3 4 5 6 7 8 9 10 11 12 13 14 15 16 17 18 19 20 21 22 23 82187 35846 35847 32808 777119 37748 35488 777239 32811 36297 38183 36825 32822 32798 777148 35330 777237 777238 32821 32817 35325 35008 35037 M6-1.
Generator Head Exploded View Rev – M.2 Ref # Part # 1 2 3 4 5 6 7 8 9 10 11 12 13 14 15 16 17 18 19 20 21 22 23 24 30991 30994 31013 30995 307489 305605 31014 31018 31015 307484 306403 306416 30997 31065 30999 30992 307479 307481 9910303129 39256 31017 31011 307478 31022 Description Drive End Bracket Protection Screen Phillips Screw Fan Grommet Terminal Box Cover M5 X .8, 16mm Long M5 X .8, 10mm Long, Green M5 X .
Limited Warranty Dear Valued Customer: The NorthStar Product you just purchased is built with the finest material and craftsmanship. Use this product properly and enjoy the benefits from its high performance. By purchasing a NorthStar product, you show a desire for quality and durability. Like all mechanical equipment this unit requires a due amount of care. Treat this unit like the high quality piece of machinery it is. Neglect and improper handling may impair its performance.
® Manufactured by Northern Tool + Equipment Co., 2800 SouthCross Drive West P.O.