
Impact Driver User Manual


OPERATING INSTRUCTIONS
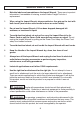
1. Before installing a socket (not included), turn off the Impact Wrench and unplug the
tool from its electrical outlet before changing accessories. Then, firmly insert a
3/4" drive socket (not included) onto the 3/4" Impact Head (10) of the tool. Note: Only
use impact sockets with this tool. (See Figure D.)
2. Whenever possible, secure the workpiece in place, using a vise or clamps (not
included).
3. Insert the socket onto the nut that is to be loosened/tightened.
1. WARNING! Always make sure the Rocker Switch (39) is in its “OFF”
position, and unplug the Power Cord (46) from its 120 volt electrical outlet
before performing any inspection, adjustments, maintenance, or cleaning.
10
4. Plug the Power Cord (46) of the Impact Wrench into the nearest 120 volt,
grounded, electrical outlet. (See Figure D.)
5. Make sure to hold the Impact Wrench firmly with both hands, as torque from the
Motor will cause the tool to twist. Then squeeze the
upper
portion of the Rocker
Switch (39) to
loosen
the nut, or squeeze the
lower
portion of the Rocker Switch
to
tighten
the nut. (See Figure D.)
6. When finished, release the Rocker Switch (39) to stop the Impact Wrench. Then,
unplug the Power Cord (46) from its electrical outlet. (See Figure D.)
7. Make sure to store the Impact Wrench in its Carrying Case (57) and in a dry,
clean, location out of reach of children and other unauthorized people.
INSPECTION, MAINTENANCE, AND CLEANING
2. Before each use: Inspect the general condition of the Impact Wrench. Check
for loose screws, misalignment or binding of moving parts, cracked or broken
parts, damaged electrical wiring, and any other condition that may affect its safe
operation. If abnormal noise or vibration occurs, have the problem corrected
before further use. Do not use damaged equipment.
3. Daily: Use a clean cloth and mild detergent to remove all dirt and debris from
the Impact Wrench. Do not use solvents. Do not immerse the Impact Wrench in
any liquid.