M268170F.5 ITEM NUMBER: 268170 SERIAL NUMBER: _____________ Owner’s Manual Instructions for Assembly, Testing, Operation, Servicing, and Storage Skid Sprayer: Outdoor agricultural product used to spray herbicides, pesticides and insecticides. ** WARNING READ and UNDERSTAND the Owner’s Manual completely before using this sprayer. Assemble, test, and use only in accordance with the Owner’s Manual instructions. READ and FOLLOW chemical label instructions. Pesticides are hazardous chemicals.
Hazard Signal Word Definitions 2
Table of Contents Intended Use ................................................................................................................................. 4 Summary of Important Safety Information ................................................................................5 During Assembly During Operation • General Chemical Safety • Chemical Application Safety • Transporting Safety • Chemical Accident Procedures During Storage / Troubleshooting Warning Label Locations ...........................
Intended Use The sprayer is intended for use in spraying residential, commercial, or agricultural pesticides and other non-flammable liquids. SPRAYING PESTICIDES: Pesticides are hazardous chemicals that must be handled with caution as directed throughout this manual and on the pesticide label. Pesticides are regulated by the United States Environmental Protection Agency (EPA) and defined as: Any substance or mixture of substances intended for preventing, destroying, repelling, or mitigating any pest.
Summary of Important Safety Information WARNING Read and understand this owner’s manual completely before using the sprayer. Read each chemical label’s instructions before handling the chemical. Improper use of the sprayer or handling of chemicals could result in serious injury or illness for the operator or nearby persons/animals, or cause damage to the environment. LISTED BELOW is a summary of safety information of particular importance. See individual sections of this owner’s manual for more details.
Summary of Important Safety Information (continued) During Spraying • DO NOT OVERAPPLY pesticide. Apply at rate recommended by chemical manufacturer. Excess pesticide can be dangerous to humans/animals, damage desirable plants, and contaminate soil and water sources. • DO NOT EAT, DRINK, SMOKE, RUB YOUR EYES, or TOUCH YOUR BARE SKIN while handling chemicals and spraying. • NEVER POINT THE SPRAY GUN at people or animals. • DO NOT SPRAY near open flames or sources of heat.
Summary of Important Safety Information (continued) Chemical accident procedures Immediate response is necessary in the event of sprayer leaks, bodily chemical contact, poisoning, or spills. See instructions below: Sprayer leak Bodily chemical contact If the sprayer develops a leak, immediately stop spraying. Turn off power to the sprayer and follow directions below, as applicable. Personal contamination can occur when chemicals splash, spill, or spray directly onto a person. 1.
Warning Label Location WARNING •CHECK • TOCHECK MAKE TO SURE ALL FITTING AND HOSE CONNECTIONS ARE TIGHT BEFORE MAKE SURE ALL FITTING AND HOSE CONNECTIONS ARE TIGHT BEFORE USE. USE. • •CHECK CHECK FORAND LEAKS, AND COMPLETELY SYSTEM BEFOREUSING USING ANY CHEMICALS.
Unpacking Closely inspect all contents in the shipping carton. Note that some parts are shipped inside the tank. • If you have missing or damaged components, please contact NorthStar Product Support at 1-800-270-0810. The following items are found in the manual bag.
Assembly Step One: Attach hose reel handle to the hose reel. 1. Attach the hose reel handle to the hose reel with the handle bolt and handle nut. Hose reel handle nut Hang handle in slot when not in use Hose reel handle bolt Hose reel handle arm Hose reel handle grip Step Two: Attach the sprayer to the vehicle 1. Secure the sprayer to the vehicle to prevent the sprayer from shifting during transport.
Assembly Step Three: Connect electric rewind hose reel to battery. WARNING Batteries are hazardous because they contain caustic acid, can emit explosive gases, and can cause electric shock. Caution must be exercised when making connections to a battery to avoid shock and contact with the acid, and to prevent any sparking that could lead to an explosion. ALWAYS follow the safety instructions and steps listed below in exact sequence when connecting the sprayer’s battery cord wires to the battery terminals. 1.
Assembly NOTE: Only dashed wires need to be connected. (Not included) 10 AWG (ext.
Assembly Step Four: Check and test completed assembly WARNING Check and test completed assembly Serious injury could result from chemical leaks if sprayer is improperly assembled or the design of the sprayer is modified. Follow the steps below to make sure the sprayer is properly assembled. Never modify the sprayer design. 1.
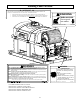
Machine Components 1. Fill Cap: The fill cap is vented to allow air to enter the tank as the chemical is used, but doesn’t allow chemical to escape the tank. 2. Sprayer Tank: The sprayer tank holds the chemical. 3. Hose Reel: The hose reel is the storage location for the gun hose. 4. Gun Hose: The gun hose transfers the chemical from the sprayer to the spray gun. 5. Hose Reel Rewind: The hose reel rewind is a push button switch. When pushed, the hose reel begins to rewind.
Operation - Important Safety Information Now that you have completed and tested your assembly, there is some important safety and health information you need to know with regard to handling and spraying chemicals, as well as vehicle handling with the sprayer attached. WARNING Carefully read and make sure you understand the following safety information before using the sprayer. General Chemical Safety: WARNING Pesticides are hazardous chemicals.
Operation - Important Safety Information Chemical Application Safety: WARNING Caution must be used when spraying chemicals to avoid unsafe exposure to humans and the environment. Heed the warnings below and follow all instructions carefully. • • • • • • • • • • • • • • • • • • Before Spraying Sprayer prep. ALWAYS inspect and prepare the sprayer before use according to the directions provided in this manual. Fueling. Follow instructions in this manual for safely fueling the engine.
Operation - Important Safety Information Transporting Safety: WARNING Serious injury can occur if the vehicle on which the sprayer is mounted is driven unsafely. • • • • • • • • Read vehicle instructions. Review safety instructions in your vehicle manual with regard to carrying heavy cargo loads. Driver age. You must be 16 years of age or older to drive the vehicle with the filled sprayer attached. Vehicle handling. Be aware that vehicle handling will be affected when driving with the filled sprayer.
Operation - Important Safety Information Poisoning by ingestion or inhalation Chemical spills c) Clothing – remove contaminated clothing immediately. Dispose of heavily contaminated clothing per the instructions on the chemical label for safe chemical/container disposal. 2. Seek medical advice if instructed on the label, or if the victim experiences symptoms of harmful effects such as burning, swelling, nausea, chest pain, difficulty breathing, dizziness or confusion.
Operation – Preparing the Sprayer for Each Use Step One. Inspect/Repair If the sprayer has been used previously, it must be prepared BEFORE EACH SUBSEQUENT USE. WARNING Read instructions below carefully for inspecting and preparing the sprayer. Damaged or clogged equipment could result in leaks or uncontrolled spray. Leaks could result in injury to the operator or bystanders from chemical exposure, or cause damage to the environment. Important safety rules: • • • Power off.
Operation – Preparing the Sprayer for Each Use 4. Inspect & repair Inspect and test the sprayer thoroughly a. Inspect hoses for exposed mesh and holes. Replace all worn or damaged hoses. b. Inspect fittings for cracks and leaks. Replace all damaged fittings with original NorthStar parts. c. Inspect tank for cracks. d. Check to be sure all nuts, bolts, and screws are tight. e. Ensure tank straps are snug. f. Check oil levels in pump and gearbox. See pump owner’s manual. g. Check oil level in engine.
Operation – Preparing the Sprayer for Each Use Step Two: Fueling WARNING Gasoline is highly flammable and explosive. You can be burned or seriously injured when handling fuel. Use extreme care when handling gasoline. 1. Engine off / cool The engine must be off and allowed to cool at least two minutes before adding fuel. WARNING: A running engine is hot enough to ignite fuel. Never add fuel or remove gas cap if engine is running or still hot. 2. Outdoor location Fill fuel tank outdoors – never indoors.
Operation—Using the Sprayer Step One: Assess wind conditions and clear work area. Before you decide to spray, you must determine whether wind conditions are suitable. You must also restrict access to the work area to ensure the safety of bystanders. WARNING Do not spray if wind speeds are greater than 4 MPH or if there are bystanders in the intended spray area. 1. Assess wind speed Assess weather conditions to ensure that it is not too windy to spray. DO NOT SPRAY if wind speeds are greater than 4 MPH.
Operation – Using the Sprayer 6. Ensure tank flushed Ensure tank is flushed of all chemicals from prior uses. - Chemicals can interact dangerously when mixed, and residue chemicals are also a health hazard. See the “Flush Sprayer” information in Clean sprayer and decontaminate after use section of this manual. The tank can be drained using either the drain cap, or opening the ball valve and removing the filter bowl. Filter bowl Drain cap 7. Fill tank Add pesticide to tank through fill cap: 8.
Operation – Using the Sprayer Step Three: Operate the sprayer. WARNING ALWAYS wear personal protective equipment as directed on the chemical label when spraying. Long pants and sleeves, chemical-resistant gloves, and eye protection are strongly recommended. Additional protective gear may be required depending on the particular pesticide. 1.
Operation – Using the Sprayer 4. Open ball valve Before filling tank, make sure yellow handle on the ball valve is in the open position. (Handle parallel to fluid path.) This must be done for operation. Ball valve handle 5. Close spray gun and agitation valves Close spray gun and agitation valves.
Operation – Using the Sprayer 6. Rotate bypass lever to start Rotate the bypass lever to the START POSITION. Bypass lever start position 7. Start engine Consult the engine Owner’s Manual for starting the engine. 8. Rotate bypass lever to run Rotate the bypass lever to the RUN Position.
Operation – Using the Sprayer 9. Adjust pressure as needed Turn the pressure regulator until desired pressure is achieved. Do not exceed 580 PSI. TM Pressure regulator NOTE: Do not open spray gun valve at this time.
Operation – Using the Sprayer 10. Begin agitation if needed 1. Decide if agitation is required Some formulations of liquid pesticides do not remain in solution and should be agitated to maintain a uniform mix. This sprayer is equipped with an agitator that should be used when spraying pesticides classified as “flowable” (“F” or “L”), “wettable powder” (“WP” or “W”), “emulsion” (“EC” or “E”), “microencapsulated” (“M”), or water dispersible granules (“WDG” or “DF”).
Operation – Using the Sprayer 4. Operate the agitator TM Agitation valve Begin agitation by opening the agitation valve. The agitation fluid can be visually monitored in the clear PVC tubing. 11. Operate spray gun (as needed for application) Proper Operation of the Spray Gun. NOTE: This spray gun has a maximum pressure rating of 200 PSI. Do not exceed 200 PSI while using this gun. If your spraying application requires more than 200 PSI, order high-pressure tree gun #25134 separately at 1-800-270-0810.
Operation – Using the Sprayer 2. Squeeze the trigger to begin spraying. 3. To engage the trigger lock. Squeeze the trigger and push up on the trigger lock. 4. To disengage the trigger lock, push the trigger lock down and release the trigger. Trigger Lock Trigger IMPORTANT: ALWAYS hold the spray gun with a firm grip when spraying at higher pressures to prevent gun from whipping. Keep good footing and balance at all times.
Operation – Using the Sprayer Step Four: Clean sprayer and decontaminate after use. When done using the sprayer, it is important to clean the sprayer and decontaminate yourself. Do not store the sprayer with chemicals in the tank. It is unsafe and could result in damage to the equipment. WARNING Clean up and decontamination procedures must be followed after each use.
Storage Prepare the sprayer for end-of-season storage by running RV antifreeze through the system. This will keep internal parts lubricated, protect against corrosion, and keep the unit from freezing. WARNING Gasoline vapors can ignite and cause a fire. Select a well-ventilated storage area away from sources of heat, flame, or sparks. CAUTION The sprayer will be damaged if it freezes. Protect the sprayer from freezing during storage by following the instructions below. Preparing for storage: 1.
Troubleshooting WARNING Before troubleshooting or attempting to service, read the following safety rules to avoid accidental exposure to chemical and also risk of electric shock. Note: A reserve, clean container capable of holding at least 200 gallons should be kept for use when the sprayer tank needs to be emptied temporarily for repairs. It is advisable to purchase a reserve tank suitable for pesticide storage from Northern Tool and Equipment for use in these circumstances.
Specifications Sprayer Specifications Engine……………………………… Pump……………………………….. Pump Oil…………………………… Tank Maximum Capacity………….. Maximum GPM……………………. Maximum Pressure………………… Overall Dimensions………………... Dry Weight………………………… Weight full of liquid……………….. Available Accessories Broadcast kit……………………….. Trailer kit…………………………... High Speed Trailer Upgrade kit……. (Requires Item #268175) Tree spray gun……………………... (Sprays water 40ft high) Component Materials* Tank............................… Suction Tube...............
Exploded View – 268170 – Rev. F.
Exploded View – 268170 – Rev. F.
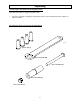
Pump Exploded View – 268170 – Rev. F.
Pump Exploded View – 268170 – Rev. F.5 Ref Part # 1 2 3 4 5 6 7 8 9 10 11 12 13 14 15 16 17 18 19 20 21 22 23 25 26 27 28 29 3020 0002 0019 0085 0001 0444 0010 0026 0438 0001 3019 0001 0438 0066 0403 0147 0604 0073 2400 0089 3609 0179 3200 0080 3605 0027 0602 0008 1800 0020 0400 0080 0020 0010 2409 0097 0205 0069 3011 0024 3020 0029 3609 0165 2811 0004 1210 0447 5004 0151 0402 0001 1800 0001 1809 0001 Ref 15 44 45 53 Description Retaining clip Oil seal Shaft Conn.
Pump Exploded View – 268170 – Rev. F.
Gearbox Exploded View – 268170 – Rev. F.
Limited Warranty Dear Valued Customer: The NorthStar Product you just purchased is built with the finest material and craftsmanship. Use this product properly and enjoy the benefits from its high performance. By purchasing a NorthStar product, you show a desire for quality and durability. Like all mechanical equipment this unit requires a due amount of care. Treat this unit like the high quality piece of machinery it is. Neglect and improper handling may impair its performance.
WARNING: This product can expose you to chemicals including gasoline engine exhaust, which is known to the State of California to cause cancer, and carbon monoxide, which is known to the State of California to cause birth defects or other reproductive harm. For more information go to www.P65Warnings.ca.gov. Manufactured by Northern Tool + Equipment Co., 2800 SouthCross Drive West P.O.