
Product Manual

Assembly
10
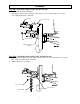
Step Six: Attach the side marker cover and light to the side rail.
1. Attach side marker light cover using (2) 5/16 x ¾” Carriage Bolts and (2) 5/16” Flange
Nuts. Tighten to 20 ft-lbs.
2. Insert black wire on side marker light through either hole left or right of center light
mount hole. Use (1) of the supplied 1/4”-20 Hex Nuts and (1) supplied lock washer from
the light kit to attach the light to the side rail. Tighten until the lock washer is flat.
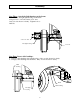
Step Seven: Wire side marker light.
1. Pull apart the two wires running down the
side of the trailer frame near the side
marker mounting location. Be careful not
to damage the insulation on the wires. To
make the next step easier the wires should
be spilt apart for a length of 6 inches.
2. Wire the side marker light to the brown
wire using a supplied wire splitter
connector from the light kit. Lay the
black wire on the inside recessed area
with the end of the wire pushed against
the stop. Lay the brown wire in the
outside recessed area and snap the wire
splitter connector shut.
Side Rail
5/16”
Flange Nut
Lock
Washer
1/4”
Hex Nut
Light Cover
Side Marker
Light
5/16” x 3/4”
Carriage Bolt
Light Mount
Hole
Wire through
holes
Brown wire
Black wire
Wires connected together
Wires Connected
Together
Wires pulled
apart
Wire Splitter
Connector
Yellow wire