
Product Manual


Assembly
11
Step Eight: Wire and attach the other side marker.
Repeat steps six (6) and seven (7) for the other side marker.
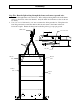
Step Nine: Wire the taillights and attach to the light housings.
1. Cut off excess wire leaving 6 inches hanging out the back of both light housings.
2. For both taillights, connect the brown wire to the two black wires using a provided wire
nut from the light kit.
3. For the left taillight, connect the yellow wire to the red wire using a provided wire nut.
For the right taillight, connect the green wire to the red wire using a provided wire nut.
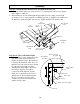
4. Ensure the wires are tucked in the recessed area on the back of the taillight and bolt the
light to the light housing using the provided hardware. Tighten the nuts until the lock
washers are flat.
Step Ten: Test the wiring to ensure proper installation and fasten wires securely.
1. Turn the vehicle ignition to run and turn on the lights.
2. Check that all of the trailer lights are on.
3. Have someone press the brake petal. The taillights should become brighter.
4. Test that the left and right blinker function properly.
5. If the blinkers flash very fast or very slow, or a taillight goes off when a blinker is
activated, the trailer lights may not be properly grounded.
a. Ensure that the nut has broken paint and contacts bare metal.
b. You may have to remove some paint under the nut to get a proper ground.
6. Once the lights are working, correctly fasten the wiring to the frame using the supplied
wire clips.
Light housing
Left taillight
Yellow wire
Brown wire
Black wires
Red wire
Nut and lock
washer