
Product Manual


Operation – Using the Trailer Kit
14
Step One. Inspect/Repair
If the trailer has been used previously, it must be prepared BEFORE EACH SUBSEQUENT USE.
WARNING
Read instructions below carefully for inspecting and preparing the trailer kit.
Damaged or missing components could result in injury to the operator, bystanders, or property damage.
Important safety rules:
Replacement parts. If a part needs replacement, only use parts that meet the manufacturer’s
specifications. Replacement parts that do not meet specifications may result in a safety hazard or
poor operation of the trailer kit.
Inspect and repair
Inspect and test the trailer kit thoroughly
a. Check tires for proper pressure level.
b. Check to be sure that all nuts and bolts are tight.
Step Two: Tow the trailer sprayer.
1. Review safety
information
Review the “Operation – Important Safety Information” related to
Transportation Safety provided in this manual.
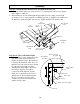
2. Attach to hitch.
Attach sprayer to vehicle hitch
1. Attach sprayer’s coupler to a class 3 or higher hitch with 2” ball (only).
2. Adjust coupler to ball by raising locking lever and turning lock nut with
fingers.
3. Proper adjustment is obtained when coupler is as tight as possible on ball
and locking lever can still be opened and closed.
4. Lock lever closed to secure the attachment. An optional locking pin or
padlock may be inserted in the locking lever hole for extra security.
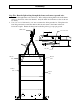
Important: When filled, the trailer sprayer has a tongue weight of approximately
400lbs. Ensure that the tow vehicle is properly equipped to handle this load.
(unlocked position)
Housing
Locking Lever (locked position)
Channel Lock
Lock Nut
Ball Clamp
Light Spring
Heavy Spring