M2827271A ITEM NUMBER: 2827271, 2827272 SERIAL NUMBER: _____________ Owner’s Manual Instructions for Assembly, Testing, Operation, Servicing, and Storage Tow Behind Sprayer: For outdoor use with agricultural pesticides and other liquids** WARNING READ and UNDERSTAND the Owner’s Manual completely before using this sprayer. Assemble, test, and use only in accordance with the Owner’s Manual instructions. READ and FOLLOW chemical label instructions. Pesticides are hazardous chemicals.
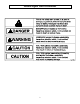
Hazard Signal Word Definitions 2
Table of Contents Intended Use .............................................................................................................................................. 4 Summary of Important Safety Information ............................................................................................. 5 During Assembly During Operation • General Chemical Safety • Chemical Application Safety • Towing Safety • Chemical Accident Procedures Warning Label Locations .......................................
Intended Use The sprayer is intended for use in spraying agricultural pesticides and other nonflammable liquids. SPRAYING PESTICIDES: Pesticides are hazardous chemicals that must be handled with caution as directed throughout this manual and on the pesticide label. Pesticides are regulated by the United States Environmental Protection Agency (EPA) and defined as: Any substance or mixture of substances intended for preventing, destroying, repelling, or mitigating any pest.
Summary of Important Safety Information WARNING Read and understand this owner’s manual completely before using the sprayer. Read each chemical label’s instructions before handling the chemical. Improper use of the sprayer or handling of chemicals could result in serious injury or illness for the operator or nearby persons/animals, or cause damage to the environment. LISTED BELOW is a summary of safety information of particular importance. See individual sections of this owner’s manual for more details.
Summary of Important Safety Information (continued) During Spraying • DO NOT OVERAPPLY pesticide. Apply at rate recommended by chemical manufacturer. Excess pesticide can be dangerous to humans/animals, damage desirable plants, and contaminate soil and water sources. • DO NOT EAT, DRINK, SMOKE, RUB YOUR EYES, or TOUCH YOUR BARE SKIN while handling chemicals and spraying. • NEVER POINT THE SPRAY GUN at people or animals.
Summary of Important Safety Information (continued) Chemical accident procedures Immediate response is necessary in the event of sprayer leaks, bodily chemical contact, poisoning, or spills. See instructions below: Sprayer leak Bodily chemical contact If the sprayer develops a leak, immediately stop spraying. Turn off power to the sprayer and follow directions below, as applicable. Personal contamination can occur when chemicals splash, spill, or spray directly onto a person. 1.
Warning Label Location WARNING READ and UNDERSTAND the Owner's Manual completely before using this sprayer. Assemble, test, and use only in accordance with the Owner's Manual instructions. READ and FOLLOW chemical label instructions. Pesticides are hazardous chemicals which must be handled carefully. KNOW emergency procedures BEFORE handling chemicals. Sprayer leaks, bodily chemical contact, poisoning, and spills are all situations which require immediate response.
Unpacking Closely inspect all contents in the shipping carton. Note that some parts are shipped inside the tank. • If you have missing or damaged components, please contact NorthStar Product Support at 1-800-270-0810.
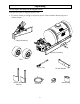
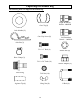
Unpacking the Manual Bag The following items are shipped in the manual bag.
Assembly Step One: Attach wheels to cart 1. Remove the protective rubber caps from the ends of the cart axle. 2. Slide the tire onto the cart axle. 3. Slide the axle washer onto the cart axle. 4. Insert the axle pin into the cross hole on the cart axle. Axle pin Cart axle Tire Axle washer Step Two: Attach tongue assembly to sprayer assembly 1. Maneuver the tongue assembly into the position shown. Be careful not to pull the hoses. 2.
Assembly (continued) Step Three: Attach gun clips Attach the gun clips to the sprayer assembly with the gun clip screws. Step Four: Install gun fitting Remove the shipping plug and replace with gun fitting. Hand tighten, then 2 turns with wrench. Gun clip Gun clip screw Gun fitting Shipping plug Step Five: Attach the spray gun to the gun hose 1. Attach the gun hose to the gun fitting with a hose clamp. (Follow hose clamp instructions below.) 2. Attach the gun hose to the spray gun with a hose clamp.
Assembly (continued) Step Six: Install nozzle bracket mounts to sprayer assembly Use (4) 5/16 x 1” bolts and (4) 5/16 nuts to attach nozzle bracket mounts. Tighten to 20 ft-lbs. Step Seven: Attach nozzle bracket to nozzle bracket mounts Use (8) U-bolts and (8) wing nuts to attach nozzle bracket. Wing nut U-bolt Nozzle bracket 5/16 Nut Right nozzle bracket mount Left nozzle bracket mount 5/16 x 1” Bolt Step Eight: Install broadcast nozzles 1.
Assembly (continued) Step Nine: Attach sprayer to vehicle Secure the sprayer to the tow vehicle with a hitch pin (not included, call 800-270-0810 and order Item# 2501946). Hitch pin (not included) Step Ten: Check and test completed assembly. WARNING Check and test completed assembly Serious injury could result from chemical leaks if sprayer is improperly assembled or the design of the sprayer is modified. Follow the steps below to ensure the sprayer is properly assembled. Never modify the sprayer design.
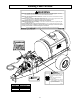
Machine Components 1.) 2.) 3.) 4.) 5.) 6.) 7.) 8.) 9.) 10.) 11.) 12.) 13.) 14.) 15.) 16.) 17.) 18.) 19.) Fill Cap. The fill cap is vented to allow air to enter the tank as the chemical is used, but doesn’t allow chemical to escape the tank. Sprayer Tank. The sprayer tank holds the chemical. Gun Clips. Use the gun clips to store the spray gun. On/Off Control. Use the on/off control to start or stop engine. Spray Gun. Use the spray gun to apply chemical to specific areas.
Operation – Important Safety Information Now that you have completed and tested your assembly, there is some important safety and health information you need to know with regard to handling and spraying chemicals, as well as vehicle handling with the sprayer attached. WARNING Carefully read and make sure you understand the following safety information before using the sprayer. General Chemical Safety: WARNING Pesticides are hazardous chemicals.
Operation – Important Safety Information (continued) Chemical Application Safety: WARNING Caution must be used when spraying chemicals to avoid unsafe exposure to humans and the environment. Heed the warnings below and follow all instructions carefully. • • • • • • • • • • • • • • • • • • • Before Spraying Sprayer prep. ALWAYS inspect and prepare the sprayer before use according to the directions provided in this manual. Fueling. Follow instructions in this manual for safely fueling the engine.
Operation – Important Safety Information (continued) Towing Safety: WARNING The filled sprayer is very heavy. It can crush and cause serious injury if it rolls out of control or tips over. Follow the instructions below for safely towing the sprayer. • • • • • • • • • • • • Read vehicle instructions. Review towing safety instructions in your towing vehicle manual. Driver age. You must be 16 years of age or older to operate the towing vehicle with the filled sprayer attached. Securely attached.
Operation – Important Safety Information (continued) Bodily chemical contact Personal contamination can occur when chemicals splash, spill, or spray directly onto a person. 1. Follow the emergency first aid instructions on the chemical label listed in the “First Aid” or “Statements of Practical Treatment” section. Poisoning by ingestion or inhalation Chemical spills General procedures include: a) Eyes – immediately flush with water or follow other directions as specified on the chemical label.
Operation – Preparing the Sprayer for Each Use Step One. Inspect/Repair If the sprayer has been used previously, it must be prepared BEFORE EACH SUBSEQUENT USE. WARNING Read instructions below carefully for inspecting and preparing the sprayer. Damaged or clogged equipment could result in leaks or uncontrolled spray. Leaks could result in injury to the operator or bystanders from chemical exposure, or cause damage to the environment. Important safety rules: • • • Power off.
Operation – Important Safety Information (continued) 4. Inspect & repair Inspect and test the sprayer thoroughly: a) Inspect hoses for exposed mesh and holes. Replace all worn or damaged hoses. b) Inspect fittings for cracks and leaks. Replace all damaged fittings with original NorthStar parts. c) Inspect tank for cracks. d) Check to be sure all nuts, bolts, and screws are tight. e) Check wheels and tires. Make sure that wheel lugs are tight and tires are inflated. f) Check for fuel leaks.
Operation – Using the Sprayer Step One: Assess wind conditions and clear work area. Before you decide to spray, you must determine whether wind conditions are suitable. You must also restrict access to the work area to ensure the safety of bystanders. WARNING Do not spray if wind speeds are greater than 4 MPH or if there are bystanders in the intended spray area. 1. Assess wind speed Assess weather conditions to ensure that it is not too windy to spray. DO NOT SPRAY if wind speeds are greater than 4 MPH.
Operation - Using the Sprayer (continued) 7. Check strainer cap Ensure strainer cap is securely fastened. Ball valve Strainer cap 8. Fill tank Add pesticide to tank through fill cap: a) Confirm the chemical/water dilution ratios specified on the chemical label. b) Determine chemical and water volumes needed for the planned application, taking into consideration that maximum tank capacity is 55 gallons.
Operation - Using the Sprayer (continued) Step Three: Operate the sprayer. WARNING ALWAYS wear personal protective equipment as directed on the chemical label when spraying. Long pants and sleeves, chemical-resistant gloves, and eye protection are strongly recommended. Additional protective gear may be required depending on the particular pesticide. 1.
Operation - Using the Sprayer (continued) 4. Open ball valve Open the suction line ball valve. Ball valve open Ball valve closed 5. Start engine Consult the engine Owner’s Manual for starting the engine.
Operation - Using the Sprayer (continued) 6. Begin agitation if needed 1. Decide if agitation is required Some formulations of liquid pesticides do not remain in solution and should be agitated to maintain a uniform mix. This sprayer is equipped with an agitator that should be used when spraying pesticides classified as “flowable” (“F” or “L”), “wettable powder” (“WP” or “W”), “emulsion” (“EC” or “E”), “microencapsulated” (“M”), or water dispersible granules (“WDG” or “DF”).
Operation - Using the Sprayer (continued) 7. Adjust pressure as needed Turn the pressure regulator until the desired pressure is achieved. Do not exceed 150 PSI. Pressure gauge Pressure regulator 8. Operate spray gun (as needed for application) To spray, rotate the handle of the spray gun. -Rotating the handle will change the spray pattern from OFF, to cone, to stream. Note: It is not unusual for the operator to be exposed to chemical while operating the spray gun– gloves should be chemical resistant.
Operation - Using the Sprayer (continued) 9. Operate broadcast 1. Open broadcast valve to send flow to the broadcast nozzles. boom/nozzles 2. Adjust pressure regulator for desired pressure. Broadcast valve Pressure regulator Pressure gauge 3. To ensure proper coverage, overlap the ends of the spray pattern 24”. Use the tables in Appendix A to determine what speed to drive your vehicle for the desired application rate. 10. Leaving unattended 11.
Operation - Using the Sprayer (continued) Step Four: Clean sprayer and decontaminate after use. When done using the sprayer, it is important to clean the sprayer and decontaminate yourself. Do not store the sprayer with chemicals in the tank, as it is unsafe and could also result in damage to the equipment. WARNING Clean up and decontamination procedures must be followed after each use.
Operation - Using the Sprayer (continued) 2. Unused chemical 3. Flush sprayer 4. Decontaminate & launder Properly store or dispose of unused chemical: a) If the unused pesticide is to be stored for future use: Store all unused pesticide in its original, or a suitably marked, container in a secure location out of the reach of children & animals.
Storage Prepare the sprayer for end-of-season storage by running RV antifreeze through the system. This will keep internal parts lubricated, protect against corrosion, and keep the unit from freezing. WARNING Gasoline vapors can ignite and cause a fire. Select a well-ventilated storage area away from sources of heat, flame, or sparks. CAUTION The sprayer will be damaged if it freezes. Protect the sprayer from freezing during storage by following the instructions below. Preparing for storage: 1.
Troubleshooting WARNING Before troubleshooting or attempting to service, read the following safety rules to avoid accidental exposure to chemical and also risk of electric shock. Note: A reserve, clean container capable of holding at least 55 gallons should be kept for use when the sprayer tank needs to be emptied temporarily for repairs. It is advisable to purchase a reserve tank suitable for pesticide storage from Northern Tool and Equipment for use in these circumstances.
Specifications Sprayer Specifications Engine……………………………… Kohler CH255 (2827271) Honda GX160 (2827272) Pump……………………………….. Hypro 4101XL Tank Maximum Capacity………….. 55 Gallons Maximum GPM……………………. 7.0 GPM Maximum Pressure………………… 150 PSI Overall Dimensions………………... 83”L x 39”W x 40”H Dry Weight………………………… 238 lbs. Weight full of water………………... Approx. 678 lbs. Available Accessories Remote switch for broadcast spray… Item# 22851 Component Materials* Tank............................… Suction Tube...............
Exploded View – Rev A 34
Exploded View – Rev A Item Part# Description 1 SNY343047 Tank Lid 2 777499 Warning Decal 3 5262 Tie Down Straps 4 796779 Tank Assembly (includes items 2, 18, and 19) 5 SNY34700002 Anti-Vortex Fitting 6 50NBR12 ¾” Hose Barb Elbow 7 17141 Large Hose Clamp 8 30289 ¾” Hose, 4” 9 52101 Ball Valve 10 5318 Hex Nipple 11 797209 Strainer, ¾” Y-Line 12 5267 ¾” Hose Barb 13 30289 ¾” Hose, 16” 14 777260 Cart 15 777917 Tire 16 82129 Washer 17 30313 Bridge Pin 18 777843 Agitator with Tips 19 5370 Bulkhead Fitting 20 3028
Appendix A – Broadcast Spray Application Tables Below are some guidelines to calibrate a North Star boom sprayer with DT3.0 (777359) spray nozzles. This is a very important step in operating the boom sprayer so the right amount of chemical is applied. 1. Use the suggested application rate from the chemical manufacturer (i.e. gallons per Acre, 1000 sq.ft., or 100 sq.ft.) 2.
Limited Warranty Dear Valued Customer: The NorthStar Product you just purchased is built with the finest material and craftsmanship. Use this product properly and enjoy the benefits from its high performance. By purchasing a NorthStar product, you show a desire for quality and durability. Like all mechanical equipment this unit requires a due amount of care. Treat this unit like the high quality piece of machinery it is. Neglect and improper handling may impair its performance.
WARNING: This product can expose you to chemicals including gasoline engine exhaust, which is known to the State of California to cause cancer, and carbon monoxide, which is known to the State of California to cause birth defects or other reproductive harm. For more information go to www.P65Warnings.ca.gov. Manufactured by Northern Tool + Equipment Co., 2800 SouthCross Drive West P.O.