M99903A.3 ITEM NUMBER: 99903 SERIAL NUMBER: _____________ Owner's Manual Instructions for Assembly, Testing, Operation, Servicing, and Storage ATV Mounted Boomless Broadcast Kit: For outdoor use with agricultural pesticides and other liquids** WARNING READ and UNDERSTAND the Owner's Manual completely before using this sprayer. Assemble, test, and use only in accordance with the Owner's Manual instructions. READ and FOLLOW chemical label instructions. Pesticides are hazardous chemicals.
Hazard Signal Word Definitions 2
Table of Contents Summary of Important Safety Information ............................................................................................. 4 During Assembly During Operation • General Chemical Safety • Chemical Application Safety • ATV Vehicle Handling Safety • Chemical Accident Procedures Warning Label Locations ........................................................................................................................... 6 Component Inventory Unpacking ............................
Summary of Important Safety Information WARNING Read and understand this owner's manual completely before using the sprayer. Read each chemical label's instructions before handling the chemical. Improper use of the sprayer broadcast kit or handling of chemicals could result in serious injury or illness for the operator or nearby persons/animals, or cause damage to the environment. LISTED BELOW is a summary of safety information of particular importance.
Summary of Important Safety Information (continued) During Spraying • • • • • • • DO NOT OVERAPPLY pesticide. Apply at rate recommended by chemical manufacturer. Excess pesticide can be dangerous to humans/animals, damage desirable plants, and contaminate soil and water sources. DO NOT EAT, DRINK, SMOKE, RUB YOUR EYES, or TOUCH YOUR BARE SKIN while handling chemicals and spraying. NEVER POINT THE SPRAY GUN at people or animals.
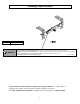
Warning Label Location Part# 798894 Description Boom chemical/Label WARNING DO NOT SPRAY flammable fluids. RELIEVE SYSTEM PRESSURE before performing any maintenance. READ and FOLLOW chemical label instructions. Pesticides are hazardous chemicals which must be handled carefully. EXERCISE CAUTION in vehicle handling. Vehicle will be less stable and handle very differently with filled sprayer and boom attached.
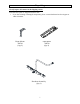
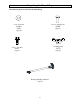
Unpacking Closely inspect all contents in the shipping carton. Note that some parts are shipped inside the tank. • If you have missing or damaged components, please contact NorthStar Product Support at 1-800-270-0810.
Unpacking the Manual Bag The following items are found in the manual bag.
Assembly Step 1 – For sprayer item #99908 and 99909 • Disconnect boom supply hose by unthreading nut at side cover • Remove T-handle knobs at tank mounts and then remove Boom mounts • Remove Boom from Sprayer • Skip to step 3 Tools Needed • None Boom Mounts Boom Supply Hose Boom T-Handle knobs 9
Assembly Step 2 – Install tank mounts to bottom of tank for sprayer item # 99916, 99917, 26810011,2681201,2681101,26812101 Tools Needed • 1/2" Wrench • Install tank mounts with four 5/16" x 3/4" bolts. • Tighten bolts to 5 Ft-lbs. • Note: Sprayer item #2681022 does not have threaded inserts In the bottom of the tank. Use straps (not included) to secure tank to tank mounts.
Assembly Step 3 - Install boom mounts to tank mounts • Install boom mounts onto two bolts in tank mounts.
Assembly Step 4 - Install broadcast assembly to boom mounts Tools Needed • None • Install broadcast assembly to boom mounts with two 5/16"-Carriage bolts. • Install two locking knobs to boom mounts to tighten boom assembly to boom mounts.
Assembly Step 5 - For sprayer item #99916, 99917, 26810011, Tools Needed 2681201, 2681101, 26812101. Conversion kit 94996 is required, see assembly instructions from that kit.
Assembly Step 6 – Orient broadcast nozzle and tighten Tools Needed • Orient broadcast nozzle so the nozzle is pointed toward the ground. The screw on the face of the nozzle should be in the 12 o’clock position. • Tighten swivel nut once orientation is correct.
Assembly Step 7A – For sprayer item #99918, 99919, 99920, 99921 • • • • Remove side cover Remove plug from regulator Install ball valve into regulator port Route hose to slot in side cover and attach to cover using lock washer and nut • Reattach side covers to tank Tools Needed • 1/2" Socket • Extension Components Needed from Owner’s Manual Bag: Boom plumbing assembly (Qty 1) 15
Assembly Step 7B – For sprayer item #99905, 99906 Tools Needed • • • • • 1/2"Socket • Extension Remove side cover Remove HB fitting from regulator Install ball valve into regulator port Route hose to slot in side cover and attach to cover using lock washer and nut • Reattach side covers to tank Components Needed from Owner’s Manual Bag: Boom plumbing assembly (Qty 1) 16
Assembly Step 8A - Attach boom supply hose to sprayer for sprayer item #99905, 99906, 99918, 99919, 99920, 99921 Tools Needed • None • Thread swivel nut from boom supply hose onto boom connection port.
Assembly Step 8B - Attach boom supply hose to sprayer for sprayer item #99916, 99917, 26810011, 2681201, 2681101, 26812101 Tools Needed • None • Install ball valve into regulator port (from conversion kit 94996) • Thread swivel nut from boom supply hose onto boom connection port.
Assembly Step 9: Check and test completed assembly. WARNING Check and test completed assembly Serious injury could result from chemical leaks if sprayer is improperly assembled or the design of the sprayer is modified. Follow the steps below to ensure the sprayer is properly assembled. Never modify the sprayer design. 1.
Operation – Important Safety Information Now that you have completed and tested your assembly, there is some important safety and health information you need to know with regard to handling and spraying chemicals, as well as vehicle handling with the sprayer attached. WARNING Carefully read and make sure you understand the following safety information before using the sprayer. General Chemical Safety: WARNING • Pesticides are hazardous chemicals.
Operation – Important Safety Information (continued) Chemical Application Safety: WARNING • Caution must be used when spraying chemicals to avoid unsafe exposure to humans and the environment. • Heed the warnings below and follow all instructions carefully. • • • • • • • • • • • • • • • • • Before Spraying Sprayer prep. ALWAYS inspect and prepare the sprayer before use according to the directions provided in this manual. Keep sprayer off.
Operation – Important Safety Information (continued) ATV Vehicle Handling Safety: WARNING Serious injury can occur if the ATV on which the sprayer is mounted is driven unsafely. • • • • Driver age. You must be 16 years of age or older to operate the ATV with the sprayer attached. Less stable. Be aware that all vehicle handling will be affected with the filled sprayer attached.
Operation – Important Safety Information (continued) c) Clothing – remove contaminated clothing immediately. Dispose of heavily contaminated clothing per the instructions on the chemical label for safe chemical/container disposal. Poisoning by ingestion or inhalation Chemical spills 2. Seek medical advice if instructed on the label, or if the victim experiences symptoms of harmful effects such as burning, swelling, nausea, chest pain, difficulty breathing, dizziness or confusion.
Operation – Using the Broadcast Kit Step 1: Assess wind conditions and clear work area. Before you decide to spray, you must determine whether wind conditions are suitable. You must also restrict access to the work area to ensure the safety of bystanders. WARNING Do not spray if wind speeds are greater than 4 MPH or if there are bystanders in the intended spray area. 1. Assess wind speed Assess weather conditions to ensure that it is not too windy to spray.
Operation - Using the Broadcast Kit (continued) Step 2: Operate the broadcast kit. WARNING • ALWAYS wear personal protective equipment as directed on the chemical label when spraying. • Long pants and sleeves, chemical-resistant gloves, and eye protection are strongly recommended. Additional protective gear may be required depending on the particular pesticide. 1. Review safety information 2. Wear personal protective equipment 3.
Operation - Using the Broadcast Kit (continued) 5. Adjust pressure regulator Turn pressure regulator knob to adjust outlet pressure 1. Turn knob clockwise to increase pressure. 2. Turn knob counter-clockwise to decrease pressure Note: If the pressure regulator knob is completely tightened, the pressure setting will be higher than the pressure switch on the pump. This allows the pump to operate as a demand pump and turn on only when spraying Fluid bypass Pressure regulator knob Pressure gauge 6.
Operation - Using the Broadcast Kit (continued) B. Ensure uniform coverage To ensure proper coverage, the height of the broadcast nozzles should be 24"48" inches from the ground. Using both broadcast nozzles, the spray pattern is 40 feet. However, the spray pattern should be overlapped 36 inches. Use the tables in Appendix A to determine what speed to drive your vehicle for the desired application rate. Correct 12” Overlap 12” Overlap Incorrect C.
Operation - Using the Broadcast Kit (continued) Step 3: Clean sprayer and decontaminate after use. When done using the sprayer, it is important to clean the sprayer and decontaminate yourself. Do not store the sprayer with chemicals in the tank, as it is unsafe and could also result in damage to the equipment. WARNING • Clean-up and decontamination procedures must be followed after each use.
Storage When not in use, store the sprayer indoors. For long term or winter storage, prepare the sprayer by running RV antifreeze through the system. This will keep internal parts lubricated, protect against corrosion, and keep the unit from freezing. CAUTION • The sprayer will be damaged if it freezes. • Protect the sprayer from freezing during storage by following the instructions below. Preparing for storage: 1. Add antifreeze Pour 1 gallon of RV antifreeze into the tank.
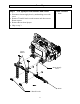
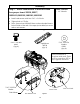
Exploded View – (Model 99903) 30
Exploded View – (Model 99903) Ref# 1 2 3 4 5 6 7 8 9 10 11 12 13 14 15 16 17 18 19 20 21 22 Part# 798538 82015 82021 82016 82697 798541 38578 798540 82088 777853 798569 777454 5230 798622 798630 797792 798498 777851 38545 36576 798894 82703 Description Tank mount 5/16"-18 x 3/4" 5/16" flat washer 5/16"-18 x 1" 5/16"-18 jam nut Boom mount Locking knob Nozzle bracket 5/16"-18 x 3/4" carriage bolt Swivel nut 1/2" flat seat hose barb for 11/16" nut Nozzle hose barb Nozzle nut 1/2" braided PVC hose, 350mm 1/2"
Appendix A –Boom Spray Calibration Tables Below are some guidelines to help you calibrate your tow behind broadcast sprayer. This is a very important step in operating the tow behind broadcast sprayer such that too much or too little chemical may be applied. 1. Using Table 1, find a table that corresponds with the chemical manufacturer's suggested application rate (gallons per acre, gallons per 1000 sq. ft., or gallons per 100 sq. ft.). 2.
Limited Warranty Dear Valued Customer: The NorthStar Product you just purchased is built with the finest material and craftsmanship. Use this product properly and enjoy the benefits from its high performance. By purchasing a NorthStar product, you show a desire for quality and durability. Like all mechanical equipment this unit requires a due amount of care. Treat this unit like the high quality piece of machinery it is. Neglect and improper handling may impair its performance.
Manufactured by Northern Tool + Equipment Co., Ltd. Burnsville, MN 55306 NorthernTool.