
Product Manual

24
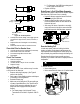
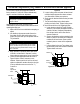
Lid
Insulation
cap
Heating
coil
Heating
chamber
Inspect Heating Coil and Desoot as Needed
Inspect and desoot coil annually. Although most coils
never require desooting, poor grades of fuel oil or
inadequate combustion air will cause heavy soot build-
up on the outside surface of the heating coil tubing.
These deposits will insulate the coil, which then restricts
airflow through the heat exchanger and further
aggravates the soot build-up.
If soot has built up on the exterior of the coil tubing,
clean as follows:
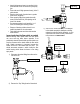
• Wear protective clothing, goggles, and gloves.
• Disconnect high-pressure hose on inlet side of
coil and thermostat on outlet side of coil.
• Remove the lid and insulation cap from the
heating chamber and hoist the coil out. The coil
weighs 125 lbs.
• Clean the coil.
• Reassemble the coil and lids to the machine.
Make sure white insulation remains in place.
Figure 20 – Heating Chamber Interior
• Reattach high-pressure hose and thermostat and
make sure all fittings are tight before using
machine.
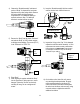
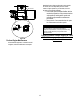
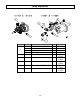
Inspect/Clean/Adjust Electrodes
Inspect electrodes annually and make adjustments as
needed.
• Tip machine back until it rests on the frame.
• Remove the 4 nuts that attach burner to the
heating chamber. You do not have to disconnect
the fuel lines or electric cords.
Figure 21
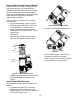
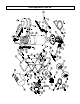
• Let burner fall away from the heat exchanger.
• Clean off carbon deposits, which may have
accumulated on the tips of electrodes.
• Reset the spacing as shown below in Figure 23.
• Reattach burner to the heat exchanger.
4 nuts
Figure 22