M157594AN.3 ITEM NUMBERS: 157594 SERIAL NUMBER: _____________ Owner's Manual Instructions for Set-up, Operation, Maintenance & Storage HOT WATER PRESSURE WASHER – 4000 PSI / 4 GPM Portable Outdoor-Use Only This pressure washer produces both cold and hot water high-pressure spray. Cleaning chemicals may be incorporated into the spray if desired. The pressure pump for this equipment is powered by a gasoline internal combustion engine and the water is heated by a kerosene/fuel-oil fired, open flame burner.
Hazard Signal Word Definitions Equipment Protection Quick Facts Inspect Upon Delivery Fill with Engine Oil Check Pump Oil Battery Required Water Flow Requirements Storage Chemical Spraying Maintenance Schedule STOP! Closely inspect to make sure no components are missing or damaged. See the "Assembly and Initial Set-Up" section for instructions on whom to contact to report missing or damaged parts. STOP! Engine is shipped without oil. DO NOT start pressure washer without adding oil to engine.
Table of Contents About Your Pressure Washer .................................................................................................... 4 Specifications................................................................................................................................. 5 Component Identification ............................................................................................................ 6 Safety Labeling ..................................................................
About Your Pressure Washer Thank you for purchasing a NorthStar hot water pressure washer! Your machine is designed for long life, dependability, and the top performance you demand. This pressure washer is designed to: 1) Produce a high-pressure spray of heated or unheated water (up to 4 gallons per minute at 4000 psi). 2) Incorporate cleaning chemicals into a low-pressure water spray.
Specifications MODEL Model # 157594 FLOW OUTPUT Pressure Rating 4000 psi Flow Rate 4 gpm Maximum Temperature 210 F DIMENSIONS / COMPONENTS Length 47" Width 37.5" Height 42" Weight (dry) 500 lbs.
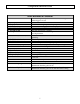
Component Identification Ref # 1 2 3 4 5 6 7 8 Description Unloader Lifting Eye Engine (see engine manual) Inlet Plumbing Diesel Tank Gasoline Tank Pump Water Inlet (feed tank) Ref # 9 10 11 12 13 14 15 16 Description Ball Valve (feed tank) Ball Valve (city tap water) Water Filter Water Inlet (city tap water) Control Panel Battery Box (battery not included) Pressure Switch Water Outlet (high pressure) 6 Ref # 17 18 19 20 21 22 Description Engine Key Switch Circuit Breaker Heat Switch Thermostat Indic
Component Identification REFERENCE GUIDE 1. Unloader 2. 3. 4. 5. 6. 7. Lifting Eye Engine Inlet Plumbing Diesel Tank Gasoline Tank Pump 8. Water Inlet (feed tank) 9. Ball Valve (feed tank) 10. Ball Valve (city tap water) 11. Water Filter 12. Water Inlet (city tap water ) 13. Control Panel 14. Battery Box 15. Pressure Switch 16. Water Outlet 17. Engine Key Switch 18. Circuit Breaker 19. Heat Switch 20. Thermostat 21. Indicator Light (pressure sw.) 22.
Safety Labeling DANGER FOR OUTDOOR USE ONLY ! Using this pressure washer indoors CAN KILL YOU IN MINUTES. Engine exhaust and burner exhaust contain carbon monoxide. This is a poison you cannot see or smell. NEVER use inside any building, structure or garage, EVEN IF doors and windows are open. Only use OUTSIDE and far away from windows, doors, and vents. WARNING High Pressure Fluid Forces / Burn Hazards High pressure spray can cause injection injury, eye injury, and loss of balance.
Special Equipment Safety Features High Pressure Safety Device (Rupture Disc) WARNING: If the high-pressure safety device ever discharges water, turn the engine off and do not use the machine. The device will no longer function properly. See a dealer or call Product Support at 1-800-270-0810. This unit is equipped with a high pressure safety device, which acts as a backup safety feature. If the unloader malfunctions, the high-pressure safety device will open and relieve excess system pressure.
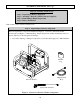
Assembly and Initial Set-Up Step 1. Step 2. Step 3. Step 4. Steps for Assembly / Initial Set-Up Unpacking & Delivery Inspection Attaching a Water Feed Tank (customer supplied) Initial Pump & Engine Preparation Battery Installation Each of these steps is discussed in the below: Step 1. Unpacking & Delivery Inspection Find and separate the components identified in Figure 2 – Overview of Pressure Washer Components and Figure 3 – Hardware Bag.
Assembly and Initial Set-Up Chemical Injector Qty-1 Part # 779614 Nozzles Qty-5 Part # 778946 - 0°, red Part # 778739 - 15°, yellow Part # 778948 - 25°, green Part # 778947 - 40°, white Part # 778949 - Soap, black Suction Hose Assembly Qty-1 Part # 221222 and 777165 Figure 3 – Hardware Bag Contents 11
Assembly and Initial Set-Up Step 2. Attaching a Water Feed Tank If Desired (customer supplied) Water may be supplied to the pressure washer either via an external water tank or via a standard tap supply. CAUTION: Inadequate plumbing between a feed tank and the pressure washer can • • • • • cause damage to the pump from cavitation. To avoid cavitation: Use 3/4" hose and fittings or larger. Hose should be no longer than 6 ft. Place feed tank so bottom of tank is level or higher than bottom of skid frame.
Assembly and Initial Set-Up Step 5. CLOSE the city tap water ball valve and OPEN the feed tank ball valve, as shown in Figure 4a. Step 6. Reroute the easy start valve so it discharges back to the feed tank as shown below in Figure 4b. (This will aid pump priming on initial start-up.) Reroute hose to water feed tank Unloader Figure 4b The easy start valve is located below the Unloader – see "Component Identification" section of this manual for location of Unloader. The tank is now ready to be filled.
Assembly and Initial Set-Up Step 3. Initial Pump & Engine Preparation Prepare Water Pump Verify pump oil level. Note: The pump is shipped with oil. *Change oil after first 40 hours, then every 3 months or 500 hours 1. Verify oil level: a. Remove shipping tape from oil fill cap. Verify that oil level is half way up the sight glass (or at the indicator line on the dip stick, if equipped). 2. If oil level is low, fill using SAE30 non-detergent oil or Cat Pump Oil Item #22158. Oil fill cap 3.
Assembly and Initial Set-Up Step 4. Battery Installation Install a 12-volt standard automotive battery (Group 75/86) with a minimum 18 amp-hour rating. The engine will run but the burner will not fire unless a battery is installed. The battery is to be supplied by the customer and should be installed in the protective battery compartment located near the engine. The inside dimensions of the battery compartment are 111/8"L x 7-3/4"W x 10-1/8"H.
Moving and Handling WARNING The pressures washer is heavy. You can be injured when trying to lift it without mechanical assistance. It can crush and cause serious injury if it drops on someone. Follow the instructions below for safely moving the pressure washer. To reduce risk of injury, use a hoist to elevate or lower the pressure washer. Lift from the lifting eye when using a hoist.
Before Each Use Follow the steps below prior to each use of the pressure washer. Steps to Follow Before Each Use Step 1. Check Equipment Step 2. Add Fuel(s) Step 3. Select Suitable Worksite Step 1. Check Equipment Check/add pump oil Check/add pump oil. *Change oil after first 40 hours, then every 3 months or 500 hours Caution: Never run the pump without sufficient lubrication! 1. Check oil level. Verify that oil level is half way up the sight glass. 2.
Before Each Use replace it with a part that is rated at or above the pressure rating of this machine. 1) Check hoses, fittings, wand, trigger gun and connections for signs of wear, cracks, looseness, or leaks. Replace as required. 2) Check and clean the nozzle orifice. 3) Clean inlet filter. (See Maintenance instructions) Inspect fuel system Always inspect (engine and burner) fuel systems & check for leaks BEFORE starting pressure washer.
Before Each Use Always follow these general safety rules when fueling: 1) Turn pressure washer off and allow to cool for at least two minutes before removing any fuel cap. Note: A running or still-hot engine or burner is hot enough to ignite fuel. 2) Fill fuel tank OUTDOORS – never indoors. Fuel vapors can ignite if they collect inside and enclosure and explosion can result. 3) Stay away from all sources of heat, sparks, and flames. Do not smoke.
Before Each Use 3) Replace fuel cap securely before starting engine. 4) Wipe any excess fuel from unit before starting Step 3. Select Suitable Outdoor Worksite Before using the pressure washer, you must understand the criteria for selecting a suitable location for operation. Note that this pressure washer is for OUTDOOR USE only.
Before Each Use • Note that this pressure washer is NOT designed or approved for use in vehicles or marine applications. Never run the pressure washer inside RVs or other vehicles, on boats, or on pick-up truck beds. WARNING: Never attempt to attach ductwork to the engine muffler or burner exhaust to allow for installation inside an enclosure.
Operation After you have checked and fueled the equipment and positioned it in a suitable worksite, it is time to start your pressure washer. The following are the procedures necessary for safe, successful operation of your pressure washer. WARNING Carefully read and make sure you understand all instructions and safety information before using the pressure washer.
Operation Connect your water supply If using tap water: Follow these instructions when supplying water from a pressurized source such as city tap water: Acquire a suitable garden hose and attach to the water supply: 1. Acquire a suitable garden hose: a. The water supply garden hose must have an inside diameter of at least 5/8". If the hose is more than 100 ft. long, the diameter must be at least 3/4". b. Always use a flexible rubber hose for your water supply. Do not use rigid piping. c.
Operation If using feed tank: Follow these instructions when supplying water from a feed tank: 1. Make sure you have followed all instructions provided in this manual for attaching water feed tank. (See Assembly/Initial Set-Up section, "Step 2. Attaching a Water Feed Tank".) 2. Ensure that you have the tank feed ball valve OPEN, and the city tap water ball valve CLOSED, as indicated in the diagram below. Open this ball valve Close this ball valve 3. Make sure the water in your tank is clean.
Operation 3. Release the collar, making sure it springs back and re-seats to its original (non-retracted) position. (Figure 8b). Check the connection by pulling on the hose to ensure a positive connection. Correct Insertion Not Fully Inserted Collar Seated Collar NOT Seated Figure 8b Select spray nozzle Your pressure washer is equipped with four high-pressure nozzles and one low-pressure nozzle. Generally, the wider the spray angle of the nozzle, the lower the spray pressure produced.
Operation 1. Make sure the engine is off and the hose line depressurized. 2. To install the nozzle, pull the collar back and twist the nozzle firmly into the coupler on the end of the wand. (Figure 9a) Lance Coupler Nozzle Collar Figure 9a 3. Release the collar, making sure it springs back and re-seats to its original (non-retracted) position. (Figure 9b). Check the connection by pulling on the nozzle to ensure a tight connection -- if correctly inserted, nozzle will rotate but not pull out.
Operation • It mixes the cleaning chemical into a low pressure spray. Cleaning chemicals applied under low pressure adhere better to the surface being cleaned, allowing the formula time to react and remove dirt more effectively. Note: An external chemical injector pump is not recommended for use with this pressure washer. WARNING: Chemical spraying • Never spray acids, corrosives, or abrasive or flammable liquids. Breathing hazards, surface burns/corrosion, or fire/explosion could result.
Operation Step 3. Spraying Safety rules for operation Before starting the pressure washer, review the following general safety rules for operation: Conditions for Use Know how to stop. Be thoroughly familiar with proper use of the equipment and all controls and connections. Know how to stop the pressure washer and depressurize system quickly if needed (see "Step 4. Stopping"). Instruct all operators. The pressure washer's owner must instruct all operators and potential renters in safe set-up and operation.
Operation prop. Lock trigger safety latch when not spraying. Spray gun is equipped with a builtin trigger safety latch to guard against accidental trigger release. Rotate safety latch to the locked position when not spraying. Leaving unattended. Always turn off the pressure washer and relieve system pressure before leaving the sprayer unattended. Prompt Emergency Response Seek medical aid for suspected injection injury.
Operation • Make sure the water supply hose is not kinked. A kinked hose will provide insufficient water supply to the pump and reduce its life. Make sure the hose remains unkinked after moving the pressure washer. If using water feed tank: • • • Start engine Ensure that the tank feed ball valve is OPEN, and the city tap water ball valve is CLOSED. (The ball valve you are not using must be closed before starting the engine or pump cavitation could occur.
Operation 5. 6. 7. 8. 9. Turn on burner (If hot spray or steam is desired) injector will draw the chemical into the water stream. The chemical concentration of the spray can be changed by turning the chemical adjustment knob located on the chemical injector. Apply chemicals evenly to the cleaning surface. Never use more chemical than is necessary to clean the surface. Allow the chemicals time to react with the dirt before rinsing. Prepare to rinse by changing to a high-pressure nozzle.
Operation WARNING: It is important that the burner stops firing when the trigger is released. If the burner remains firing, discontinue use until the pressure washer is serviced. Extremely high temperatures can result in serious injury and equipment damage. Begin high pressure spray High Pressure Spray Procedure WARNING: High pressure spraying safety • Keep spray away from people. Never direct discharge stream at or near any person.
Operation CAUTION: Spray gun metal gets extremely hot when using the burner and can burn you on contact. Never touch the metal screw or any metal parts of the spray gun when the heater is being used. Use only designated grip areas. Safety Latch 00417 4. Wash from the bottom to the top, using side-to-side motions. This washes away heavy dirt and allows the detergent to soak as you work toward the top. 5. Use the width of the spray pattern to wash a wide path. Overlap spray paths for complete coverage. 6.
Operation 9. If temporarily interrupting spraying, rotate trigger safety latch downward to the locked position to guard against accidental trigger release. 10. Always turn off the engine and activate spray gun trigger to relieve system pressure when: • the sprayer is unattended, or • disconnecting hoses, installing/cleaning nozzles, or servicing the pump. WARNING: Always turn off the engine and relieve system pressure when finished spraying or when leaving sprayer unattended.
Storage Storage When you are finished using the pressure washer, you must prepare the sprayer for storage and store it in a proper location. Note: o If you will be storing the sprayer in freezing conditions, follow the instructions for preparing the sprayer for storage in freezing conditions. o If you will not be using the sprayer again for 30 days or more, follow the instructions for preparing the engine for long-term storage. WARNING • Fuel and its vapors can ignite and cause a fire.
Storage 3. Using a wrench, disconnect the plumbing that connects to the heating coil inlet. The water will flow out of the heating coil. This will protect the coil from freeze damage. 4. Open both water inlet ball valves and remove the cap from the water filter. This will drain the pump and water inlet plumbing. Long Term freeze protection: (if storing more than 30 days) The RV antifreeze will save the components from freeze damage and keep them lubricated. 1.
Storage d. Replace spark plug, but do not reconnect the spark plug wire. Prepare pressure washer for storage Prepare the pressure washer for storage. Move pressure washer to storage location Let engine cool for 5 minutes before moving the pressure washer to its storage location. 1. Disconnect the battery, remove it from the battery compartment, and store it indoors. 2. Make sure the engine start switch is OFF and fuel valve is OFF. 3. Disconnect the engine spark plug wire if you haven't already done so.
Burner Adjustment Oil Burner Adjustment (only needed if white exhaust smoke appears) The oil burner is preset and performance tested at the factory (elevation 1100 feet). Different altitudes may require a one-time initial burner adjustment. CAUTION: If white smoke appears from the burner exhaust vent during start-up or operation, discontinue use and readjust air bands. Specific steps for burner correction are given below.
Burner Adjustment 5. Slowly open the air band until white smoke just starts to appear. 6. Turn air band halfway back to the black smoke position previously noted. Tighten the locking screw. 7. Now fine tune the burner air by adjusting the shutter: a. Locate the shutter as shown in Figure 14 below. The shutter is a thin circular metal plate located on the outside of the air band. The shutter adjusts independently from the air band and is used to fine-tune the amount of intake air. b.
Maintenance & Repair Inspect and maintain your pressure washer as specified below in order to keep it in safe and optimal working order. Follow all safety rules and recommended maintenance instructions. WARNING ALWAYS shut off water supply, bleed water pressure, turn off engine and disconnect the spark plug before cleaning, adjusting, or servicing the pressure washer. After servicing, make sure all guards and cover shields are replaced before using.
Maintenance & Repair approved repair parts. Replacement parts that do not meet specifications may result in a safety hazard or poor operation of the pressure washer and will void the warranty. Keep pressure washer clean Keep pressure washer clean. If dust or debris accumulates on the pressure washer, clean the pressure washer with a damp cloth or soft bristle brush. Do not allow air intakes to become blocked. CAUTION: Do not spray pressure washer with a garden hose or pressure washer.
Maintenance & Repair Good Water dripping or spraying, or localized moisture Bad Exposed wire mesh due to wear Clean water filter Bad Figure 15 Clean the water filter before each use. WARNING: When cleaning filters, check whether dangerous chemicals have been used with the filter and take any precautions that may be recommended by the manufacturer of these chemicals. Always dispose of hazardous fluids per local, state, and national guidelines. 1) Locate water filter on pump inlet fitting.
Maintenance & Repair Change pump oil Change the pump oil after the first 40 hours of use, and then after every 3 months or 500 hours of use after that. 1. 2. 3. 4. Open oil drain valve on pump. Drain pump oil into suitable container and dispose of responsibly. Close oil drain valve. Make sure unit is sitting level. Fill pump with 18 oz. of SAE30 nondetergent oil or Cat Pump Oil Item #22158 to middle of sight glass (or at the indicator line on the dip stick if equipped). 5. Replace oil fill cap.
Maintenance & Repair Descale heating coil Descale coil tubing annually or more frequently as needed. In hard water areas, scale can build up inside the heating coil tubing. Scale deposits will decrease the output pressure and temperature of heated spray, and may eventually clog water flow through the heating coil. Descale the coil tubing at least annually and more frequently if you detect a decrease in output pressure or temperature.
Maintenance & Repair surface of the heating coil tubing. These deposits will insulate the coil, which then restricts air flow through the heat exchanger and further aggravates the soot build-up. If soot has built up on the exterior of the coil tubing, clean as follows: 1) Wear protective clothing, goggles, and gloves. Lid 2) Disconnect high-pressure hose on inlet side of coil Insulation and thermostat on outlet lid side of coil.
Maintenance & Repair 4) Reset the spacing as shown below in Figure 21. Electrodes 1/16” 1/8” 5/16” Figure 21 NOTE TO COMMERCIAL USERS: All mechanical equipment, no matter how well designed, will need maintenance and repairs. A Northstar pressure washer is no exception. At times, a Northstar pressure washer may become inoperable because repairs are required.
Troubleshooting Engine Will Not Start Causes Low Oil Shutdown Cold Engine No Fuel Dead Battery Spark plug wire not attached Solutions Fill engine with the adequate amount of oil. Choke engine to start. Add gas to engine, make sure fuel shutoff valve is open. Recharge/Replace battery. Attach spark plug wire to spark plug.
Parts Explosion-Rev AN.
Parts Explosion-Rev AN.
Parts Explosion-Rev AN.
Wiring Diagram- Rev AN.
Summary of Important Safety Information This section provides a summary of the various safety procedures and measures that have been presented throughout the manual. Keep this summary handy and refer to it to refresh your memory about how to safely use your pressure washer. WARNING Carefully read and understand the following safety information before using the pressure washer.
Summary of Important Safety Information • Prevent carbon monoxide poisoning – Use outside only! Exhaust fumes from both the engine and the burner contain carbon monoxide (CO), a poisonous gas you cannot see, smell, or taste. The CO generated by the pressure washer can rapidly accumulate, even in areas that appear to be well ventilated, resulting in dangerous and fatal concentrations within minutes.
Summary of Important Safety Information - Never operate unless all safety guards are in place. • Position safely. Place sprayer on firm, level ground to prevent accidental falls and equipment tip-over. • Not in presence of combustibles. Do not use the pressure washer in the presence of flammable vapors, dust, gases, or other potentially combustible materials. Operate only where open flame or torch is permitted • Use backflow preventer.
Summary of Important Safety Information • • • • • • • • • • • • • • whether dangerous chemicals have been used with the filter and take any precautions that may have been recommended by the supplier of these chemicals. Always dispose of hazardous fluids per local, state, and national guidelines. Do not exceed pressure and or temperature limits.
Limited Warranty Dear Valued Customer: The NorthStar Product you just purchased is built with the finest material and craftsmanship. Use this product properly and enjoy the benefits from its high performance. By purchasing a NorthStar product, you show a desire for quality and durability. Like all mechanical equipment this unit requires a due amount of care. Treat this unit like the high quality piece of machinery it is. Neglect and improper handling may impair its performance.
This page has intentionally been left blank.
WARNING: This product can expose you to chemicals including gasoline engine exhaust, which is known to the State of California to cause cancer, and carbon monoxide, which is known to the State of California to cause birth defects or other reproductive harm. For more information go to www.P65Warnings.ca.gov. Manufactured by Northern Tool + Equipment Co., Inc. Burnsville, MN 55306 NorthernTool.