
Product Manual


Burner Adjustment
38
Oil Burner Adjustment
(only needed if white exhaust smoke appears)
The oil burner is preset and performance tested at the factory (elevation 1100 feet). Different
altitudes may require a one-time initial burner adjustment.
CAUTION:
If white smoke appears from the burner exhaust vent during start-up or operation,
discontinue use and readjust air bands.
Specific steps for burner correction are given below.
Burner
Correction
Adjusting the burner will require you to access the burner from underneath the
pressure washer while someone else is operating the spray gun.
Detailed instructions:
1. Make sure burner is cool to the touch before attempting to adjust.
WARNING: The burner adjustment procedure requires part of
an individual's body to be underneath the pressure washer while it is
elevated. Always ensure the pressure washer is securely elevated
before working on the burner underneath.
2. Begin operation of the pressure washer and switch on the burner, as instructed
in the "Operation" section of the manual. Have someone operate the spray
gun so the burner fires.
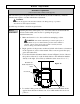
3. Locate the air intake adjustment band as shown in Figure 13 below. Observe
the position of the arrow on the air band relative to the calibration numbers
directly to the right. (Note: Factory calibration starts out at close to "1".)
4. Loosen the locking screw and rotate the air band closed until black smoke
appears from the burner exhaust vent. Note which number the arrow now
points to.
Figure 13
Rotatable Air
Intake Adjustment
Band
Arrowhead
Burner