M2682271H.4 ITEM NUMBER: 2681042, 2682271, 2682272, 2683061, 2683062, 2684061, 2684062, 2685561, 2685562, 2687061, 2687062, 26811102, 26815151, 26815152 SERIAL NUMBER: __________ Owner’s Manual Instructions for Assembly, Testing, Operation, Servicing, and Storage 12V Diaphragm Pump: For use with non-potable liquids such as water-based agricultural pesticides and other liquids** WARNING READ and UNDERSTAND the Owner’s Manual completely before using this pump.
Hazard Signal Word Definitions 2
Table of Contents Intended Use .................................................................................................................................... 4 Summary of Important Safety Information .................................................................................... 5 During Assembly During Operation General Chemical Safety Chemical Applicator Safety Chemical Accident Procedures Warning Label Location ............................................................................
Intended Use The pump is intended for use in spraying agricultural pesticides and other non-flammable liquids. SPRAYING PESTICIDES: Pesticides are hazardous chemicals that must be handled with caution as directed throughout this manual and on the pesticide label. Pesticides are regulated by the United States Environmental Protection Agency (EPA) and defined as: Any substance or mixture of substances intended for preventing, destroying, repelling, or mitigating any pest.
Summary of Important Information WARNING Read and understand this owner’s manual completely before using the pump. Read each chemical label’s instructions before handling the chemical. Improper use of the pump or handling of chemicals could result in serious injury or illness for the operator or nearby persons/animals, or cause damage to the environment. LISTED BELOW is a summary of safety information of particular importance. See individual sections of this owner’s manual for more details.
Summary of Important Information DO NOT EAT, DRINK, SMOKE, RUB YOUR EYES, or TOUCH YOUR BARE SKIN while handling chemicals and spraying. NEVER POINT A SPRAY GUN at people or animals. EXERCISE EXTRA CAUTION when spraying near areas accessible to children and pets. CLEAN up spills immediately per instructions on the chemical label. TURN OFF power to pump, and RELIEVE system pressure before leaving pump unattended. SEE Troubleshooting section of this manual before attempting any repairs.
Warning Label Location WARNING DO NOT PUMP FLAMMABLE FLUIDS. DO NOT USE PUMP IN AN EXPLOSIVE ENVIRONMENT. READ AND UNDERSTAND THE OWNER’S MANUAL COMPLETELY BEFORE USING. RELIEVE SYSTEM PRESSURE BEFORE PERFORMING MAINTENANCE.
Installation Step One: Mounting This NorthStar pump is self-priming. The pump should be located in an area that is dry and provides adequate ventilation. CAUTION DO NOT locate the motor near low temperature plastics or combustible material. The surface temperature of the motor may exceed 250°F [121°C]. The pump may be mounted in any horizontal position.
Installation (continued) Step Three: Connect pump to battery or 12V supply WARNING Batteries are hazardous because they contain caustic acid, can emit explosive gases, and can cause electric shock. Caution must be exercised when making connections to a battery to avoid shock and contact with the acid, and to prevent any sparking that could lead to an explosion. ALWAYS follow the safety instructions and steps listed below in exact sequence when connecting the pump to the battery terminals. 1.
Installation (continued) 3. Connect pump to battery Connect the pump to a 12V DC battery using the following procedure: a) b) c) d) Disconnect the vehicle battery ground wire. Connect the pump’s red wire to the positive (+) terminal of the battery. Connect the pump’s black wire to the negative (-) terminal of the battery. Reconnect the vehicle battery ground wire. Note: Skip steps (a) and (d) if battery is not in a vehicle. WARNING: Always connect in this sequence to avoid possible shock.
Installation (continued) Step Four: Check and test completed assembly. WARNING Check and test completed assembly Serious injury could result from chemical leaks if pump is improperly assembled or the design of the pump is modified. Follow the steps below to ensure the pump is properly assembled. Never modify the pump design. 1. Check assembly Check assembly to assure the pump is properly assembled and in safe working condition: 2.
Operation – Important Safety Information Now that you have completed and tested your assembly, there is some important safety and health information you need to know with regard to handling and spraying chemicals. WARNING Carefully read and make sure you understand the following safety information before using the pump. General Chemical Safety: WARNING Pesticides are hazardous chemicals. Heed the warnings below and follow all instructions carefully.
Operation – Important Safety Information (continued) Chemical Application Safety: WARNING Caution must be used when spraying chemicals to avoid unsafe exposure to humans and the environment. Heed the warnings below and follow all instructions carefully. Before Spraying Pump prep. ALWAYS inspect and prepare the pump before use according to the directions provided in this manual. Keep pump off.
Operation – Important Safety Information (continued) Chemical accident procedures: WARNING Before you use the pump, review the following information with regard to handling accidents. Chemical spills, pump leaks, personal contamination, and poisoning are accident situations which you may encounter. All require an immediate response – See instructions below. Pump leak Bodily chemical contact In the event that the pump develops a leak while spraying chemicals, you must immediately stop spraying.
Operation – Important Safety Information (continued) General procedures include: 1. Control the spill by stopping the source of the spill. If the source of the spill is a container leak, place the leaking container in a larger, watertight container. Keep unprotected people away from the spill site. 2. Contain the spill so that it does not spread and get into water sources. Use a shovel or other tool to make a dike around the spill with soil, sod, or absorbent material. 3.
Operation – Preparing the Pump for Each Use If the pump has been used previously, it must be prepared BEFORE EACH SUBSEQUENT USE. WARNING Read instructions below carefully for inspecting and preparing the pump. Damaged or clogged equipment could result in leaks or uncontrolled spray. Leaks could result in injury to the operator or bystanders from chemical exposure, or cause damage to the environment. Important safety rules: Power off.
Operation – Using the Pump Step One: Assess wind conditions and clear work area. Before you decide to spray, you must determine whether wind conditions are suitable. You must also restrict access to the work area to ensure the safety of bystanders. WARNING Do not spray if wind speeds are greater than 4 MPH or if there are bystanders in the intended spray area. 1. Assess wind speed Assess weather conditions to ensure that it is not too windy to spray. DO NOT SPRAY if wind speeds are greater than 4 MPH.
Operation – Using the Pump (continued) 4. Pressure Switch Operation The pressure switch reacts to outlet pressure, and interrupts power at the preset shut-off pressure indicated on the pump label. When outlet pressure drops below a predetermined limit the switch will close and the pump operates until the shut-off pressure is achieved. The shut-off pressure is set to factory calibrated standards.
Operation – Using the Pump (continued) Step Three: Clean pump and decontaminate after use. When done using the sprayer, it is important to clean the pump and decontaminate yourself. Do not store the pump when saturated with chemicals, as it is unsafe and could also result in damage to the equipment. WARNING Cleanup and decontamination procedures must be followed after each use.
Storage When not in use, store the sprayer indoors. For long term or winter storage, prepare the sprayer by running RV antifreeze through the system. This will keep internal parts lubricated, protect against corrosion, and keep the unit from freezing. CAUTION The pump will be damaged if it freezes. Protect the pump from freezing during storage by following the instructions below. Preparing for storage: 1. Add antifreeze Pour RV antifreeze into the pump system.
Troubleshooting WARNING Before troubleshooting or attempting to service, read the following safety rules to avoid accidental exposure to chemical and also risk of electric shock. Note: A reserve, clean container capable of holding at least the volume of the entire pump system should be kept for use when the pump system needs to be emptied temporarily for repairs. It is advisable to purchase a reserve tank suitable for pesticide storage from Northern Tool and Equipment for use in these circumstances.
Troubleshooting (continued) PROBLEM Pump will not turn on CAUSE SOLUTION Bad electrical connection Short in wires Fuse blown Locked drive Faulty pressure switch Incorrect voltage Out of product Check battery connections Check condition of wires Replace fuse Replace diaphragm assembly Replace pressure switch assembly Check voltage (±10%) Refill supply container Tighten fittings/ Replace cracked fittings Remove restriction Check voltage (±10%) Remove obstruction Remove obstruction Tighten fittings/ Repla
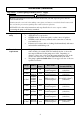
Specifications Model Number Electrical connection Maximum amp draw Maximum flow Maximum pressure Ports Overall dimensions 7.3"x 3.9"x 3" [184mm x 100mm x 78mm] 2681042 12 VDC 4 Amps 1.0 GPM [3.8 LPM] 40 PSI [2.8 bar] 3/4" Quick connect 2682271 12 VDC 8 Amps 2.2 GPM [8.3 LPM] 70 PSI [4.8 bar] 9"x 4"x 4" 3/8" Female 4.9 lbs. [230mm x 102mm NPT [2.22 kg] x 102mm] 2682272 12 VDC 8 Amps 2.2 GPM [8.3 LPM] 70 PSI [4.8 bar] 3/4" Quick connect 2683061 12 VDC 10 Amps 3.0 GPM [11.
Accessories Model #s 2681042, 2682272, 2683062, 2684062, 2685562, 2687062, 26811102, 26815152 Quick Connect x 3/8" Hose barb Part # 787208 Quick Connect x 1/2" MNPT Part # 787211 Quick Connect x 3/4" Hose barb elbow Part # 787214 Part# Quick Connect x 1/2" Hose barb Part # 787209 Quick Connect x 1/2" Hose barb elbow Part # 787213 Quick Connect x 3/8" Hose barb elbow Part # 787212 Quick Connect x 1/2" Hose barb, 50° elbow Part # 787215 Description Quick Connect x 3/4" Hose barb Part # 787210 Quick
Exploded View – 2681042 – Rev H.
Exploded View – 2682271 – Rev H.
Exploded View – 2682272 – Rev H.
Exploded View – 2683061, 2684061, 2685561 – Rev H.
Exploded View – 2683062, 2684062, 2685562 – Rev H.
Exploded View – 2687061 – Rev H.
Exploded View – 2687062 – Rev H.
Exploded View – 26811102 – Rev H.
Exploded View – 26815151 – Rev H.
Exploded View – 26815152 – Rev H.
Limited Warranty Dear Valued Customer: The NorthStar Product you just purchased is built with the finest material and craftsmanship. Use this product properly and enjoy the benefits from its high performance. By purchasing a NorthStar product, you show a desire for quality and durability. Like all mechanical equipment this unit requires a due amount of care. Treat this unit like the high quality piece of machinery it is. Neglect and improper handling may impair its performance.
Northern Tool + Equipment Co., Inc. Burnsville, MN 55306 NorthernTool.