
Product Manual

2
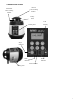
2. FUNCTION OF KEYS
Power On/Off Button
Press this button and the unit will start automatic leveling.
Press this button to turn off the unit.
Left Arrow Button
In grade setting mode, press this button to change digit value from 0-9.
Right Arrow Button
In grade setting mode, press this button to change digit value from 9-0.
Right Turn Button
In scan mode, press this button to move the line segment or point clockwise.
Left Turn Button
In scan mode, press this button to move the line segment or point counter-clockwise.
Scan Mode Button
Press this button to switch from rotating to line generating mode.
Slope/Hold Button.
Press this button once after the unit finds its level and the unit will not continue self- leveling, but will hold the established
level. .
Press this button twice and the unit enters into the grade setting mode.
Height of Instrument Button
Press this button twice after the unit levels to enter into the height of instrument (HI)
protection mode. If the instrument is bumped, the unit
will stop rotating and laser beam will blink. In the grade setting mode,
press this button to move the cursor. Press this button again to exit.
3. SETTING UP INSTRUMENT
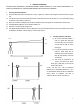
1 Horizontal Applications
You may set your NRL800X laser unit up on a tripod, hang it up on a wall with a wall mount, (a NUCB05 wall mount,
sold separately), or simply set it on a solid surface.
2. Vertical Applications
With the vertical bracket provided (or NUCB05 wall mount, sold separately), set the instrument on a tripod or solid surface.
Instrument should be set approximately level within ±5°.