3-Pt. Landscape Rake Owner’s Manual WARNING: Read carefully and understand all ASSEMBLY AND OPERATION INSTRUCTIONS before operating. Failure to follow the safety rules and other basic safety precautions may result in serious personal injury.
Thank you very much for choosing a Nortrac™ product! For future reference, please complete the owner’s record below: Serial Number/Lot Date Code: ________________________________ Purchase Date: ____________________________________________ Save the receipt, warranty, and this manual. It is important that you read the entire manual to become familiar with this product before you begin using it. This 3-Pt. Landscape Rake is designed for certain applications only.
Table of Contents Intended Use .......................................................................................................................................... 4 Technical Specifications ...................................................................................................................... 4 Important Safety Information ............................................................................................................... 4 Specific Operation Warnings .......................
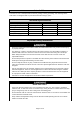
Intended Use The NorTrac 3-Pt. Landscape Rake is ideal for grading, leveling, spreading, and removing stones from lawns. It’s designed with a 3-point hitch which fits category 1 pins. Technical Specifications Property #51454 #51455 #51456 207. lb. 235.0 lb. 255.0 lb. Working Width (inches) 48 60 72 Max. HP 45 45 45 Tines (qty.) 24 30 36 Tines per Foot (qty.) 6 6 6 Ship Weight Important Safety Information • Read and understand all instructions.
• Be aware of all power lines, electrical circuits, water pipes, and other mechanical hazards in your work area. Some of these hazards may be hidden from your view and may cause personal injury and/or property damage if contacted. PERSONAL SAFETY • Stay alert, watch what you are doing, and use common sense when operating the rake. Do not use the rake while you are tired or under the influence of drugs, alcohol, or medication.
• • • • • • • • • • • • Read and understand the Owner’s Manual before operating, servicing, or repairing the equipment. Stop the engine, remove the key, and set the brake before dismounting the tractor. Operate from the tractor seat only. DO NOT operate without guards in place and in good condition. Never allow riders on equipment. Keep bystanders at least 50 feet away while operating. DO NOT operate or transport on steep inclines. DO NOT exceed this implement’s maximum speed of 5 MPH.
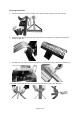
Mounting Instructions 1. Take all components out of the packing crate. (See the Parts List at the end of the manual.) 2. Install the tooth support (#15) and tooth (#16) onto the mounting frame. Tighten them with M10 x 30 bolt and M10 nut. 3. Assemble the main frame weldment (#1) with the mounting frame using a slotted nut and draw pin. 4.Assemble the side bars (lift arms) (#7) and braces (#3) with the main frame weldment.
Make sure the lower draw pins (pull pins) are installed correctly for your tractor. Insert the draw pins into the ball sockets in the lower lift arms of the tractor’s 3-point hitch. Lock into place with linch pins. Attach the mast of the 3-point main frame by installing the tractor’s top link with the top link pin. Adjust the top link assembly to obtain the correct angle of the implement. Check the tractor 3-point lift arms and adjust to level the implement from side to side.
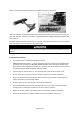
Operating Instructions To prevent property damage, watch for and avoid catching the blade on stumps, large rocks, large dirt piles, and other immovable objects. If you have any questions regarding the proper operation of this rake, contact your dealer or the manufacturer. 1. Set the rake on the ground. Rake about twenty feet, or until you can see what adjustment the rake needs. 2. Adjust the tractor’s top link and the rear landslide heel to set the rake frame level end-to-end. 3.
• Always be sure the implement is in the fully raised position when in transport. • When removing, changing the angle, or reversing the rake, be sure that your feet are never under the rake. • Use extreme caution when backfilling deep holes and trenches. • Be careful to avoid catching the rake on stumps or other immovable objects. • Use care when working on slopes. • Avoid excessive speed during operation. • Make adjustments only when the rake is attached to the tractor.
Parts Diagram Parts List Ref. Part Description Qty. Ref. Part Description Qty. 1 Main Frame Weldment 1 11 Nut M30 1 2 Lock Nut M16 2 12 Bolt M16x100 1 3 Brace 1 13 Hair Pin 2 4 Pin 2 14 Nut M10 5 Bolt M16x50 1 15 Tooth Support 6 Draw Pin 2 16 Tooth 7 Side Bar 2 17 Tinebar Weldment 1 8 Lock Washer 22 2 18 Bolt M10x30 4':24, 5':30, 6':36 Page 11 of 14 51454: 24 pcs; 51455: 30 pcs; 51456: 36 pcs. 51454: 4 pcs; 51455: 5 pcs; 51456: 6 pcs.
Ref. Part Description Qty. Ref. Part Description Qty. 9 Nut M22x1.5 2 19 Lock Washer M30 1 10 Steel Collar 2 Replacement Parts • For replacement parts and technical questions, please call Customer Service at 1-800-222-5381. • Not all product components are available for replacement. The illustrations provided are a convenient reference to the location and position of parts in the assembly sequence.
Limited Warranty Northern Tool and Equipment Company, Inc. ("We'' or '"Us'') warrants to the original purchaser only ("You'' or “Your”) that the Nortrac product purchased will be free from material defects in both materials and workmanship, normal wear and tear excepted, for a period of one year from date of purchase. The foregoing warranty is valid only if the installation and use of the product is strictly in accordance with product instructions.
Distributed by: Northern Tool & Equipment Company, Inc. Burnsville, Minnesota 55306 www.northerntool.