All products are trademarks of Nostalgia Products Group, LLC. Worldwide design & utility patented or patents pending. © 2011 Nostalgia Products Group, LLC. www.nostalgia electrics.com (rev.
KRS2000 SERIES Kegorator™ Instruction Manual
CONTENTS IMPORTANT PRECAUTIONS . . . . . . . . . . . . . . . . . . . . . . . . . . . . . . 3 IMPORTANT SAFEGUARDS . . . . . . . . . . . . . . . . . . . . . . . . . . . . . . 3 INTRODUCTION . . . . . . . . . . . . . . . . . . . . . . . . . . . . . . . . . . . . . 5 PARTS & ASSEMBLY . . . . . . . . . . . . . . . . . . . . . . . . . . . . . . . . . . . 6 WASHERS . . . . . . . .
ENGLISH IMPORTANT PRECAUTIONS 1. NEVER use an abrasive sponge, cloth or scouring pad on this appliance. 2. NEVER leave appliance unattended while in use. 3. Unplug unit from outlet when not in use and during cleaning. 4. DO NOT operate this appliance with a damaged cord or plug, or if the appliance ever malfunctions. 5. DO NOT clean any parts of this appliance in a dishwasher. 6. Keep out of reach of children. 7. This appliance is NOT A TOY. 8.
Do not operate this appliance when parts are missing or broken. 14. Do not use this appliance for commercial use. 15. This appliance is designed for indoor use only and should not be used outdoors. 16. To reduce is the risk of injury, do not allow children to play in or on the appliance. Close supervision is necessary when the appliance is used near children. 17. The appliance door must be closed during operation. Do not leave the door open when children are near the dispenser. 18.
ENGLISH INTRODUCTION To ensure that your KEGORATOR™ works to the maximum efficiency for which it was designed, keep it in a location where there is proper air circulation and electrical outlets. Choose a location where the KEGORATOR™ will be away from heat and will not be exposed to direct sunlight. • The KEGORATOR™ is designed for indoor use only. It should not be used outdoors. • The KEGORATOR™ is designed to be freestanding and should not be placed in a built-in or recessed area.
Read assembly instructions carefully before installing the KEGORATOR™ . If still unsure whether the KEGORATOR™ has been properly installed after assembly is complete, it is recommended that you contact a qualified installer. Allow the KEGORATOR™ to stand in an upright position for about 8 hours before turning on the power. Once the unit is laid on its side, the coolant in the refrigeration unit is shifted. The coolant in the refrigeration unit needs to stabilize before the power is turned on.
ENGLISH Parts #1 Keg Coupler #2 Backflow Stopper #3 Rubber Washer (Fits D-Sankey Keg Qty. 1 Qty. 1 Valves) Qty. 1 #5 Beer Tower Washer Qty. 1 #9 CO2 Tank Valve Qty. 1 #6 Beer Tap/Hose #7 CO2 Regulator Assembly Qty. 1 Qty. 1 #10 Guard Rail Qty. 1 #11 Drip Tray Grate Qty. 1 #13 Rubber Foot #14 Keg Base Board #15 Metal Washer Qty. 4 Qty. 1 Qty. 4 #17 Casters Qty. 2 #18 CO2 Tank Band Qty. 1 #21 Air Hose Connector Washer Qty. 1 #22 Beer Tap Wrench Qty. 1 #25 Beer Tapper & Handle Qty.
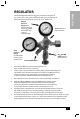
ENGLISH REGULATOR The Double Regulator works the CO2 Tank and measures PSI (pounds per square inch), as well as the volume of the CO2 gas in the Cylinder. Set Output Pressure Gauge between 8-12 PSI for a nice, frothy head. Output Pressure Gauge (0-60 PSI) for measuring PSI of CO2 outflow from Tank to Keg (8-12 PSI recommended). Tank Pressure Gauge (0-3000 PSI) for measuring PSI of CO2 in tank. Screw adjusts the output pressure. CO2 Shut Off Valve (shown in open position) Pressure Relief Valve 1.
ENGLISH INSTALLING THE CASTERS Follow the steps below to install the Casters. 1. Empty the inside of the cabinet completely and lay the KEGORATOR™ down on it’s side. We recommend that you place a piece of cardboard or cloth underneath the cabinet to prevent dents or scratches. 2. Place washers over Caster bolts, then insert the Casters into the holes on the bottom corners of the cabinet. Tighten each Caster by turning the nut clockwise with a wrench (not provided in the kit). 3.
ENGLISH CO2 & TAP TOWER INSTALLATION You must read and understand the steps below for the CO2 assembly before installation. When you purchase the first keg of beer, you must also have your CO2 cylinder filled at your local supplier. CO2 tanks can be refilled at locations such as welding supply shops, party stores, or wherever kegs are purchased. STEP 1 Make sure white nylon High Pressure Washer (already installed) is attached to CO2 Double Regulator.
ENGLISH STEP 6 The CO2 Rubber Directional Washer goes back into the Keg Coupler. STEP 8 Place the Tap Tower on the KEGORATOR™ and feed the hose line through the hole in the top of the KEGORATOR™ . STEP 10 Place Coupler Washer (#3)on top of the Keg Coupler. 11 STEP 7 Connect the CO2 line from the Double Regulator to the Keg Coupler. STEP 9 Make sure the notches in the Tap Tower fit into the holes in the top of the KEGORATOR™ . Tighten the Tap Tower by twisting until it locks in place.
Complete CO2 Tank Installation ENGLISH CO2 Bottle Double Regulator Beer Tower Tap/ Hose Assembly Connects Beer Tap to Keg Coupler Large Butterfly Nut Secures Hose to Beer Tap CO2 Tank Band CO2 Bottle Beer Tap Handle Air Hose Connects Regulator to Bottom of Keg Coupler Part Connects to Keg DANGER! CO2 can be dangerous! CO2 cylinders contain high-pressured gas, which can be hazardous if handled improperly. They must be handled with care.
ENGLISH TAPPING THE BEER KEG Connect to the Beer Line Tube Connect to CO2 Gas Line Tube TU (SINGLE VALVE-TYPE KEG) RRNN WIIS KW SE E CK OC CLLO C Black pull handle Keg Coupler Beer Keg Neck fig. 1 fig. 2 fig. 3 Lift Upright Beer Keg Keg Support fig. 4 fig. 5 Follow these steps below to tap the Beer Keg. 1. Make sure the black pull handle of the Keg Coupler is in the closed (up) position before installing it on the keg (Fig. 1).
• It is recommended that you flush the hoses with water prior to first use to remove any dust and debris from shipping. • Only open the CO2 Tank ¼ turn to begin with and then use the regulator to adjust to desired pour. If it is not enough, continue to open the CO2 Tank by ¼ turn and use regulator until desired setting is reached. • It is normal to see condensation form on the faucet.
ENGLISH RETURNS & WARRANTY SHOULD YOUR UNIT NOT WORK OR IS DAMAGED WHEN YOU FIRST TAKE IT OUT OF THE BOX, PLEASE RETURN IT TO THE PLACE OF PURCHASE IMMEDIATELY. KEGORATOR™ / KRS2000 SERIES Should you have any questions, please contact us via email or at the customer service number listed below between the hours of 8:00 AM and 5:00 PM, Monday through Friday, Central Standard Time. Distributed by: Nostalgia Products Group LLC 1471 Partnership Dr.