
User's Manual


4
INSTALLATION AND SETUP
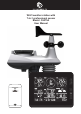
Your console can pair up with one wireless 7-in-1 outdoor sensor and up to 7 wireless indoor
sensors. (1pc wireless indoor sensor included)
INSTALL WIRELESS 7-IN-1 SENSOR
Your wireless 7-IN-1 sensor measures wind-speed, wind-direction, rainfall, UV, light intensity,
temperature and humidity for you. It’s assembled and calibrated for your easy installation.
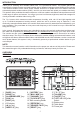
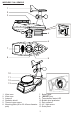
INSTALL BATTERIES
Unscrew the battery door at bottom of unit and insert the
batteries according to the +/- polarity indicated. Screw the
battery door compartment on tightly.
NOTE:
- Ensure the water tight O-ring is properly aligned in
place to ensure water resistant.
- The red LED will begin ashing every 12 seconds.
Screw
location
3 x AA
batteries
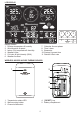
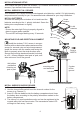
MOUNTING POLE AND DIRECTION ALIGNMENT
Install the wireless 7-IN-1 sensor in an open
location with no obstructions above and around the
sensor for accurate rain and wind measurement.
Install the sensor with the smaller end facing the
North to properly orient the wind direction vane.
Secure the mounting stand and bracket (included)
to a 35 ~ 40mm diameter steel post or pole, and
allow minimum 2m off the ground.
Point to
NORTH
2 meter
off the
ground
mounting pole
and stand not
included
Add rubber
pad before
mounting on
pole or post
INSTALL WIRELESS INDOOR SENSOR
1. Remove the battery door of the sensor.
2. Use the channel slide switch to set the channel number for the
sensor (e.g. Channel 1)
3. Insert 2 x AA size batteries into the battery compartment and close
the battery door according to the polarity information marked on the
battery compartment.
4. The sensor is in synchronization mode, and can be registered to the
console within the next few minutes. The transmission status LED
will begin to ash every 1 minute.