Adam Equipment CORE SERIES (P.N.
Easy Reference: Model name of the balance: Serial number of the unit: Software revision number (Displayed when power is first turned on): Date of Purchase: Name of the supplier and place: 2|P a g e © Adam Equipment Company 2008
1.0 CONTENTS 1.0 2.0 3.0 3.1 3.2 3.3 3.4 3.5 4.0 4.1 4.2 4.3 4.4 5.0 5.1 5.2 5.3 6.0 7.0 7.1 7.2 8.0 9.0 10.0 Contents........................................................................................... 3 Introduction ..................................................................................... 3 Set Up .............................................................................................. 4 Unpacking And Setting Up Your Balance ............................................
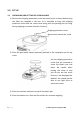
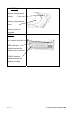
3.0 SET UP 3.1 UNPACKING AND SETTING UP YOUR BALANCE 1) Remove the shipping protection screw and round cover as shown below using the Allen key supplied in the box. (It is advisable to keep the shipping protection screw and the round cover along with the packing box for using during shipping to another location in future). Shipping protection screw Round cover around the screw 2) Place the pan (which comes separately packed) in the receptacles on the top cover.
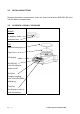
3.2 INSTALLING BATTERIES Remove the battery compartment cover and insert six batteries (R6P/LR6 /AA size) into the battery compartment. 3.3 OVERVIEW ‐ DISPLAY / KEY BOARD BEHIND AC adapter socket Lock down slot TOP Stainless Steel pan Plastic Pan LCD display [On/Off] key Turns the balance power on/off [Unit] key Changes weighing units.
BOTTOM Battery compartment screws Battery compartment cover Batteries are not included DISPLAY battery indicator ZERO indicator Indicates when the balance zero is correct. STABLE indicator Indicates when the reading is stable.
3.4 LOCATING AND PROTECTING YOUR BALANCE In order to keep your balance functioning at its best we suggest that you do the following: Avoid extremes of temperature. Do not place in direct sunlight or near air conditioning vents. Make sure the balance is located on a strong table and free from vibration. Avoid unstable power sources. Do not operate near large users of electricity such as welding equipment or large motors. Do not leave batteries in the balance if you are not using it for a long time.
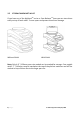
3.5 STORING WHEN NOT IN USE If you have any of the HighlandTM series or Core BalanceTM lines you can store them easily on top of each other. To save space and protect them from damage. Without Shield With Shield Note: Only 4.8” / 120mm ø pan size models can be stacked for storage. Core models with 5.7” / 145mm ø may be stacked at the top of the pile but machines can NOT be stacked on top of them due to the larger pan size.
4.0 BASIC OPERATION 4.1 TURNING ON THE BALANCE Plug in the unit using the AC adapter or power from the batteries. 1) Press the On/Off button and the balance will automatically show Cqt-1.0 Cqt then count from 0 to 9 for a few seconds and show the voltage X.X Vol where x.x is the voltage of the battery or the AC adapter. Finally it will display "0.00" along with the last selected weighing unit, Stable symbol, and Zero symbol. 2) The balance is ready to be used.
4.3 WEIGHING To determine the weight of a sample, first tare an empty container (if used), then place the sample in the container. The display will show the weight and the unit of weight currently in use. The stable indicator will light up when the reading is stable. 4.4 WEIGHING UNITS To change the weighing units, press [Unit] to cycle through the available units. See the Parameter section to enable or disable the weighing units.
5.0 PARAMETERS The balance has 3 parameters that can be set by the user. FUNCTION Auto Off Backlight SECTION See section 5.1 DESCRIPTION Sets the auto power off function See section 5.2 Sets the backlight OFF BL backlight is off 1 BL backlight is automatic 2 BL backlight is always on Weighing unit 5.1 See section 5.3 Sets the units to be used kg – g – lb – oz – ct – dr – GN – N‐tl.t AUTO POWER OFF The auto power off function helps conserve power, when using the batteries or AC adapter.
5.2 SETTING THE BACKLIGHT The backlight may be enabled or disabled by the user. If the backlight is disabled, the battery life will be greater. The following settings are available: 1 BL 2 BL OFF BL Sets the backlight to operate automatically when a weight is placed on the balance or a key is pressed. Sets the backlight to be on all the time. Sets the backlight to be off.
7) To exit turn the balance off and back on again The following table shows the different weighing units which are available to the user and the conversion factors for each. Name of the Description Units Kilograms A standard metric unit Grams A standard metric unit Pounds Standard weighing unit in UK/USA. Ounce Avoirdupois ounce. 16 ounces make a pound. Carat Used for weighing jewelry and gems, etc. Dram Avoirdupois unit there are 16 DR in an ounce. Grains A basic weighing unit in the imperial system.
6.0 CALIBRATION Calibration may be required when the balance is initially installed or moved to a new location. Over time and use, mechanical deviations may occur so it is recommended that you calibrate you balance regularly for peak performance. Before calibrating your should make sure you have the correct weights. The weights should be known to an accuracy that is appropriate for the balance being calibrated, for example, OIML Class M1 type or ASTM E617 Class 4.
7.0 TROUBLE SHOOTING 7.1 ERROR MESSAGES If an error message is shown, repeat the step that caused the message. If the error message is still shown then contact your dealer for support. ERROR CODE ADO ADL ----- Unit-E FAIL 15 | P a g e DESCRIPTION POSSIBLE CAUSES Solutions A/D Value too high. Weight on the pan when turning on. Improper calibration of the balance. Damaged load cell. Damaged Electronics. A/D Value too low. Pan is not installed when turning on. Calibration not correct.
7.2 REPLACEMENT PARTS AND ACCESSORIES If you need to order any spare parts and accessories, contact your supplier or Adam Equipment.
8.0 SPECIFICATIONS Model # Maximum Capacity Readability Resolution Repeatability (Std Dev) Linearity ± Units of Measure Stabilisation Time Operating Temperature Power Supply Calibration Calibration Mass Display Draft shield (diameter x h) Balance Housing Pan Size Overall Dimensions (w x d x h) Net Weight 17 | P a g e CQT‐200 200g 0.01g 1:20000 CQT‐ 250 250g 0.1g 1:2500 CQT‐600 600g 0.1g 1:6000 CQT‐1500 1500g 0.1g 1:15000 CQT‐2600 2600g 0.
9.0 CALIBRATION CERTIFICATE 10.0 WARRANTY STATEMENT Adam Equipment offers Limited Warranty (Parts and Labor) for the components failed due to defects in materials or workmanship. Warranty starts from the date of delivery. During the warranty period, should any repairs be necessary, the customer must inform the supplier or Adam Equipment. The company or its authorised Technician reserves the right to repair or replace any components at its own discretion.
Manufacturer’s Declaration of Conformity This product has been manufactured in accordance with the harmonized European standards, following the provisions of the below stated directives: Electro Magnetic Compatibility Directive 2004/108/EC Low Voltage Directive 2006/95/EC Adam Equipment Co. Ltd. Bond Avenue, Denbigh East Milton Keynes, MK1 1SW United Kingdom FCC COMPLIANCE This equipment has been tested and found to comply with the limits for a Class A digital device, pursuant to Part 15 of the FCC Rules.
ADAM EQUIPMENT is an ISO 9001:2000 certified global company with more than 35 years experience in the production and sale of electronic weighing equipment. For a complete listing of all Adam balances and balances visit our website at: www.adamequipment.com © Copyright by Adam Equipment Co. Ltd. All rights reserved. No part of this publication may be reprinted or translated in any form or by any means without the prior permission of Adam Equipment.