OPERATING INSTRUCTIONS Notes OAKTON® 35618-Series Write down the name and information of your OAKTON distributor here.
Table of Contents 1. Introduction............................................................................................4 2. Display and keypad functions .............................................................5-6 2.1 Display ...................................................................................................................................5 2.2 Keypad ...................................................................................................................................
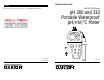
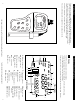
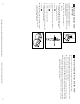
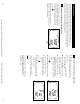
1. Introduction Thank you for selecting an OAKTON meter. This OAKTON portable meter is a microprocessor-based instrument that measures pH, mV, and temperature. It’s completely waterproof—and it floats! Your meter has many user-friendly features, all of which are accessible through the membrane keypad. This meter includes two electrode holders and batteries. READY MEAS pH C ATC MR DE TER EN WATERPROOF LD HO pH/mV/°C Data Meter pH 300 Series ON F OF L CA AS ME MI ▼ UP SET Display 2.
2.2 Keypad The large membrane keypad makes the instrument easy to use. Each button, when pressed, has a corresponding graphic indicator on the LCD. ON/OFF............Powers and shuts off the meter. HOLD ..............Freezes the measured reading. To activate, press HOLD while in measurement mode. To release, press HOLD again. pH 310 model only: When auto endpoint feature is switched on, it automatically holds reading after 5 seconds of stability. The HOLD indicator appears on the display.
Connecting the Electrode and Temperature Probe To connect the pH, ORP or ISE electrode: 1. Slide the BNC connector of the probe over the BNC connector socket on the meter. Make sure the slots of the connector are in line with the posts of the socket. Rotate and push the connector clockwise until it locks. 3.2 The OAKTON pH/mV meter can use any standard pH, ORP, or ISE electrode with a BNC connector.
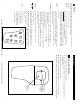
3.3 Attaching the Electrode Holder to the Meter Attaching the electrode holder to the meter facilitates one-hand operation. Attach two electrode holders if you have a separate electrode and temperature probe. the meter. 1. Locate the slot on the left hand side of 2. Gently slide the flange of the holder into the slot on the meter. Make sure the holder is secured properly into the slot. See figure A You can attach the electrode holder in different positions.
Important Information on Meter Calibration 4. Calibration 4.1 When you recalibrate your meter, old pH, Rel mV and mV calibration points are replaced on a point by point basis. For example, if you previously calibrated your meter at pH 4.01, 7.00, and 10.01, and you recalibrate at pH 7.00, the meter retains the old calibration data at pH 4.01 and pH 10.01. To view current calibration points, see Program P2.0 in the SETUP section, page 29.
4.3 pH calibration A B READY MEAS CAL CAL pH pH pH pH ATC C pH NOTE: We recommend that you perform at least a 2-point calibration using standard buffers that bracket (one above and one below) the expected sample range. You can perform a 1-point calibration, but make sure that the buffer value is close to the sample value you are measuring. 1. If necessary, press the MODE key to select pH mode. The pH indicator appears in the upper right hand corner of the display. See figure A 2.
4.4 Relative mV Calibration 1. While in the measurement function, press MODE to enter the mV mode. The mV indicator appears in the upper right hand corner. See figure A 2. Press the CAL/MEAS key. The CAL indicator appears above the primary display. The primary display shows the relative mV reading and the secondary display shows the absolute mV value. NOTE: If you have never calibrated relative mV or if the meter has been reset, the value shown in the primary display is the same as the absolute mV value.
5. Measurement Automatic Temperature Compensation MEAS ATC C pH This meter is capable of taking measurements with automatic or manual temperature compensation. Automatic temperature compensation only occurs when a temperature sensor is plugged into the meter. If there is no temperature sensor plugged into the meter, the default manual temperature setting is automatically 25°C. You can manually set the temperature to match your working conditions using a separate thermometer. 5.
5.3 Taking Measurements A MEAS Be sure to remove the electrode soaker bottle or protective rubber cap on the electrode before measurement. To take readings: 1. Rinse the probe with deionized or distilled water before use to remove any impurities adhering to the probe body. If the pH electrode has dehydrated, soak it for 30 minutes in OAKTON electrode storage solution or a 2M–4M KCl solution. 2. Press ON to switch on meter. The MEAS annunciator appears on the top center of the LCD.
6. HOLD function This feature lets you freeze the value of the pH, mV (or Relative mV) and temperature readings for a delayed observation. HOLD can be used any time when in MEAS mode. 1. To hold a measurement, press the HOLD key while in measurement mode. "HOLD" will appear on the display. See figure A again. Continue to take measurements. 2. To release the held value, press HOLD NOTE: This meter shuts off automatically after 30 minutes of nonuse.
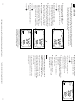
7.2 Memory Recall B C D E MEM MEM MEM MEM pH C Time/date appears on pH 310 meter display only PM This function recalls the previous readings stored in the memory. You can only access MR from the MEASurement mode. Memory recall is in “Last In First Out” order. To recall readings: 1. Press the MR key once to retrieve the last reading stored. The memory location screen—MEM, “Loc” and the memory number—will flash on the display. See figure B 2.
8.1 Advanced set-up mode overview Press the SETUP key to enter Set up mode. Press the ▲ and ▼ keys to scroll through sub groups. MEM pH MEM pH P6.0: Reset to factory default • Setting year • Setting date (month/day) • Setting time (hour/minute/second) P5.0: Setting Clock • P4.1: Ready indicator on or off • P4.2: # of calibration points: 2, 3, 4, 5, or 6 (6th point available for DIN buffer set only) • P4.3: Select calibration buffer set: USA, DIN, or NIST • P4.4: Select °C or °F P4.
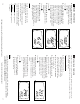
8.2 P1.0: Memory Clear 8.3 P2.0: Viewing previous calibration data mode. See figure A 2. Press the ▲ and ▼ keys to scroll through subgroups until you view parameter P2.0. 3. pH 300 meter only: Press the ENTER key repeatedly to view previous calibration data. See figure B B SETUP SETUP SETUP pH pH This mode lets you recall previous calibration data, which helps you know when to recalibrate your meter. This is a “view only” mode.
8.4 P3.0: Viewing electrode data B A SETUP SETUP SETUP R.mV pH mV pH Program 3 has two “view only”options that lets you check the electrode parameters for diagnostic purposes. P3.1: Electrode offset From measurement mode mode. 1. Press the Setup key to enter Set Up 2. Press the ▲ and ▼ keys to scroll through subgroups until you view parameter P3.0. See figure A parameter 3.1. 3. Press the ENTER key to select 4. The display shows the electrode offset value.
8.5 P4.0: Unit configuration P4.1: READY indicator and auto endpoint function Program P4.1 lets you select “READY indicator on” to indicate when the reading is stable*, or select “READY indicator off” for faster meter response. B A ON READY SETUP SETUP pH 310 meter only: Program P4.1 also lets you switch the Auto endpoint function on or off. Select auto endpoint on to “hold” the reading when it is stable for more than 5 seconds.
P4.3 Calibration buffer selection sets Available in pH 310 meter only P4.4 Selecting °C or °F 1. Press Setup key to enter Set Up mode. subgroups until you view parameter P4.0. 2. Press the ▲ and ▼ keys to scroll through See figure G select parameter 4.4. 3. Press the ENTER key four times to See figure H between °C and °F. 4. Press the ▲ and ▼ keys to toggle 5. Press the ENTER key to confirm selection and to return to the subgroup menu. Press the CAL/MEAS key to return to measurement mode.
8.6 P5.0: Resetting to factory default settings 8.7 P5.0: Setting the real-time clock SETUP SETUP SETUP SETUP Available in pH 310 meter only 1. Press Setup key to enter Set Up mode. From measurement mode Available in pH 300 meter only SETUP MEAS 2. Press the ▲ and ▼ keys to scroll through subgroups until you view parameter P5.0. See figure A 3. Press the ENTER key to enter parameter P5.0. The meter lets you select the century: “19-” or “20-”. The century digits will flash.
11. Press the ENTER key to confirm the date and move to “hour” selection. The “hour” digits will flash. See figure F 12. Press the ▲ and ▼ keys to toggle to the correct hour. Note the “AM” and “PM” indicator on the lower portion of the display. 13. Press the ENTER key to confirm the hour and move to “minute” selection. The “minute” digits will flash. See figure G 14. Press the ▲ and ▼ keys to toggle to the correct minutes. 15. Press the ENTER key to confirm the minutes and move to “second” selection.
9. Probe Care and Maintenance Since your pH electrode is susceptible to dirt and contamination, clean it every one to three months depending on the extent and condition of use. NOTE: for specialty electrode care, consult the instruction manual included with your electrode. pH electrode activation (for glass bodied electrodes only) WARNING: Only qualified persons proficient with the safe handling of dangerous chemicals should perform the procedure below.
Cause Solution 10. Troubleshooting Problem a) Batteries not in place. a) Check that batteries are in place and making good contact. 11. Error Messages Cause Solution Release key. Select valid operations depending on mode. Indicates Wrong input in selected mode. LCD Display Unrecognized input from keypad b) Reinsert batteries with correct polarity. Err annunciator b) Batteries not in correct polarity (+ and –). Calibration error c) Weak batteries.
Resolution Range Mode ±0.01 pH 0.01 pH -2.00 to 16.00 pH pH 6-pin plug ±0.5˚C (also ±0.5˚F for pH 310 meter) 0.1˚C (also 0.1°F for pH 310 meter) –10.0 to 110.0˚C (also 14.0 to 230.0°F for pH 310 meter) Temperature BNC connector ±0.2 mV between ±199.9 mV ±2 mV beyond ±199.9 mV 0.1 mV between ±199.9 mV 1 mV beyond ±199.9 mV -2000 to 2000 mV (same for Rel mV) mV 12. Specifications Accuracy BNC connector Input Calibration pH 300 meter: Up to five points (pH1.68, 4.01, 7.00, 10.01, 12.
OAKTON calibration solutions pH solutions have ±0.01 pH accuracy at 25°C. Shpg wt 1.1 lb (510 g). 00654-01 pH 1.68 calibration buffer, 1 pint. 00654-00 pH 4.01 calibration buffer, 1 pint. 00654-04 pH 7.01 calibration buffer, 1 pint. 00654-08 pH 10.01 calibration buffer, 1 pint. 00654-12 pH 12.45 calibration buffer, 1 pint. OAKTON “Singles” calibration solution pouches pH solutions have ±0.01 pH accuracy at 25°C. Shpg wt 1.1 lb (510 g) per box. 35653-00 Deionized rinse water solution pouches, 20/box.