Notes OPERATING INSTRUCTIONS OAKTON® 35632-Series Write down the name and information of your OAKTON distributor here.
Table of Contents 8.5 pH mode—Program P4.0: Resetting to factory default settings .................................38 8.6 % saturation mode—Program P1.0: Dissolved oxygen parameters 1. Introduction............................................................................................4 Pressure adjustment mode..............................................................................................39 2. Display and keypad functions .............................................................
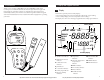
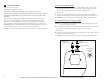
1. Introduction 2. Display and Keypad Functions Thank you for selecting an OAKTON meter. This OAKTON portable meter is a microprocessor-based instrument that measures pH, dissolved oxygen and temperature. It’s completely waterproof—and it floats! Your meter has many user-friendly features, all of which are accessible through the membrane keypad. The LCD has a primary and secondary display. Your meter includes batteries. Please read this manual thoroughly before operating your meter.
2.2 Keypad 3. Preparation The large membrane keypad makes the instrument easy to use. Each button, when pressed, has a corresponding graphic indicator on the LCD. ON/OFF............Powers and shuts off the meter. 3.1 Inserting the Batteries HOLD ..............Freezes the measured reading. To activate, press HOLD while in measurement mode. To release, press HOLD again. NOTE: When auto endpoint feature is switched on, it automatically holds reading after 5 seconds of stability.
3.2 Probe information To connect the pH electrode: 1. Slide the BNC connector of the probe over the BNC connector socket on the Your meter uses two probes: meter. Make sure the slots of the connector are in line with the posts of the socket. Rotate and push the connector clockwise until it locks.
4.2 4. Calibration 4.1 Important Information on Meter Calibration When you recalibrate your meter, old calibration points are replaced on a “point by point” basis in pH and completely for % saturation and mg/l (ppm). For example: • pH: if you previously calibrated your meter at pH 4.01, 7.00, and 10.01, and you recalibrate at pH 7.00, the meter retains the old calibration data at pH 4.01 and pH 10.01. • % saturation and mg/l (ppm): All new calibrations automatically override existing calibration data.
4.3 6. Press ENTER to confirm calibration. pH calibration NOTE: We recommend that you perform at least a 2-point calibration using standard buffers that bracket (one above and one below) the expected sample range. You can perform a 1-point calibration, but make sure that the buffer value is close to the sample value you are measuring. The temperature sensing element is in the DO probe.
4.4 Preparing the meter for DO calibration 4.5 Dissolved Oxygen calibration in percent saturation Before calibrating your meter, make sure to rinse the DO probe well with de-ionized water or rinse solution. You can calibrate this meter quickly and easily in air. The exact calibration value depends on barometric pressure. The meter is set to a factory default of 760 mm Hg, which results in a calibration value of 100% saturation in air.
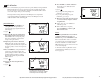
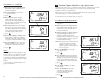
To calibrate 0 % saturation: 4.6 1. Rinse the probe well with deionized Calibrating the meter to 100 % in saturation mode will also calibrate the mg/l mode at the value in mg/l corresponding to 100% saturation. This should produce acceptable results in most applications. rinse water or rinse solution. Do not touch the membrane. MEAS 2. Press the MODE key to select the % READY % saturation mode. See figure D C 2. Place the probe in zero oxygen solution.
Notes on mg/l (ppm) mode calibration 4.7 Temperature Calibration During mg/l (ppm) calibration, the meter adjusts to the barometric pressure value that is programmed into the meter. It also adjusts to the salinity value that is programmed into the meter. The built-in temperature sensor included in the DO probe is factory calibrated. Calibrate your sensor only if you suspect sensor drift that may have occurred over a long period of time or if you have a replacement DO probe.
Taking measurements with READY indicator selected on 5. Measurement 5.1 If the READY indicator has been activated, the READY annunciator lights when the reading is stable. Switch the READY indicator on or off in the SETUP program P5.1 for % saturation measurements (page 43) or program P4.1 (page 51) for mg/l (ppm) measurements.
Salinity adjustment 5.3 SETUP NOTE: this mode appears in mg/l (ppm) measurement mode only. Be sure to remove the protective rubber cap on the electrode before measurement. To ensure Automatic Temperature Compensation (ATC) for pH measurements, the DO probe must be plugged in and must be immersed into the sample you wish to take pH readings. 1. Press the Mode key to select mg/l (ppm) mode. 2. Press the SETUP key to enter Set Up Taking pH Measurements A To take readings: mode. 1.
Taking measurements with READY indicator selected on If the READY indicator has been activated, the READY annunciator lights when the reading is stable. Switch the READY indicator on or off in Set up program P3.1— see page 35 for directions. Taking measurements with the auto endpoint feature selected on When a reading is stable for more than 5 seconds, the auto endpoint feature will automatically “HOLD” the reading. The “HOLD” indicator appears on the left side of the display.
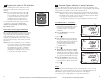
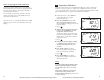
6. HOLD function 7. Backlit LCD This feature lets you freeze the value of the pH, % saturation or mg/l (ppm) and temperature readings for a delayed observation. HOLD can be used any time when in MEAS mode. Using the backlit LCD MEAS pH HOLD See figures A and C ATC A 2. To release the held value, press HOLD again. Continue to take measurements. MEAS NOTE: This meter shuts off automatically after 20 minutes of nonuse.
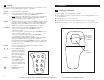
8.1 8. Advanced SETUP functions The advanced set up mode lets you customize your meter’s preferences and defaults. Your OAKTON waterproof meter features different sub groups that organize all SETUP parameters. Advanced SETUP mode detailed overview Press the SETUP key to enter SETUP mode. Press the ▲ and ▼ keys to scroll through sub groups.
From the % saturation measurement mode SETUP dPr: Dissolved oxygen parameters From the mg/l (ppm) measurement mode dPr: Dissolved oxygen parameters SETUP • Select Hg or Pa barometric pressure units • Select barometric pressure Instructions on page 39 SETUP Instructions on page 47-48 OFS: % saturation offset adjustment CAL: Viewing previous calibration data SETUP • Set % saturation offset adjustment Instructions on page 40 SETUP • View previous calibration data, including date/time Instructions on
8.2 pH mode—P1.0: Viewing previous calibration data 8.3 pH mode—P2.0: Viewing electrode data Program P1.0 lets you recall previous calibration data, which helps you know when to recalibrate your meter. This is a “view only” mode. Program P2.0 has two “view only”options that lets you check the electrode parameters for diagnostic purposes. From measurement mode: P2.1: Electrode offset 1. Press the MODE key to select pH From measurement mode: measurement mode. 2.
P2.2: Electrode slope 8.4 SETUP NOTE: this parameter is available in pH measurement mode only. pH mode—P3.0: pH measurement configuration pH P3.1: READY indicator and auto endpoint function This program lets you select: From measurement mode: 1. If necessary, press the MODE key to select pH measurement mode. Press the SETUP key to enter SETUP mode. • “READY indicator on” to indicate when the reading is stable. D • “READY indicator off” for faster meter response. 2.
P3.2: Selecting number of pH calibration points P3.3 Selecting °C or °F Program P3.2 lets you select the number of pH calibration points the meter will use in calibration mode: 2, 3, 4, or 5. The meter will automatically exit calibration mode after you have calibrated to your selected number of points. This meter lets you select between °C and °F units for temperature readings. From measurement mode: SETUP 1. Press the MODE key to select pH From measurement mode: pH measurement mode. 1.
8.5 pH mode—P4.0: Resetting to factory default settings 8.6 This program lets you reset all pH parameters to factory default settings. This clears all calibration data any other pH setup functions you might have changed. The following settings will remain as you have set them: • Temperature unit of measure (°C or °F) • The temperature offset calibration value • All dissolved oxygen calibration data and parameters including the LCD contrast setting From measurement mode: SETUP 1.
8.7 % saturation mode—P2.0: Offset Adjustment 8.8 Use the offset adjustment to act as an offset at values between 0 and 100%. It is useful to match against end-user standards (i.e. a test kit value). % saturation mode—P3.0: Previous calibration information This sub group shows you the previous calibration data, along with date and time of calibration. This is a “view only” parameter. In % saturation mode: calibration information is shown in % saturation units. From measurement mode: 1.
8.9 % saturation mode—P4.0: Electrode properties 8.10 % saturation mode—P5.0: Unit configuration These “view only” parameters show the electrode properties for diagnostic purposes: Unit configuration mode lets you select the following parameters: probe slope: shows the calibration slope of the probe. This mode displays slope from 0.5 to 1.999 % of slope (1.0 = 100%). A. Ready indicator and auto endpoint function B.
% saturation mode—P6.0: Adjusting LCD brightness P5.2: Selecting °C or °F temperature readout 8.11 This meter lets you select between °C and °F units for temperature readings. This mode lets you adjust the brightness of the backlit LCD. Selecting a dimmer backlighting level helps conserve batteries. From measurement mode: SETUP 1. Press the MODE key to select the From measurement mode: % saturation measurement mode. % saturation measurement mode. 3.
8.12 % saturation mode—P7.0: Resetting to factory default settings This program lets you reset all parameters to factory default settings. This clears all calibration data, memory, and any other setup functions you might have changed. The LCD contrast setting will be reset to 8 (the maximum setting).
P1.2 Salinity adjustment mode 8.14 Salinity correction mode lets you correct for the variations in oxygen solubility due to salt concentration in the sample. This sub group shows you the previous calibration data, along with date and time of calibration. This is a “view only” parameter. mg/l (ppm) mode—P2.0: Previous calibration information In mg/l (ppm) mode: calibration information is shown in mg/l (ppm) units. From measurement mode: 1. Press the MODE key to select mg/l (ppm) mode. 2.
8.15 8.16 mg/l (ppm) mode—P3.0: Electrode properties mg/l (ppm) mode—P4.0: Unit configuration These “view only” parameters show the electrode properties for diagnostic purposes: Unit configuration mode lets you select the following parameters: probe slope: shows the calibration slope of the probe. This mode displays slope from 0.5 to 1.999 % of slope (1.0 = 100%). A. Ready indicator and auto endpoint function B. mg/l or ppm units C.
P4.2: Selecting mg/l or ppm units P4.3: Selecting °C or °F temperature readout This mode lets you select between mg/l or ppm dissolved oxygen units. This meter lets you select between °C and °F units for temperature readings. From measurement mode: From measurement mode: SETUP 1. Press the MODE key to select mg/l SETUP 1. Press the MODE key to select mg/l (ppm) mode. (ppm) mode. 2. Press SETUP key to enter SETUP mode. 2. Press SETUP key to enter SETUP mode. 3.
8.17 mg/l (ppm) mode——P5.0: Adjusting LCD brightness This mode lets you adjust the brightness of the backlit LCD. Selecting a dimmer backlighting level helps conserve batteries. From measurement mode: SETUP 1. Press the MODE key to select mg/l (ppm) mode. 8.18 mg/l (ppm) mode—P6.0: Resetting to factory default settings This program lets you reset all parameters to factory default settings. This clears all calibration data, memory, and any other setup functions you might have changed.
9. Probe Care and Maintenance 9.1 pH Electrode Care Since your pH electrode is susceptible to dirt and contamination, clean it every one to three months depending on the extent and condition of use. Reactivating the pH electrode If stored and cleaned properly, your pH electrode should be ready for immediate use. However, a dehydrated bulb may cause sluggish response. To rehydrate the bulb, immerse the electrode in a pH 4 buffer solution for 10 to 30 minutes.
9.3 DO Membrane Replacement 5. Using the installation tool, unscrew and remove the membrane lock from the membrane cap. Replacement of the membrane is required only when you cannot calibrate the probe, or if the membrane is damaged. Installation tool See figure B 6. Remove the membrane and O-ring. Typical membrane damages are punctures or wrinkles caused during measurements or cleaning. Insert notches on installation tool into slots on membrane lock. Then, unscrew membrane lock from membrane cap.
9.4 DO Electrolyte solution The electrolyte solution in your probe’s cap will periodically evaporate and need to be replaced. 35640-71 replacement electrolyte solution comes premixed and ready to use. However, the electrolyte mixture package 35640-70 has a longer shelf life in its unmixed form. If you purchase the electrolyte mixture package to make your own replacement electrolyte solution, use the following steps to prepare the solution: 10.
11. Error Messages LCD Display 12. Specifications Indicates Cause Solution Err annunciator Unrecognized input from keypad Wrong input in selected mode. Release key. Select valid operations depending on mode. CAL & Err annunciators blink Calibration error Wrong value input at calibration. Dirty probe. Check your input value, clean probe. See Calibration sections or Probe Maintenance section. Battery indicator blinks Low battery level Need new batteries or battery connection is bad.
OAKTON “Singles” calibration solution pouches 13. Accessories pH solutions have ±0.01 pH accuracy at 25°C. Shpg wt 1.1 lb (510 g) per box. 35653-00 Deionized rinse water solution pouches, 20/box. Meters 35632-02 pH/DO 300 meter Meter only 35632-00 pH/DO 300 meter Includes DO probe with 10-ft cable (35640-50), pH electrode with 10-ft cable (35805-23), and electrolyte solution 35653-01 pH 4.01 calibration buffer solution pouches, 20/box. 35653-02 pH 7.00 Calibration buffer solution pouches, 20/box.
14. Appendix 1: Meter Theory Dissolved oxygen levels in natural and waste waters depend on the physical, chemical, and biochemical activities in the water body. This meter uses a galvanic probe. It consists of a cell that contains electrolyte and that is enclosed by a selective membrane, and two metallic electrodes. The membrane is practically impermeable to water and ionic dissolved matter, but is permeable to oxygen and a few other gases.
16. Appendix 3: Factory Default Settings 17. Warranty Resetting the meter to factory default settings clears all calibration data and returns other setup functions to the default settings shown in the table below. However, the following settings will remain as you have set them: • temperature unit of measure (°C or °F) • The temperature offset calibration value • the LCD contrast setting See pages 38, 46 and 55 for directions on setting all modes of this meter to factory default settings.