
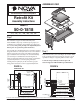
- NOVA Solutions Retrofit Kit Desk Assembly Instructions

Review and identify Retrofit Kit parts listed above.
HARDWARE PACKING LIST
Ref. # Item # Qty. Description
1 20060126 1 Keyboard hanger with glide
– Left
2 20060105 2 Side Assembly
3 20060101 2 Cross Brace
4 20060127 1 Keyboard hanger with glide
– Right
5
Varies with Retrofit 1 Keyboard Drawer
6 10060127 1 Monitor Support
7 5081070 1 Viewport Glass
8 50900258 4 Leveler
9 1412APPBO 18 Screw - #14x3/4"
10 50900032 6 Screw - #14x1-1/2"
11 TB-M 4 Tracking Block
TB-F 4 Tracking Block
12 6N50TXPZ 8 Screw - Security, #6x5/8"
13 5011818 2 Leg
14 50900034 4 Trim Ring Corner
15 50900035 4 Trim Ring Straight - B
16 5081060 1 Visor
17 FR2020/Clip 2 Locking Tab
OPTIONS
5081120 1 Power Strip
5081066 1 CPU Holder
5081018 1 Anti-Reflective Glass
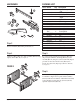
Step 3
Attach Cross Braces (Ref. #3) to Side Assemblies (Ref. #2) using
eight (8) Screws (Ref. #9). See Figure 2.
Step 4
If you are not using optional floor support legs (Ref. #13),
skip to Step #7. Otherwise, attach Leg (Ref. #13) to Side
Assembly (Ref. #2) using two (2) Screws (Ref. #10). Repeat
procedure for other side. Insert Levelers (Ref. #8) into
bottom of Leg (Ref. #13). Repeat procedure for other side.
See Figure 2.
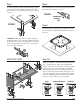
Step 5
Step 6
9
10
12
8
11
14
15
16
FIGURE 2
10
13
8
8
13
8
8
3
9
9
9
9
2
2
3
10
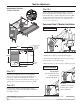
Page 2
Turn Retrofit Assembly upright. Slide under viewport cutout
in worksurface. Align holes in top rails of Side Assemblies
(Ref. #2) with holes in worksurface. Attach Retrofit Assembly
to the worksurface securely using six (6) Screws (Ref. #9).
Optional: Adjust Levelers (Ref. #8).
9
50-0-1818 Asy. Instr., © Nova Solutions, Inc. 2002
17
4