Installation Guide Installation is as easy as... 1. Complete the prep work ® A TCC MATERIALS® COMPANY 2. Install the corner blocks 3.
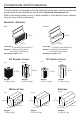
Components and Accessories The items shown on this page and on the inside of the back cover, are the components and accessories manufactured or distributed by Novabrik International Inc. Refer to this section when you see “Check availability” in this booklet. Some retailers may not carry all the components. Novabrik - Stretcher Split Smooth 4” (100 mm) 4” (100 mm) 8” (400 mm) 8” (400 mm) Coverage: 4.5 bricks/ft2 (48.4 bricks/m2) Coverage: 4.5 bricks/ft2 (48.4 bricks/m2) Weight: 5.3 lbs/brick (2.
Table of Contents Before You Begin Introduction ......................................................................................2 Use and Restrictions........................................................................2 Material Take-off ..............................................................................3 Tools and Equipment .......................................................................5 Insulation, Openings and Housewrap ..............................................
Introduction This booklet describes the steps required to install Novabrik on a standard wood frame construction. Its purpose is to provide basic information that will simplify the installation process while assuring successful results. This guide does not claim to cover all situations that may occur.
Material Take-off This planning guide will help you determine the amount of Novabrik and its accessories required to complete your project. You may also refer to our estimating sheet under the “Get A Quote” section on the Novabrik web site or on the corporate CD-rom. Step 1 Make sketches of the home showing all sides. height width height width Step 2 Measure the height of each side (excluding gables) and multiply by the width to obtain the surface area.
Material Take-off Starter Strip Add the length of each wall plus the width of all doors and windows to calculate the total length of starter strip needed (refer to the inside cover of this guide). Door and Window Trim (check availability) Calculate the sides and top of all windows to abtain the required length of the window trim, add them together. Repeat this step with the doors.
Tools and Equipment A proper set of tools will get the job done right. Safety is the number one item on any construction project. Use protective eye wear when cutting brick.
Insulation, Openings and Housewrap Before going into details regarding the preparation work and installation of Novabrik, here are a few important notes on insulation, flashing and housewrap for your home. Insulation If you’re replacing an old siding, this is a perfect time to insulate your house from the exterior. Use rigid insulation, extruded polystyrene foam type, and fasten the furring strips through the insulation into the studs using longer screws.
Wall Preparation Remove the existing siding and make sure the wall is sound and not degraded due to wet or dry rot. If this is the case, reconstruct with new substrate materials before installing the new Novabrik siding. Have a qualified electrician extend the exterior outlets and light fixtures, and move the electric meter. Finally, have a qualified plumber extend the hose bib and remove downspouts if necessary.
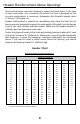
Header Reinforcement Above Openings Doors and windows need extra framing to support the brick above. In the case of new construction, your consultant can ensure the lintel is designed so that no extra reinforcement is necessary. Remember that Novabrik weights about 27 lb/sq. ft. (132 kg/sq. m). Header reinforcement is required for remodelling work since the lintel has not been previously designed to support the extra weight of Novabrik. Use the header chart to size each window and door header.
Header Reinforcement Above Openings Example: “a” Width of opening (“a”): 6’ (1.8m) Rows of bricks above: 11 (3 rows per 1’ (305mm)) From the header chart: height of header: 16” (400mm) To install Novabrik over large openings or ‘wide spans’, extra structural review is essential. In some cases, steel may be required for extra reinforcement. In those situations use a steel plate, cut to the appropriate length, pre-drill and attach with screws.
Overhang Section Limit Novabrik installation to one story on overhanging sections and extending maximum 16” (400mm) with floor joist spacing 16” (400mm) on center maximum. max. 16” (400mm) min. 6” (150mm) Starter Strip max. 16” (400mm) • Install ¾” (19mm) plywood as baseboard, extend plywood minimum 6” (150mm) above floor. • Fasten each Novabrik on the first course with two screws. • Make sure to fasten top of baseboard to both the sill plate and studs.
90º Exterior Corner Step 1 Pre-drill a hole at a 30° downward angle in the notch of each corner block before installation. 30° Step 2 • Install 1” x 4” (19mm x 89mm) furring strips over the corner of the house. • Use 1” x 6” (19mm x 140mm) furring strips if installing over rigid insulation. • Plumb corners and fasten corner strip. • Fasten corner strip with # 8 or # 10 corrosion resistant 2” (51mm) screws at 10” (250mm) c/c, in a staggering pattern.
90º Exterior Corner Step 4 • Continue to install blocks the same way up to the end of the first corner strip. • Insert one more block onto the corner strip. • Slide down second steel corner strip into the last block. • Align with bottom strip and fasten to the wall. Step 5 • Continue up the wall to the end of the last full length steel corner strip. • Insert one more block into the corner strip. Step 6 • Measure the remaining length to top of wall.
90º Interior Corner Interior corners are built using an interior corner block or by overlapping one brick facing over the other. • Install 1” x 6” (19mm x140mm) boards over the corner of the house. Correct out of plumb or uneven corners at this point. • Pre-drill a hole at a 30° downward angle in each corner block. Align the holes towards the studs of the wall. • Use a 4” (100mm) long corrosion-resistant screw to fasten each block. Apply construction adhesive between blocks.
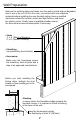
Installing the SV-Starter and Furring Strips • Measure and mark each corner where you want the first row of Novabrik to start. We usually mark each corner at 1/2” (13mm) above the foundation. • Hold the string straight and tight at both ends and snap the line on the house wrap. • Line up the furring strips over the framing studs and above the chalk line. Attach with # 8 or # 10 corrosion resistant screws at 10” (250mm) c/c. The screws must penetrate at least 1 1/4” (32mm) into the studs.
Brick Coursing The aesthetic look is a very important aspect of the project. Locate the openings on the wall and the bricks so to arrange the pattern to fit around your windows or doors with the least amount of small bricks needed. • Place a row of Novabrik on the starter strip. • Check the alternating courses by placing two Novabrik on the second row as shown on the illustration. • Sight down from the window corners to see how the seams line up.
Installing the Novabrik With all the prep work completed, you are ready to install Novabrik. • Install the Novabrik on the Starter Strip*. At every furring strip, hold down the face of the brick and drill holes at a downward angle (around 30°). • Hold the brick flat on the wall and anchor it with a # 8 or # 10 x 2 ½” (64mm) screw at a slight downward angle until the head touches the brick. Do not over tighten. • Be sure to mix Novabrik from different pallets as you stack and install.
Window Sill Installation Window sills require a bit of cutting and fitting. Install sill at a downward angle to provide for water run off from the house. • The space between the window frame and the horizontal furring strip has to be at least the thickness of your sill plus 1/8” (3mm) to insert the window sill. • Cut the top of the bricks under the window if needed. • Apply a large bead of adhesive along the top of the bricks and the horizontal furring.
Wainscot Architectural Detail Wainscoting is a very popular style. By combining Novabrik with any other siding material you can achieve a very appealing architectural style. For this we recommend the use of a story board to help determine the desired height of the wainscot cap.
Bullnose Installation This component is installed the same way as the Wainscot Cap. Just set Bullnose in place using construction adhesive. Create a transition between two colors, textures and different materials..
Combining Novabrik with an Existing Siding There are two ways we recommend when adjoining an existing siding with your new Novabrik veneer and with the Fast Track corner blocks. Method 1 • Bend the corner strip by pushing it against a flat surface and twisting it with your hands. • Bring the corner block towards the middle of the facade, leaving only the depth needed for the existing siding.
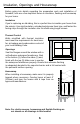
Installation Above Openings This page shows the installation of a horizontal course above openings. Install a 3/4” (19mm) thick plywood reinforcement header sized according to the header reinforcement section. Cover this header with a housewrap or a waterproof membrane. A continuous housewrap or a waterproof membrane tucked under housewrap Plywood reinforcement header Starter Strip Aluminum or steel flashing Window frame • Install aluminum or steel flashing above opening.
Window Trim (check for availability.) Window trim is used to extend the window frame out. It can be installed in two ways. Covering the edge of the bricks or giving Novabrik an edge to butt up to. Note that the furring strip and Novabrik will add 3 1/4” (83mm) to the face of your wall. 3 1/4” (83mm) • Cut the trim pieces to the proper length of the sides and top of windows (make sure the top piece overlaps the sides), extend the side trim down past the top of the sill and butt the sill to the trim.
Aluminum or Steel Flashing Around Openings Aluminum or steel flashing can also be used to extend the window frame out to give a clean, finished edge. There are different ways to cap the sides of openings. Two common ways are shown below. Unless you own a metal brake, you will have to find a place to get your flashing bent. Take your measurements and make a drawing of what you need. Do not forget the flashing above openings.
Soldier Course Installation A soldier course above windows and doors is pleasant to see and provides a perfect fit with above coursing. • Fasten a 15” (380mm) high 3/4” (19mm) thick plywood over the opening. • Install aluminum or steel flashing above opening (have it bent to size). 6” (150mm) • Cover plywood and metalic flashing with a waterproof membrane or a housewrap. Waterproof membane or housewrap Flashing Starter Strip 15” (381mm) • Keep stacking Novabrik around the window or door.
Soldier Course Installation • Install the rest of the soldiers in the same manner. • Remove the top part of the last Novabrik soldier and glue it in place. Note: If you need to cut a brick to fit the width of the opening, start installing soldiers at both ends and cut the brick in the middle of the opening. This will give a more symmetrical look. Soldier Course Band A different color soldier course looks good on high and long walls. 5.
Installation on Rounded Openings Installing Novabrik over round head windows or doors can be done in two ways. A horizontal course or a soldier course forming an arch. Arches can only be achieved over openings with a large radius. In both cases, flashing around the opening is very important. Good quality materials and attention to details are critical. Horizontal Coursing • Fasten a 3/4” (19mm) thick plywood header over the opening (size according to the header chart).
Installation on Rounded Openings Making an Arch Arches are done by opening the joint between two bricks at one end. The width of the gap is limited by aesthetics. This is why arches are limited to openings with a large radius. Reducing the height of the brick will allow for a shorter radius. • Prepare the opening as shown on the previous page, with a plywood reinforcement header, housewrap and a waterproof membrane covering the plywood and aluminum flashing.
Soffit Details This section shows the two most common ways to install Novabrik at the top of the wall. Best results will be achieved by running Novabrik up into the open eave and installing a new soffit. On gable ends, install a new soffit against the Novabrik wall or use a shadow box. New Soffit • Install Novabrik up beyond the soffit line. • Cut the bricks to fit under the roof trusses if necessary. construction adhesive • Secure the second course from the top with corrosion-resistant screws.
Soffit Details Existing Soffit • Install full bricks as high as possible. • Cut the top of the brick to fit under the existing soffit. • Insert a filler piece and attach with construction adhesive. • You can also install a soldier course up to the soffit.
Novabrik on Various Types of Structures Novabrik can be installed virtually anywhere. The following pages will show you additional examples of the versatility of this innovative brick veneer. Novabrik on concrete blocks The installation of Novabrik is done just like on a wooden structure. It is a simple procedure, therefore follow all the steps from the beginning of this guide. The key to a sound installation is to use concrete screws that have a secure grip into the concrete.
Novabrik on Various Types of Structures Novabrik on Insulated Concrete Forms (ICF) Before starting an ICF project, consult a professional engineer for structural requirements. • Install 1” x 6” (19mm x 140mm) treated wood or furring strips covered with a waterproof membrane on the corners. Fasten with 3/16” (5mm) corrosion resistant concrete screws, with a minimum penetration into the concrete of 1 1/4” (32mm), at 10” (250mm) c.c. and 2” (50mm) from the inside edge of the form.
Novabrik on Various Types of Structures Novabrik on Structural Insulated Panels (SIPs) Before starting an SIPs project, consult a professional engineer for structural requirements. • Install 1” x 3” (19mm x 64mm) treated wood or furring strips and fasten with #8 x 1½” (38mm) corrosion resistant concrete screws at 10” (250mm) c.c. • Secure the Novabrik with #8 or 10 x 2½” (64mm) corrosion resistant screws at every fourth course to each furring strip.
Novabrik on Various Types of Structures Novabrik on Post Frame structures Post-frame buildings are sometimes called post-and-beam buildings. The design concept is simple and offers flexibility, which makes it a popular construction structure for agricultural and commercial applications. • Consult a professional engineer to review and approve your structure and design before you install Novabrik. • Refer to the beginning of this guide for Novabrik installation.
Frequently Asked Questions • Will I ever need to paint it? The color is permanent and will not fade or peel like paint. • How long will Novabrik last? Like other high-strength concrete products, our Novabrik is made to last and is warrantied for 50 years. • Where can I use Novabrik? Novabrik is great for all types of siding and remodeling projects. Since you won’t need a brick ledge or mortar, Novabrik can be used on new or existing buildings both inside and outside.
Tips Preparation tips • When using power equipment, follow safety procedures. • Predrill all Novabrik Corners and all first row Novabrik that will be screwed into furring strips. • To predrill holes in the Novabrik, lay the brick on a flat surface and drill with the drill bit at a 90° angle to the ground. Correct Incorrect • After drilling holes or cutting the Novabrik, brush off any dust or concrete chips that may remain on the brick.
More Tips Installation tips • Screw the furring strip 10” (250mm) from the bottom edge of the strip. The bottom will be screwed in once you install the Starter Strip. Correct Incorrect • Give a firm rubber hammer strike down on a 2” x 4” setting on the bricks, before fastening the bricks and tap the face of the bricks. This will set and level the brick before fastening. • Hold down the face of the brick when fastening the Novabrik. This will prevent it from kicking out during this procedure.
Components and Accessories Window Sill Smooth Split 25/8” (66 mm) 25/8” (66 mm) 15¾” (400 mm) Weight: 15.0 lbs (6.8 kg) 15¾” (400 mm) Weight: 15.0 lbs (6.8 kg) 90° Corner Strip SV-Starter Strip Unit length: 8 ft (2438 mm) Unit length: 4 ft (1219 mm) Weight: 2.2 lbs (1.0 kg) Quantity per box: 20 Weight: 4.2 lbs (1.9 kg) Quantity per bag: 10 Window Trim Unit length: 8 ft (2438 mm) Weight: 2.0 lbs (0.
Installation Guide Installation is as easy as... 1. Complete the prep work ® A TCC MATERIALS® COMPANY 2. Install the corner blocks 3.