
User guide


(using this turns off drag brakes)
A. PRESS & HOLD SPEED CONTROL’S SET BUTTON
With ESC at neutral, press & hold SET button until the BLUE status LED
turns on solid-
--Release ESC’s SET button once LED is on solid.
B. SELECT MINIMUM BRAKE PERCENTAGE
Blue LED
Blue status LED ashes to indicate active Minimum Brake setting. Quick
press & release SET button to select desired setting.
Setting (# of ashes) 1 2 3 4 5 6 7 8 9 10
Minimum Brake
(%):
0 3 6 9 12 15 18 21 24 27
C. PRESS & HOLD SET BUTTON TO STORE SELECTION
When SET button is pressed & held for about 1 second, the new selection
is stored in ESC’s memory--The 4 status LEDs will scroll back & forth to
indicate ESC is exiting programming & the Red
(Blue may also be on)
LED
will turn on solid--ESC is at neutral & ready to go.
A. PRESS & HOLD SPEED CONTROL’S SET BUTTON
With ESC at neutral, press & hold SET button until BLUE & AMBER status
LEDs turn on solid---Release SET button once LEDs are on solid.
B
. SELECT DRAG BRAKE PERCENTAGE
Blue & Amber LEDs
Blue & Amber status LEDs ash to indicate Drag Brake setting
(Minimum
Brake setting will be the same as Drag Brakes)
. Quick press & release SET
button to change Drag Brake setting.
Setting (# of ashes) 1 2 3 4 5 6 7 8 9 10
Drag Brake
(%):
off 3 6 9 12 15 18 21 24 27
C. PRESS & HOLD SET BUTTON TO STORE SELECTION
Selection is stored in memory--Status LEDs scroll back & forth and ESC
exits programming. Red LED turns on solid
(Green & Blue LEDs may also be
on)
--ESC is at neutral and ready to go.
Notes: When Drag Brakes are active, the Blue & Amber LEDs will also stay on
during normal operation. To re-activate the standard style of braking (no drag
brakes during neutral), repeat Minimum Brake adjustment as described above.
To Adjust Dead Band:
A. PRESS & HOLD SPEED CONTROL’S SET BUTTON
With ESC at neutral, press & hold SET button until BLUE & GREEN status
LEDs turn on solid---Release SET button once LEDs are on solid.
B. SELECT DEAD BAND PERCENTAGE
Blue & Green LEDs
Blue & Green status LEDs ash to indicate active Dead Band setting.
Quick press & release SET button to change setting.
Setting (# of ashes) 1 2 3 4 5
Dead Band
(%):
2 3 4 5 6
C. PRESS & HOLD SET BUTTON TO STORE SELECTION
Selection is stored in memory--Status LEDs scroll back & forth and ESC
exits programming. Red LED turns on solid
(Green & Blue LEDs may also be
on)
--ESC is at neutral and ready to go.
To Adjust Minimum Drive:
A. PRESS & HOLD SPEED CONTROL’S SET BUTTON
With ESC at neutral, press & hold SET button until AMBER status LED
turns on
solid---Release SET button once LED is on solid.
B. SELECT MINIMUM DRIVE PERCENTAGE
Amber LED
Amber status LED ashes to indicate active Minimum Drive setting.
Quick press & release SET button to change setting.
Setting (# of ashes) 1 2 3 4 5
Minimum Drive
(%):
1 3 5 8 12
C. PRESS & HOLD SET BUTTON TO STORE SELECTION
Selection is stored in memory--Status LEDs scroll back & forth and ESC
exits programming. Red LED turns on solid
(Green & Blue LEDs may also be
on)
--ESC is at neutral and ready to go.
HV PRO ESC CUSTOM PROGRAMMING
P6
RESTORING FACTORY DEFAULTS:
Every time you perform the One-Touch Set-Up, the factory
default settings are restored for each of the throttle proles
and the Speed Control reverts to Prole #1.
Your transmitter can be either ON or OFF:
1. IF TRANSMITTER IS OFF, DISCONNECT ESC FROM RECEIVER
Remove input signal harness from receiver to avoid radio interference.
2. CONNECT SPEED CONTROL TO CHARGED BATTERY PACKS
3. SLIDE ESC’s ON/OFF SWITCH TO ‘ON’ POSITION
4. MAKE SURE THE THROTTLE PROFILE 1-4 IS ACTIVE
If you are not sure what profile is selected, follow the procedures in
‘THROTTLE PROFILE SELECTION’ to check or select the desired prole.
5. FOLLOW THE STEPS ON RIGHT SIDE OF THIS PAGE TO
CUSTOMIZE THE THROTTLE PROFILE SETTINGS
You can adjust different parameters (described on back side of this sheet) for
Throttle Proles 1-4 to ne tune the ESC to perform & feel the way you like it.
Note: there is no time constraint during selection process of custom parameters.
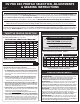
HV PRO ESC
SOFTWARE
FLOW CHART
@NEUTRAL
RED LED on solid
MIN. BRAKE
BLUE
press & hold
press & hold
press & hold
press & hold
continue holding ESC’s SET button to skip steps here
DRAG BRAKE
BLUE & AMBER
DEAD BAND
BLUE & GREEN
MIN. DRIVE
AMBER
press & hold
ACTIVE PROFILE
all LEDs (ashing)
If PRESSED within 3 sec.
of all LEDs ashing:
Active Prole Changed
If NOT PRESSED within 3
sec. of all LEDs ashing
LEDs roll off
Exit Programming
@NEUTRAL
RED LED on solid
# of ashes equals
active prole (1-5)
PLEASE NOTE: This page contains optional Advanced Programming items!
No further adjustments are required.
(but don’t worry, you can always reset factory defaults by performing the One-Touch programming again, so go ahead & experiment--that’s why the programming is in there, right?)