
User manual
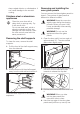
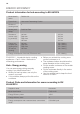

1.
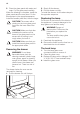
Install the anti-tilt protection 317 - 322
mm down from the top surface of the
appliance and 80 - 85 mm from the
side of the appliance into the circular
hole on a bracket. Screw it into the solid
material or use applicable reinforcement
(wall).
80-85
mm
317-322
mm
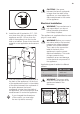
2. You can find the hole on the left side at
the back of the appliance. Lift the front
of the appliance and put it in the middle
of the space between the cupboards. If
the space between the bench
cupboards is larger than the width of
the appliance, you must adjust the side
measurement to centre the appliance.
If you changed the dimensions
of the cooker, you must align
the non-tip device correctly.
CAUTION! If the space
between the bench cupboards
is larger than the width of the
appliance, you must adjust the
side measurement to the centre
of the appliance.
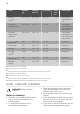
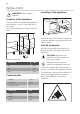
Electrical installation
WARNING! The manufacturer is
not responsible if you do not
follow the safety precautions
from Safety chapters.
This appliance is supplied without a main
plug or a main cable.
WARNING! Before you connect
the mains cable to the terminal,
measure the voltage between
phases in the house network.
Then, refer to the connection
label at the back of the
appliance to use the correct
electrical installation. This order
of steps prevents from
installation errors and damage
to the electrical components of
the appliance.
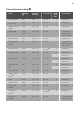
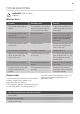
Applicable types of cables for different
phases:
Phase
Min. size cable
1 3x6.0 mm²
3 with neutral 5x1.5 mm²
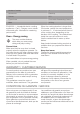
WARNING! The power cable
must not touch the part of the
appliance shaded in the
illustration.
18