www. .ch TW 7757 Benutzerinformation Notice d'utilisation Istruzioni per l’uso User manual Kondensationstrockner mit Wärmepumpe Sèche-linge à condensation avec pompe à chaleur Asciugabiancheria a condensa con pompa di calore Condenser dryer with heat pump 0848 559 111 www.fust.
Inhalt Wichtige Sicherheitshinweise Umwelttipps Aufstellen Gerätebeschreibung Bedienblende Vor der ersten Inbetriebnahme 2 4 5 7 8 9 Programmübersicht Täglicher Gebrauch Reinigung und Pflege Was tun, wenn...
sind, besteht Explosionsgefahr. Trocknen Sie nur mit Wasser gewaschene Wäschestücke. • Brandgefahr: Wäschestücke, die mit Speise- oder Pflanzenöl befleckt oder getränkt sind, stellen eine Brandgefahr dar und gehören nicht in den Wäschetrockner. • Für Wäsche, die mit Fleckenentferner behandelt wurde, muss vor dem Trocknen ein zusätzlicher Spülgang durchgeführt werden.
• Weichspüler oder ähnliche Produkte dürfen nur entsprechend den Herstelleranweisungen benutzt werden. • Achtung – heiße Oberfläche : Berühren Sie bei eingeschalteter Innenbeleuchtung nicht die Abdeckung der Glühlampe. (Betrifft nur Trockner mit Innenbeleuchtung.) Einsatzbereich • Dieses Gerät darf ohne Aufsicht nicht von kleinen Kindern oder Behinderten bedient werden. • Kinder erkennen häufig nicht die Gefahren, die von elektrischen Geräten ausgehen.
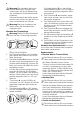
Aufstellen Gerät transportieren Wichtig! Kippen Sie das Gerät für den Transport nur auf die linke Seite (siehe Abbildung), wenn es nicht stehend transportiert werden kann. Warnung! Lassen Sie das Gerät vor Anschluss an das Netz und vor der ersten Inbetriebnahme 12 Stunden stehen, falls es nicht in aufrechter Stellung transportiert worden ist, damit das Öl in den Kompressor zurückfließen kann. Andernfalls könnte der Kompressor beschädigt werden.
Warnung! Der Hersteller übernimmt keinerlei Haftung für Schäden oder Verletzungen, die durch Missachtung der vorstehenden Sicherheitshinweise entstehen. Falls das Netzkabel des Geräts ersetzt werden muss, lassen Sie dies durch unseren Kundendienst durchführen. Warnung! Nach der Installation des Geräts muss das Netzkabel leicht zugänglich sein. Wechsel des Türanschlags Warnung! Ziehen Sie den Netzstecker, bevor Sie den Türanschlag wechseln. 1. A B C B A Öffnen Sie die Einfülltür. 2.
Bausatz, mit dem der Trockner auf eine optimale Arbeitshöhe angehoben werden kann. Die Schublade fungiert als zusätzlicher Stauraum (z. B. für Wäsche). Lesen Sie aufmerksam die dem Bausatz beiliegende Aufstellanweisung.
Bedienblende Bedienblende Maximaler Trockengrad 6 5 4 Schleuderdrehzahl-Standard Minimale Schleuderdrehzahl 1 2 - 3 Schleuderdrehzahlbereich (in Schritten von 200 U/min) Maximale Schleuderdrehzahl 1 Programm-Wahlschalter und Ein-/Ausschalter 2 Funktionstasten 3 Start/Pause Taste 4 Zeitvorwahl Taste 5 Betriebsanzeige 6 Display-Anzeige Bügeltrocken (Trockenphasenanzeige) Leicht trocken (Trockenphasenanzeige) Schranktrocken (Trockenphasenanzeige) Sehr trocken (Trockenphasenanzeige) Display-Anzeig
Vor der ersten Inbetriebnahme Warnung! Lassen Sie das Gerät vor dem Netzanschluss und vor der ersten Inbetriebnahme 12 Stunden stehen, falls es nicht in aufrechter Stellung transportiert worden ist, damit das Öl in den Kompressor zurückfließen kann. Andernfalls könnte der Kompressor beschädigt werden. Reinigen Sie die Trommel des Trockners mit einem feuchten Tuch oder führen Sie ein kurzes Trockenprogramm (ca. 30 Min.
Programme Max. Beladung Textilien/Wäscheart Optionen 1) Mikrofaser 1 kg Für dünne bügelfreie Textilien aus Polyester und Polyamid. Alle außer Zeitwahl Mix-programm 3 kg Zum Trocknen von Textilien aus Baumwolle und Kunstfasern bei niedriger Temperatur. Alle außer Zeitwahl Bettwäsche 3 kg Bettwäsche (Einzel-/Doppelbettlaken, Kopfkissen, Bettbezüge, Tagesdecken). Alle außer Zeitwahl Viskose 1 kg Für dünne bügelfreie Textilien aus Viskose, Polyester und Polyamid.
Wäsche einfüllen 1. Trockengrad Erhöht den Trockengrad der Wäsche entsprechend der gewählten Stufe: , , . Diese Option hilft Ihnen, zufriedenstellende Trockenergebnisse zu erzielen. - Standard-Trockengrad. Öffnen Sie die Einfülltür: Drücken Sie kräftig gegen die Einfülltür (Druckpunkt) 2. Legen Sie die Wäsche locker in die Trommel. Vorsicht! Achten Sie darauf, dass die Wäsche nicht zwischen Tür und Gummidichtung eingeklemmt wird. 3. Drücken Sie die Tür fest zu. Das Schloss muss hörbar einrasten.
Zeitvorwahl Ermöglicht die Startverzögerung eines Trockenprogramms um minimal 30 Minuten bis maximal 20 Stunden. 1. Wählen Sie das Trockenprogramm und Zusatzoptionen. 2. Drücken Sie die Taste Zeitvorwahl sooft, bis die gewünschte Programmdauer auf dem Display eingeblendet wird, z. B. , wenn das Programm nach 12 Stunden beginnen soll. 3. Drücken Sie Taste Start/Pause, um die Zeitvorwahl zu aktivieren. Die verbleibende Zeit bis zum Programmstart wird fortlaufend angezeigt.
feuchteter Hand. (Siehe Kapitel "Reinigung und Pflege".) 3. Entnehmen Sie die Wäsche. 4. Drehen Sie den Programmwähler auf Aus. - Reinigen Sie Mikrofein- und Feinfilter - Leeren Sie den Kondensatbehälter (Siehe Kapitel "Reinigung und Pflege".) 5. Die Tür schließen. Wichtig! Nach jedem Trockenprogramm: Reinigung und Pflege Entleeren des Kondensatbehälters Der Kondensatbehälter muss nach jedem Trockengang entleert werden.
Reinigen des Wärmetauscherfilters 1 Wichtig! • Benutzen Sie den Trockner nie ohne Flusenfilter. • Verstopfte Filter erhöhen den Energieverbrauch, da sie den Trockengang verlängern, und führen zu Schäden am Trockner. • Eine verschmutzte Wärmepumpe kann nur mit einem kostspieligen Verfahren gereinigt werden. • Entfernen Sie bei Bedarf (etwa alle 6 Monate) mit dem mitgelieferten Schwamm die Flusen vom Wärmetauscher. Tragen Sie dabei Gummihandschuhe. 2 3 4 5 6 7 8 9 10 11 Was tun, wenn...
Rückstände in der Trommel. Reinigen Sie die Innenfläche der Trommel. Hohe Wasserhärte. Geeignete Wasserhärte einstellen. 4). Einfülltür schließt nicht. Filter nicht eingerastet. Feinfilter einsetzen und/oder Grobfilter einrasten. Err ( Fehler ) auf dem LCDDisplay. 5) Versuch, die Parameter nach dem Programmstart zu ändern. Schalten Sie den Trockner aus und wieder ein. Stellen Sie die erforderlichen Parameter ein. Keine Innenbeleuchtung.
sein. Anderenfalls darf der Trockner nicht in Betrieb genommen werden. nicht, wenn die O-Ringdichtung an der Abdeckung der Trommelbeleuchtung fehlt. Warnung! Aus Sicherheitsgründen muss die Abdeckung fest angeschraubt Technische Daten Höhe x Breite x Tiefe 85 x 60 x 58 cm Trommelvolumen 108 l Tiefe bei geöffneter Einfülltür 109 cm Höhenverstellbarkeit 1,5 cm Leergewicht ca. 56 kg Füllmenge (je nach Programm) 1) max.
Geräteeinstellungen Einstellung Vorgehen Signal dauerhaft aktiviert/deaktiviert 1. Drehen Sie den Programm-Wahlschalter auf ein beliebiges Programm. 2. Halten Sie gleichzeitig die Tasten Trockengrad und U/Min etwa 5 Sekunden lang gedrückt. 3. Der Summer ist standardmäßig deaktiviert. Sie können mit der Option Signal das akustische Signal aktivieren oder deaktivieren. Das Gerät speichert die Einstellung jedoch nicht. Wasserhärte 1) 1. Drehen Sie den Programm-Wahlschalter auf ein beliebiges Programm.
Sommaire Avertissements importants Environnement Installation Description de l'appareil Bandeau de commandes Avant d'utiliser le sèche-linge pour la première fois 18 20 21 23 24 25 Tableau des programmes 25 Utilisation quotidienne 27 Entretien et nettoyage 29 En cas d'anomalie de fonctionnement ...
• Risque d'explosion : ne séchez jamais du linge qui serait entré en contact avec des solvants inflammables (essence, alcool dénaturé, liquide de nettoyage à sec et similaire). Ces substances sont volatiles et pourraient causer une explosion. Ne séchez que du linge lavé à l'eau. • Risque d'incendie : le linge taché ou imbibé d'huile végétale ou d'huile de cuisine risque de provoquer un incendie et ne doit pas être placé dans le sèche-linge.
• Attention - surface chaude : Ne touchez pas le cache de l'ampoule d'éclairage lorsque celle-ci est en fonctionnement. (Uniquement sur les sèche-linge avec éclairage intérieur du tambour) Sécurité enfants • Cet appareil ne doit pas être utilisé par de jeunes enfants ou des personnes vulnérables sans surveillance. • Les enfants ne sont pas toujours conscients des dangers associés à l'utilisation des appareils électriques. Empêchez les enfants de jouer avec l'appareil.
Avertissement Si vous n'utilisez plus votre appareil : • Débranchez-le. • Coupez le cordon d'alimentation au ras de l'appareil et jetez-le avec la prise. • Démontez le loquet de la porte. Cela évitera aux enfants de s'enfermer dans l'appareil et de mettre ainsi leur vie en danger. Installation Transport de l'appareil Important Inclinez l'appareil vers la gauche (voir illustration) s'il n'est pas possible de le transporter verticalement.
Branchement électrique Contrôlez les caractéristiques électriques de l'appareil (tension d'alimentation, type de courant, fusibles, etc.) sur la plaque signalétique. La plaque signalétique est située près de la porte (voir le chapitre "Description du produit"). Avertissement Le fabricant décline toute responsabilité en cas de dommage ou blessure, suite au nonrespect des consignes de sécurité susmentionnées.
cessaire de vider le bac d'eau de condensation mais celui-ci doit rester en place dans l'appareil. Lisez attentivement la notice fournie avec le kit. • socle à tiroir Pour placer le sèche-linge à une hauteur optimale et disposer de plus d'espace de rangement (ex. pour le linge). Lisez attentivement la notice fournie avec le kit.
Bandeau de commandes Bandeau de commandes séchage maximum 6 5 4 vitesse d'essorage par défaut vitesse d'essorage minimum 1 2 - 3 vitesse d'essorage (par palier de 200 tr/min) vitesse d'essorage maximum 1 Sélecteur de programmes et touche Marche/Arrêt 2 Touches de fonction 3 Touche Départ/Pause 4 Touche Départ Diffère 5 Voyant 6 Affichage prêt à repasser (voyant du cycle de séchage) légèrement humide (voyant du cycle de séchage) prêt à ranger (voyant du cycle de séchage) très sec (voyant du cyc
Avant d'utiliser le sèche-linge pour la première fois Avertissement Si l'appareil a été transporté en position inclinée, laissez-le pendant 12 heures en position verticale avant de le brancher, de sorte que l'huile retourne vers le compresseur. Le nonrespect de cette consigne pourrait endommager le compresseur. Au début du programme de séchage (pendant 3 à 5 mn), l'appareil fera un peu plus de bruit.
Programmes Charge max. 1) Utilisation/propriétés Options Rafraîchir 1 kg Pour rafraîchir les textiles en douceur. Antifroissage, Alarme, Depart Différé Microfibres 1 kg Pour les tissus fins, polyester et polyamide, ne nécessitant pas de repassage. toutes à l'exception de Temps Textiles Mélangés 3 kg Pour le séchage à basse température de textiles en coton et synthétiques.
Utilisation quotidienne Mise sous tension de l'appareil/ Eclairage du tambour Tournez le sélecteur de programmes sur n'importe quel programme ou sur Éclairage. L'appareil est mis sous tension. Quand la porte est ouverte, le tambour est éclairé. Chargement du linge 1. ge indique la durée prévue du programme, par ex., ( heures . minutes ). Pendant le cycle, le temps restant est décompté par paliers d'une minute.
2. Appuyez sur la touche Temps jusqu'à ce que la durée du programme souhaité s'affiche, par ex. correspond à une durée de 1 heure et 20 minutes. Départ Différé Permet de retarder le départ du programme de séchage depuis un minimum de 30 min. jusqu'à un maximum de 20 heures. 1. Sélectionnez le programme de séchage et les fonctions complémentaires. 2. Appuyez sur la touche Départ Diffère jusqu'à ce que le nombre d'heures souhaitées avant le départ différé s'affiche, par ex.
s'humectant la main. (Reportez-vous au chapitre "Entretien et nettoyage".) 3. Sortez le linge. 4. Tournez le sélecteur de programmes sur Arrêt. - Nettoyez les filtres fin et microfin - Videz le bac d'eau de condensation (Reportez-vous au chapitre "Entretien et nettoyage".) 5. Fermez la porte. Important Après chaque cycle de séchage : Entretien et nettoyage Vidage du bac d'eau de condensation Videz le bac d'eau de condensation après chaque cycle de séchage.
Nettoyage du filtre du condenseur thermique 1 Important • N'utilisez jamais votre sèche-linge sans les filtres à peluches. • Des filtres encrassés augmentent la consommation d'énergie (en prolongeant le cycle de séchage) et peuvent endommager la machine. • Une pompe à chaleur encrassée ne peut être nettoyée que par le biais d'un processus coûteux. • Enlevez les peluches du condenseur thermique tous les 6 mois environ à l'aide de l'éponge fournie. Pour ce faire, utilisez des gants en caoutchouc.
Fentes d'aération recouvertes. Dégagez les fentes d'aération à la base de l'appareil. Résidus à l'intérieur du tambour. Nettoyez l'intérieur du tambour. Dureté élevée de l'eau. Sélectionnez la dureté de l'eau appropriée. 4). La porte ne ferme pas Les filtres ne sont pas en place. Installez le filtre fin et/ou fixez le filtre grossier. Err ( Erreur ) s'affiche. 5) Mettez le sèche-linge hors tension puis Tentative de modification des paramètres de nouveau sous tension.
haut ; reportez-vous au chapitre « Description de l'appareil »). 2. Remplacez l'ampoule défectueuse. 3. Revissez soigneusement le cache. Avant de revisser le cache, vérifiez que le joint torique est bien positionné. N'utilisez pas le sèche-linge en l'absence du joint torique. Avertissement Par mesure de sécurité, assurez-vous que le cache est bien serré. Dans le cas contraire, vous ne devez pas mettre le sèche-linge en fonctionnement.
Réglages de l'appareil Réglage Opérations à effectuer Alarme activée/désactivée en permanence 1. Placez le sélecteur de programmes sur n'importe quel programme. 2. Appuyez simultanément sur les touches Humidité Résiduelle et T/Min et maintenez-les appuyées pendant environ 5 secondes. 3. L'alarme est désactivée par défaut. Vous pouvez utiliser l'option alarme pour activer ou désactiver l'alarme, mais l'appareil ne mémorise pas la sélection. Dureté de l'eau 1) 1.
Indice Informazioni importanti per la sicurezza Tutela dell'ambiente Installazione Descrizione del prodotto Pannello comandi Preparazione al primo utilizzo 34 36 36 39 39 40 Tabella dei programmi Utilizzo quotidiano Pulizia e cura Cosa fare se ...
l'asciugatrice per evitare potenziali rischi di incendio. • I capi trattati con smacchiatori devono essere risciacquati in acqua prima di essere introdotti nell'asciugatrice. • Prima di inserire i capi nell'asciugatrice, verificare che nelle tasche non siano stati dimenticati accendini o fiammiferi Avvertenza • Non arrestare mai l'asciugatrice prima del termine del ciclo di asciugatura. Nel caso sia assolutamente necessario, fare attenzione perché la biancheria e il cestello possono essere molto caldi.
• I bambini non sono in grado di riconoscere i rischi associati alle apparecchiature elettriche. È consigliabile controllare che i bambini non giochino con l'apparecchiatura. Avvertenza • Pericolo di soffocamento! I componenti di imballaggio (come il polistirolo o i sacchetti di plastica) possono essere molto pericolosi. Tenerli fuori dalla portata dei bambini. • Tenere in un luogo sicuro e al di fuori della portata dei bambini anche tutti i detersivi.
• L'apparecchiatura non deve essere installata dietro una porta bloccabile, una porta scorrevole o una porta con una cerniera sul lato opposto a quello dell'apparecchiatura in modo tale da impedire l'apertura completa dell'asciugatrice. Avvertenza Se l'apparecchiatura è stato ribaltato durante il trasporto, lasciarlo in posizione verticale per 12 ore prima di connetterlo alla presa elettrica e utilizzarlo per la prima volta, in modo che l'olio possa scorrere nuovamente nel motore.
Inversione dell'apertura della porta Avvertenza Prima di procedere a modificare la reversibilità della porta, staccare la spina di alimentazione. 1. A B Accessori • kit di installazione in colonna C B A Disponibile presso il Centro di assistenza o il rivenditore Aprire la porta. 2. Svitare la cerniera A sulla parte anteriore della macchina e smontare la porta. 3. Rimuovere le piastre di copertura B .
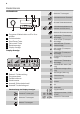
Descrizione del prodotto 1 2 4 3 5 6 8 7 10 9 11 12 1 2 3 4 5 6 7 Pannello comandi Serbatoio acqua di condensa Luce del cestello Microfiltro Filtro a maglie larghe Filtro Targa matricola 8 Porta (reversibile) 9 Sportello scambiatore di calore, filtro, scambiatore di calore 10 Pulsante di apertura dello sportellino nello zoccolo 11 Griglia di ventilazione 12 Piedini regolabili Pannello comandi Pannello dei comandi 6 1 2 5 4 3 1 2 3 4 5 6 Selettore programmi con on/off Tasti funzione Tasto A
Display carico centrifuga massima 4 2 pronto stiro (spia fase di asciugatura) asciugatura leggera (spia fase di asciugatura) normale (spia fase di asciugatura) 6 1 2 3 4 5 6 5 3 forte (spia fase di asciugatura) 1 extra asciutto (spia fase di asciugatura) tempo residuo / messaggio di errore fase del ciclo opzioni avvertenze selezione velocità della centrifuga selezione grado di asciugatura raffreddamento (spia fase di asciugatura) antipiega (spia fase di asciugatura) svuotare la tanica dell'a
alimentati da compressore, come frigoriferi, congelatori, ecc. Tabella dei programmi Carico massimo 1) Impiego / Caratteristiche Extra (Extratrocken) 7 kg Asciugatura completa di biancheria spessa o multistrato, ad es. asciugamani in spugna, accappatoi. Tutti tranne Asciug. a tempo (Zeitwahl) Intensivo (Starktrocken) 7 kg Asciugatura di tessuti spessi, es. asciugamani in spugna, tovaglie, cotoni. Tutti tranne Asciug.
Programmi Carico massimo 1) Impiego / Caratteristiche Opzioni Misto (Mixprogramm) 3 kg Tutti tranne Per asciugare tessuti in cotone e sintetici, a basAsciug. a temse temperature. po (Zeitwahl) Biancheria (Bettwäsche) 3 kg Biancheria (lenzuola singole o doppie, federe, copriletti, copripiumini). Tutti tranne Asciug. a tempo (Zeitwahl) Viscosa (Viskose) 1 kg Per tessuti sottili, viscosa e poliestere, che non richiedono stiratura. Tutti tranne Asciug.
Come caricare la biancheria 1. zionato , , . Questa opzione consente di raggiungere livelli soddisfacenti di asciugatura. - impostazione automatica grado di asciugatura. Carico centrif. a (U/Min) Abbrevia il ciclo di asciugatura proporzionalmente alla velocità di centrifuga a cui è stata sottoposta la biancheria nella lavatrice. Quanto maggiore era la velocità di centrifuga, tanto più breve il ciclo di asciugatura.
Ritardata partenza (Zeitvorwahl) Consente di ritardare l'inizio di un programma di asciugatura da un minimo di 30 min. fino ad un massimo di 20 ore. 1. Selezionare il programma di asciugatura ed eventuali ulteriori opzioni. 2. Premere il tasto Ritardata Partenza (Zeitvorwahl) ripetutamente fino a che non compare sul display la durata di programma desiderata, ad esempio se il programma deve incominciare dopo 12 ore. 3. Per attivare la partenza ritardata, premere il tasto Avvio/Pausa (Start/Pause).
4. Ruotare il selettore dei programmi in posizione Off (Aus). Importante Dopo ciascun ciclo di asciugatura: - Svuotare il contenitore dell'acqua di condensa Vedere il capitolo "Manutenzione e pulizia". 5. Chiudere l'oblò. - Pulire il filtro ultrafine e il filtro fine Pulizia e cura Svuotamento della tanica dell'acqua di condensa Svuotare la tanica dell'acqua di condensa dopo ogni ciclo di asciugatura. 1 2 2a 2b 4 3 3a 3b 3c 3d Avvertenza L'acqua di condensa non è potabile.
Pulizia del filtro dello scambiatore di calore 1 Importante • Non mettere in funzione l'asciugatrice senza i filtri. • I filtri intasati comportano un maggiore consumo di energia (prolungamento del ciclo di asciugatura) e causano danni all'asciugatrice. • Se la pompa di calore non viene pulita, deve essere sottoposta a costose operazioni di pulizia. • Indicativamente, ogni 6 mesi rimuovere i residui di lanugine dallo scambiatore utilizzando una spugna.
Griglia di ventilazione ostruita. Liberare la griglia di ventilazione alla base dell'apparecchiatura. Residui all'interno del cestello. Pulire l'interno del cestello. Elevato livello di durezza dell'acqua. Impostare un livello corretto 4). La porta non si I filtri non sono stati montati correttamen- Installare il microfiltro e/o rimontare il filtro chiude te. a maglie larghe. Err ( Error ) sul Tentativo di modificare i parametri dopo display LCD. l'avvio del programma.
3. Riavvitare il coprilampada. Controllare che la guarnizione sia correttamente montata prima di riavvitare il coprilampada. Non mettere in funzione l'asciugatrice se non è stata montata correttamente la guarnizione del coprilampada. Avvertenza Per ragioni di sicurezza, il coprilampada deve essere riavvitato perfettamente. Se ciò non avviene, l'asciugatrice non deve essere messa in funzione.
Impostazioni della macchina Impostazione Implementazione Segnale acustico sempre attivato/disattivato 1. Ruotare il selettore dei programmi impostandolo su qualsiasi programma. 2. Premere simultaneamente i tasti Grado asciugatura (Trockengrad) e Carico centrif. a (U/Min) e tenerli premuti per circa 5 secondi. 3. Per impostazione predefinita, il segnale acustico è sempre disattivato.
Contents Important safety information Environment Installation Product description Control panel Before first use 50 52 52 55 55 56 Programme chart Daily use Care and cleaning What to do if ...
Warning! • Risk of fire! Never stop a tumble dry before the end of the drying cycle unless all items are quickly removed and spread out so that the heat is dissipated. • Lint must not be allowed to accumulate around the tumble dryer. • Risk of electric shock! Do not spray down the appliance with jets of water. • The final part of a tumble dryer cycle occurs without heat ( cool down cycle ) to ensure that the items are left at a temperature that ensures that items will not be damaged.
Environment The symbol on the product or on its packaging indicates that this product may not be treated as household waste. Instead it should be taken to the appropriate collection point for the recycling of electrical and electronic equipment. By ensuring this product is disposed of correctly, you will help prevent potential negative consequences for the environment and human health, which could otherwise be caused by inappropriate waste handling of this product.
through failure to comply with the above safety precautions. Should the appliance power supply cable need to be replaced, this must be carried out by our Service Center. pile carpets, strips of wood or similar. This might cause heat built-up which would interfere with the operation of the appliance. Important! • The hot air emitted by the tumble dryer can reach temperatures of up to 60°C. The appliance must therefore not be installed on floors which are not resistant to high temperatures.
9. Press snap-in button F in and down, press cover down slightly and remove from front of the machine. 10. Change door lock E over to the opposite side, screw down the door interlock. 11. On the other side, insert cover F and allow snap-in button to lock into place. 12. Insert loading door and hinges into recesses on the front of the machine and screw down. Note regarding contact protection: The machine is only secure for operations again once all plastic parts have been inserted.
Product description 1 2 4 3 5 6 8 7 10 9 11 12 1 2 3 4 5 6 7 Control panel Water reservoir Drum light Fine fluff filter Course fluff filter Fluff filter Rating plate 8 Loading door (reversible) 9 Heat exchanger door, fluff filter, heat exchanger 10 Button for opening door in plinth 11 Ventilation grille 12 Adjustable feet Control panel Control panel 6 1 2 5 4 3 1 2 3 4 5 6 Programme selector and on/off switch Function buttons Start/Pause button Delay Start (Zeitvorwahl) button Status LED D
Display maximal spin speed 4 2 iron dry (drying phase indicator) light dry (drying phase indicator) cupboard dry (drying phase indicator) 6 1 2 3 4 5 6 5 3 strong dry (drying phase indicator) 1 extra dry (drying phase indicator) time to end / error message cycle phase status options warnings spin speed selection dryness selection cooling (drying phase indicator) crease guard (drying phase indicator) empty water reservoir (warning) clean condenser (warning) Display description clean filters
Programme chart Programmes max. load1) Application/properties Options Cottons (Baumwolle) Extra Dry (Extratrocken) 7 kg Thorough drying of thick or multi- layered fabrics, e.g. terry towelling items, bathrobes. all except Time (Zeitwahl) Intensive Dry (Starktrocken) 7 kg Thorough drying of thick fabrics, e.g. terry towelling items, towels, cottons. all except Time (Zeitwahl) Cupboard Dry (Schranktrocken) 7 kg Thorough drying of fabrics of even thicknesses, e.g.
Programmes max. load1) Application/properties Options Viscose 1 kg For thin fabrics, viscose, and polyester, which are not ironed. all except Time (Zeitwahl) Jeans 7 kg For leisure clothing, such as jeans, sweat-shirts, etc., of different material thicknesses (e.g. at the neck, cuffs and seams). all except Time (Zeitwahl) Sports Light (Sport) 2 kg For sportswear, thin fabrics, polyester, which are not ironed. all except Time (Zeitwahl) Shirts (Hemden) 1.
Open loading door: Use force to push against the loading door (push point) 2. Load your laundry (do not force it in). Caution! Do not jam laundry in between the loading door and rubber seal. 3. Close loading door securely. Lock must audibly lock. Selecting the programme Use the programme selector to set the programme you require. The estimated time to end of the programme appears on the LCD, e.g. ( hours . minutes ). During the cycle, time elapses by steps of one minute.
– Before programme is started: Appliance cannot be used – After programme is started: Programme in operation cannot be changed appears in the disThe padlock symbol play to indicate that the child safety device is activated. The child safety device is not deactivated once the programme comes to an end. If you want to set a new programme, you must first deactivate the child safety device. Starting the programme Press the Start/Pause button (6). The programme is started.
Warning! The condensed water is not suitable for drinking or for preparing foodstuffs. If the programme has been interrupted as a result of the water reservoir being full: Press the START PAUSE button to continue the drying cycle. Cleaning fluff filters The filters collect all the fluff which accumulates during drying. To ensure that the dryer works perfectly, the fluff filters (micro-fine filter and fine strainer) must be cleaned after every drying cycle.
What to do if ... Troubleshooting by yourself Problem 1) Dryer does not work. Unsatisfactory drying results. Possible cause Remedy Dryer not connected to mains supply. Plug in at mains socket. Check fuse in fuse box (domestic installation). Loading door opened. Close loading door The START PAUSE button not pressed. Press the START PAUSE button. Incorrect programme set. Set suitable programme. 2) Fluff filters clogged. Clean fluff filters. 3) Heat exchanger clogged. Clean heat exchanger.
Warning! Do not use standard bulbs! These develop too much heat and may damage the machine! Before replacing the bulb, disconnect the mains plug; with a permanent connection: fully unscrew or deactivate the fuse. 2. Replace defective bulb. 3. Screw cover back down. Check the correct positioning of o-ring gasket before screwing back the door light cover. Do not operate the dryer when missing oring gasket on door light cover. Warning! For safety reasons, the cover must be screwed down tightly.
Machine settings Setting Implementation Buzzer permanent on/off 1. Turn the programme selector to any programme. 2. Press simultaneously the Dryness (Trockengrad) and Spin Speed (U/Min) buttons and hold down for approx. 5 seconds. 3. The buzzer is by default always off. You can use the buzzer option to activate or deactivate sound but the machine does not memorise your selection. Water hardness 1) 1. Turn the programme selector to any programme. 2.
Warranty / customer service For each product we provide a two-year guarantee from the date of purchase or delivery to the consumer (with a guarantee certificate, invoice or sales receipt serving as proof). The guarantee covers the costs of materials, labour and travel.
Unsere Kundendienst-Telefonnummer: Le numéro de téléphone de notre service après-vente: Il nostro numero di telefono del servizio clientela: Our customer service telephone number: 0848 559 111 oder unter ou sur Internet oppure su Internet or in the internet www.fust.ch Dipl. Ing FUST AG Buchental 4 9245 Oberbüren Tel. (071) 955 50 50 Dipl. Ing. FUST AG Riedmoosstrasse 3172 Niederwangen-Bern Tel. (031) 980 11 11 Dipl. Ing. FUST AG An der Rheinstrasse 4414 Füllinsdorf Tel. (061) 906 95 00 Ing. dipl.
136910750-00-112009 www. .