
User Manual

17
English
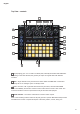
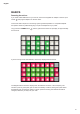
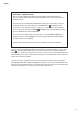
After boot-up, the grid display will change to something like that shown below:
Getting started
We’ve pre-loaded 16 demo Sessions into the memories to give you an idea of how Circuit
works. Press the Play button
12
; you should hear the rst demo Session.
If it’s not already lit, press the Synth 1 button
5
; Circuit is now displaying Note View for
Synth 1. The two upper rows – the synth pads - show the notes that Synth 1 is contributing to
the sequence, while the two lower rows – the sequence steps - show the progression through
the sequence. You can see the contributions made by Synth 2 by pressing the Synth 2 button.
Note that the notes of Synth 1 are coded pink and those of Synth 2 green; when the sequence
includes a synth note, the pad corresponding to the note changes to white. Similarly, the
sequence pads are pale blue, but turn white as the “play cursor” moves through the sequence.
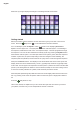
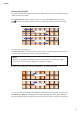
Now press the Drum 1 button. The displays for the drums differ from those for the synths: the
display shows two drums simultaneously - Drum 1 (typically kick) and Drum 2 (typically snare)
in this case. The two upper rows represent one drum (Drum 1) and the two lower rows the other
(Drum 2). The arrangement for Drums 3 and 4 is identical, except for the colour coding. Drums
3 and 4 are normally variations of cymbal, hi-hat and other percussion sounds.
Note that pads representing steps that have drum hits are lit brightly while those that don’t are
dim. Try pressing some of the dim pads to add more drum hits; press a bright pad to delete a
hit.
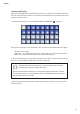
Press the Play button to stop.
Later in the manual, we explain how you can choose the synth and drum sound you want in
your pattern, and also how you can manipulate the sounds in real-time.