
User's Manual


6
B. Options
While in Steps View, press the Options button (to the right of the pads) to see the options for the current Pattern. Use
the soft buttons below ‘Velocity’, ‘Gate’ and ‘Pattern’ to call up these settings. Press Options again to return to Steps
View.
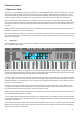
i. Velocity
Once in the Options menu, press the soft button below Velocity to edit the velocities of each Step in the current Pat-
tern. By default, you will see Steps 1 to 8 on the screens (2 per screen). Use the up/down arrow buttons to the left of
the screens to access steps 9 to 16 (the bottom row of pads).
In order to adjust MIDI note velocity, simply rotate the knob above the Step you want to adjust. You can set a Step’s
velocity to anywhere between 1 and 127. This allows you to dial desired MIDI velocities with a ne level of precision.
Notice that the screens show a single velocity for any Step of a Pattern containing one or more notes. This value is the
highest velocity of all of the notes assigned to that Step, although multiple velocities might actually be present for that
Step.
When dealing with multiple notes assigned to a Step, the SL MkIII will raise or lower the Step’s velocity to a new,
uniform value. When doing so, the SL MkIII favors higher values, and snaps closest to them. To illustrate this process,
imagine that a Step contains the velocity values 25 and 89: turning this Step’s knob to the right will snap those velocity
values to 90 or above (i.e. both 25 and 89 became 90 or above). Alternatively, if you had turned the knob to the left
those same velocities would have snapped to 88 or lower.
Note that after all the notes on a Step have been snapped to same velocity (as just described), all new notes assigned
to that Step will immediately adopt the ‘group’ velocity.
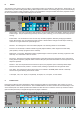
ii. Gate
Next in the Options menu is ‘Gate’. Select Gate to edit the length of MIDI notes assigned to each Step in the current
pattern. Again, use the up/down arrow buttons to the left of the screens to access steps 9 to 16. The screen will show
a single Gate value for each step of the pattern containing one or more notes. The value shown is equal to the highest
Gate of all of the notes assigned to that Step.
The SL MkIII measures Gate value in two parts: steps and fractions of a step. Each step can be broken down into six
fractions. Therefore, Gate value is shown as a step number, followed by a fraction count (ve white boxes in the meter
below). Notice how the default value for notes is ‘1 step’; use the knob above each step to lengthen or shorten the
Gate for every assigned note.
[Keep in mind that since the SL MkIII operates under the rules of MIDI, how the Gate parameter inuences your re-
sulting sound depends on the sound being triggered, as well as the MIDI instrument holding that sound. For example,
a Gate of 16 steps will not ‘stretch’ a short hi-hat sample. However, its MIDI note will indeed become 16 steps long,
regardless of the audible result.]
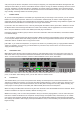
Tempo
INCONTROLGlobalShift
Zones
Sequencer
LatchArp
Scales
Sessions
Patterns
Steps
Save
Duplicate
Clear
Grid
Options
Pitch Modulation
Octave
Transpose
Track
_
+
Templates
Expand
Tempo
INCONTROLGlobalShift
Zones
Sequencer
LatchArp
Scales
Sessions
Patterns
Steps
Save
Duplicate
Clear
Grid
Options
Pitch Modulation
Octave
Transpose
Track
_
+
Templates
Expand