
User's Manual


9
F. Automation
With the SL MkIII’s Sequencer recording, you can automate the movement of the following Template controls:
• Rotary Knobs
• Faders
• Soft Buttons
• Pads (press/release & pressure)
• Pitch & Modulation Wheels
• Pedals
Once a control moves the corresponding LED or screen will light red, and the control will begin overwriting any of
its existing control data as the Transport advances. Movements are recorded and played back at a resolution of 24
PPQN regardless of the current pattern sync rate (equivalent to 6 data points for each Step at the default 1/16 sync
rate). Automation will record or overwrite until either recording or playback stops; we, therefore, recommend disabling
record as soon as possible to ensure you do not overwrite automation when the Sequencer loops back around.
You can automate up to 8 controls for each Track in a Session. The screen will notify you when you have used anoth-
er automation lane or if there are no more available lanes for the selected track.
Keep in mind that you cannot record automation for relative rotaries and controls that are assigned to song position.
Also, pads and buttons that output note messages are recorded into the note sequence rather than as automation.
Holding the Clear button will highlight all the controls that have automation data in the current Pattern and hide those
that do not. For example, if the Pitch Wheel is automated its LED will illuminate as you hold Clear. While still holding
Clear, any movement of a control will clear its automation in the current pattern.
You can also manually assign values to a Step, which is very useful when more accuracy is required. While stopped,
press the Transport’s Record button (Transport). Then, select a Step (by pressing a pad) to enter Step Edit mode. This
action will audition the Step. Move a control to the desired value to assign this value to the Step, and deactivate re-
cord. In the case of the Pitch Wheel, move it to the desired position, then disable record before letting go of the wheel.
Note that only the most recent control value is assigned to a Step. This means that while in Step Edit mode, pressing
and releasing a button or pad with a momentary function will only record the release message. To record the press
message of a button or pad, turn off record or select a new Step to record the release before releasing the pad.
G. Mute/Solo Parts
To Mute or Solo tracks of the sequencer press the Sequencer button and then the Up arrow to the right of the 8x2
buttons and you’ll see Mute and Solo appear on the far right screen.
Mute a Part by pressing a Mute button (top row of orange soft buttons) corresponding to that Part. When muted the
Sequencer will not output MIDI for that Part, but the user can still play keys or audition pads for that Part.
Solo a Part by pressing the Solo button (bottom row of teal soft buttons) corresponding to that Part. When you solo a
Part, any other Part that is not also soloed will be silent (if it was not already muted). The Mute button for a silenced
Part/s will pulse yellow to indicate that it is silent.
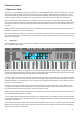
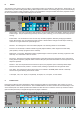
2. Templates
Each Part operates according to a Template. In other words, each Part uses a Template to determine which MIDI
messages should send for each control. Templates live in the Templates View, which you access by pressing the Shift
+ Sessions buttons. A Template determines the type of MIDI message sent from each control. The Template contains
mapping data for:
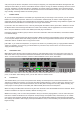
Tempo INCONTROLGlobalShift
Zones
Sequencer
LatchArp
Scales
Sessions
Patterns
Steps
Save
Duplicate
Clear
Grid
Options
Pitch Modulation
Octave
Transpose
Track
_
+
Templates
Expand