
Installation Instructions

DIV0208B 11/08/10
P.1/1
Installation steps : Images can be different than the actual product.
Étapes d‘installation :
Les illustrations peuvent différer du produit.
Mounting blocks : Installation instructions
Plaques de montage: Instructions d’installation
Figure B
3/16
”
Figure E
Figure C
Figure D
Figure A
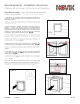
1- Determine the location of the mounting block. When it’s
necessary, cut an opening in the wall smaller than the inner
wall of block base.
1- Situer l’emplacement de la plaque de montage mural. Lorsque
nécessaire, faire une ouverture dans le mur plus petite que
l’intérieur de la base.
3- Install exterior siding. Leave at least a 3/16” (0,48cm) gap
between the base of the gable vent and the siding. (Fig.B)
3- Poser le revêtement extérieur. S’assurer de laisser un jeu d’au
moins 3/16” (0,48cm) entre la base de l’évent et le revêtement.
(Fig.B)
4- Assemble the cover on the rear part, lining up the symbols
on the two components. (Fig.C) Press part into the base to
desired depth. (Fig.E)
4- Assembler le couvercle sur la base en alignant les symboles des
deux composantes. (Fig.C) Enfoncer sur la base à la profondeur
désirée. (Fig.E)
2- Ensure the base is straight and square, and that the line-up
symbol and/or the words “top/haut” are positioned at
the top as per the model. Using nails or screws in the holes
identified by the arrow, attach the base of the mounting block,
centring it over the opening. To ensure maximum watertight
installation, apply sealant around the part. (Fig.A)
2- Assurez-vous que la base soit droite et à l’équerre et que,
selon le modèle, le symbole d’assemblage et/ou l’inscription
“top/haut”, soient positionnés en haut. Fixer la base centrée avec
l’ouverture à l’aide de clous ou de vis dans les trous identifiés par
la flèche. Afin d’assurer un maximum d’étanchéité, appliquer un
scellant autour de la pièce. (Fig. A)
Note: Do not attach accessories directly onto mounting
blocks. The fasteners must be attached to a solid surface.
Note: Ne jamais fixer d’accessoires directement sur les plaques de
montage. Les attaches doivent pénétrer la surface solide.