cEdar panels / Bardeau de cèdre Installation guide / Guide d’installation General information / Information Générale caution: remember that Polymer undergoes expansion/contraction due to variations in temperature. The following instructions will allow for the expansion / contraction of the material. Attention: ne jamais oublier que Les polymères subissent de l’expansion / contraction dues aux variations de température.
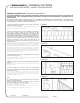
cEdar panels / Bardeau de cèdre Installation guide / Guide d’installation installation steps / Étapes d’installation 1- First install the starter strips at the lowest point of the structure. Make sure that the horizontal starting line is perfectly leveled and square with the wall. Leave a 1“(2,54cm) gap at each end of the wall when using decorative corners (1). If a floor is against the wall you must leave a gap of 3/4’’(1,91cm) between the starter and the floor (2).
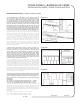
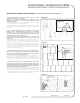
cedar panels / Bardeau de cèdre InstallatIon guIde / guIde d’InstallatIon installation stePs (continuation) / étapes d’InstallatIon (suIte) 4- after positionning each panel at the proper spacing of the installation temperature guideline, nail in the center hole of the panel (the panel will move evenly in both directions in case of retraction or expansion) and in the lateral hole. If the panel is installed on a furring wall, a furring strip is required behind these holes. (figure d) n.B.
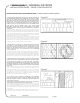
cedar panels / Bardeau de cèdre InstallatIon guIde / guIde d’InstallatIon decorative corners installation / InstallatIon de coIns décoratIfs 1- the installation of corners begins once you have completed two adjacent walls. note: for proper installation & optimal corner appearance, make sure that rows of adjacent walls are at equivalent height. 1-Pour l’utilisation de ces coins, l’installation débute lorsque vous avez terminé deux murs adjacents.