
Installation Instructions


DIV0129E
22/04/2011
p. 5/5
CEDAR PANELS / BARDEAU DE CÈDRE
INSTALLATION GUIDE / GUIDE D’INSTALLATION
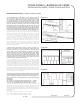
3- For all the other corners, insert the two internal hooks
into the two openings (3). Ensure they are locked in place.
Push corner upwards on siding shingles until proper fit
(4). Nail into slots at the top (Figure I).
3- Pour tous les coins suivants, insérer les crochets dans les
ouvertures (3). Vérifier qu’ils soient bien engagés. Pousser
le coin vers le haut jusqu’au contact avec les bardeaux des
panneaux (4). Clouer dans les trous oblongs en haut (Figure I).
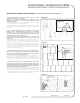
1- The installation of corners begins once you have
completed two adjacent walls.
NOTE: For proper installation & optimal corner
appearance, make sure that rows of adjacent walls are at
equivalent height.
1-Pour l’utilisation de ces coins, l’installation débute lorsque
vous avez terminé deux murs adjacents.
NOTE: Les rangées des murs adjacents doivent être à la même
hauteur pour assurer une installation et une apparence optimale
des coins.
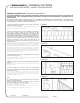
2- The corner is adjustable as the height of the siding
shingles varies. While installing, slip the two external
hooks (at rear of part) under the starter strip (1). Push
the corner upwards on siding shingles until proper fit (2).
Nail into slots at the top (Figure G).
- For the first row only, you may have to cut the two
internal hooks to avoid interference with the starter strip
(Figure H).
2- Puisque la hauteur des bardeaux varie, l’assemblage du coin
est ajustable. Lors de l’installation, glisser les deux crochets
extérieurs (derrière la pièce) dans la bande de départ (1).
Pousser le coin vers le haut jusqu’au contact avec les bardeaux
muraux (2). Clouer dans les trous oblongs en haut (Figure G).
- Pour le premier coin seulement, il est préférable de couper
les deux crochets intérieurs pour éviter un conflit avec les
bandes de départ (Figure H).
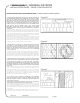
4- For the last corner only, cut excess from part. On each
side of the corner, make a hole wider than the shaft of the
nail, but smaller than the head. Affix a nailing strip behind
these locations to fasten corners firmly. Fold back the top of
the corner and nail it down. (Figure J)
4- Pour le dernier coin seulement, couper l’excédent de la
pièce. Sur chaque coté du coin, faire un trou plus large que le
corps du clou, mais plus petit que sa tête. Prévoir un support
de clouage derrière ces endroits afin de bien fixer le haut du
coin. Rabattre le haut du coin et le clouer. (Figure J)
decorative corners installation / INSTALLATION DE COINS DÉCORATIFS
Figure G
Figure H
Figure J
Figure I