
Installation Instructions


INSTALLATION GUIDE / GUIDE D’INSTALLATION
p. 2/5
NOVISTONE PREMIUM LEDGE / ALLÈGE NOVISTONE PREMIUM
DIV0295A
15/08/2014
Figure A
3/16”
(0,48cm)
1”
(2,54cm)
2”
(5,08cm)
Figure C
Figure B
30”
(76,2cm)
30”
(76,2cm)
?
?
Figure D
NoviStone:
HC-PHC-SK
NoviBric:
HL-DHL
NoviShake:
HS
NoviStone:
RR-FS
NoviPlank:
S8-D6
NoviStone:
DS
NoviShake:
RS-PS-RS8
5/8”
(1,59cm)
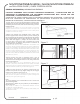
1-Begin with the installation of the siding on the lower
section of the wall upto the desired height. For an installation
without cutting the bottom of the ledges, go directly to the
next step. Otherwise, measure the siding thickness and cut
the bottom of ledges to allow a proper insertion of siding
under the ledges. If needed, pre-cut at 1’’(2,54cm) and at
2’’(5,08cm) which are integrated on the lower walls of
ledges. The initial gap is the precise distance for the nailing
zones of Novik siding panels (Figure A).
1-Installer d’abord le revêtement sur la partie inférieure du mur
jusqu’à la hauteur désirée. Pour une installation sans couper le
bas des allèges, passer directement à l’étape suivante. Autrement,
mesurer l’épaisseur du revêtement et couper le bas des allèges afin
de permettre l’insertion du revêtement sous les allèges. Au besoin,
des pré-découpes à 1’’(2,54cm) et à 2’’(5,08cm) sont intégrées
sur la parois inférieure des allèges et l’espace initial est la distance
précise pour laisser passer la tête de clouage des panneaux de
revêtement Novik (Figure A).
2-It is recommended to begin the installation of Novistone
Premium Ledge by installing the ledge corners. See section
FINISH AT A WALL CORNER for details. For installation without
corner, go directly to the next step.
2-Il est recommandé de débuter l’installation des Allèges Novistone
Premium par l’installation des coins d’allège. Voir la section FINITION
D’UN COIN DE MUR pour les détails. Pour une installation sans coin,
passer directement à l’étape suivante.
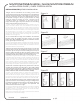
3-Measure the length of the wall and spread the cut of the first
and last ledge to center the installation of ledges on the wall.
If needed, cap the end pieces before installing on the wall (see
sections: FINISH AT END OF WALL for details). Install the first
ledge, previously cut according to the finish option chosen, over
the siding. Nail the ledge making sure it is level (Figure B).
3-Mesurer la longueur du mur et répartir la coupe de la première
et dernière allège de manière à centrer l’installation des allèges sur
le mur. Au besoin, faire la finition du bout des allèges avant de les
installer sur le mur (voir sections: FINITION À UN BOUT DE MUR
pour les détails). Installer la première allège, préalablement coupée
selon l’option de finition choisie, par-dessus le revêtement inférieur.
Clouer l’allège en s’assurant qu’elle soit bien au niveau (Figure B).
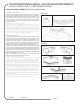
4-Install each successive ledge into the previous one. Leave the
required space between each then nail it in place while making
sure to keep them level (Figure C). Repeat until the end of the wall.
Finish the wall according to the finish option chosen (see sections:
FINISH AT END OF WALL et FINISH AT A WALL CORNER)
4-Installer chaque allège suivante en l’insérant dans la précédente.
Laisser l’espace requis entre chacune d’elles et clouer le tout en
s’assurant de bien les aligner (Figure C). Répéter jusqu’au bout du
mur. Terminer le mur selon l’option de finition choisie (voir sections:
FINITION À UN BOUT DE MUR et FINITION D’UN COIN DE MUR).
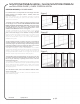
5-Once the installation of ledges is done, install the siding on the
upper section of the wall. According to the type of siding used, it
is possible to install starter strips directly on the ledges (Figure D).
Note: Pay attention to not constrain the expansion and
contraction movement of the ledges.
5-Une fois l’installation des allèges terminée, procéder à l’installation
du revêtement sur la partie supérieure du mur. Selon le type de
revêtement utilisé, il est possible d’installer les bandes de départ
directement sur les allèges (Figure D).
Note: Porter une attention particulière à ne pas limiter le mouvement
d’expansion et contraction des allèges.
INSTALLATION STEPS / ÉTAPES D’INSTALLATION