
Installation Instructions


INSTALLATION GUIDE / GUIDE D’INSTALLATION
p. 3/5
NOVISTONE PREMIUM LEDGE / ALLÈGE NOVISTONE PREMIUM
DIV0295A
15/08/2014
FINISH AT END OF WALL / FINITION À UN BOUT DE MUR
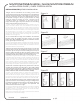
Figure F
#1
#2
Desired length
Longueur désirée
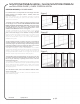
Figure G
#1
#2
#3
#4
Desired length
Longueur désirée
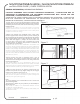
Figure E
Left End Cap / About gauche
Left End Cap
About gauche
Right End Cap / About droit
Right End Cap
About droit
Or
Ou
2-Finish with flat end (option 1):
Cut the end of the ledge at 90° to the desired length (Figure F, #1).
Trim a piece of wood similar to the opening at the end of the ledge.
Paint it with a matching color and attach it to the ledge with
small screws at conceal spots. Install the assembly on the wall,
nailing as mentioned in point 2 of the GENERAL INFORMATION
section of the guide (Figure F, #2).
Note: Pay attention to not constrain the expansion and
contraction movement of the ledge or siding.
2-Finition de bout de mur avec bout plat (option 1):
Couper le bout de l’allège en ligne droite à la longueur désirée
(Figure F, #2). Tailler un morceau de bois identique à l’ouverture
du bout de l’allège. Le peinturer d’une couleur assortie et le fixer
à l’allège avec l’aide de petites vis à des endroits discrets. Installer le
montage au mur puis clouer tel que mentionné dans le point 2 de la
section INFORMATION GÉNÉRALE du guide (Figure F, #2).
Note: Porter une attention particulière à ne pas limiter le mouvement
d’expansion et contraction de l’allège ou du revêtement.
1-Finish at end of wall with a cut corner end:
Cut the rear portion of a Novistone Premium Ledge Corner
straight to form a ledge cap according to which side of the wall
to complete (Figure E). Nail the ledge cap making sure it is level.
1-Finition de bout de mur avec un coin coupé:
Couper la partie arrière d’un Coin d’Allège Novistone Premium en
ligne droite pour former un about d’allège selon le côté du mur à
finaliser (Figure E). Fixer l’about sur le mur en s’assurant qu’il soit bien
au niveau.
3-Finish with flat end (option 2):
Cut the end of the ledge at 90° to the desired length (Figure G, #1).
Block the end with a cardboard attached to the ledge with masking
tape (Figure G #2). Fill the opening at the end of the ledge using
low expansion polyurethane foam on approximately 2’’(5,08cm)
long (Figure G, #3). Let harden. Secure the hardened foam in
the ledge with a small screw in a concealed spot. Remove the
cardboard and masking tape. Cut off the excess foam protruding
from the end of the ledge and paint the end with a matching
color to the ledge. Install the assembly on the wall, nailing as
mentioned in point 2 of the GENERAL INFORMATION section
of the guide (Figure G, #4).
Note: Pay attention to not constrain the expansion and
contraction movement of the ledge or siding.
3-Finition de bout de mur avec bout plat (option 2):
Couper le bout de l’allège en ligne droite à la longueur désirée
(Figure G, #1). Bloquer l’extrémité à l’aide d’un carton attaché
à l’allège avec du ruban à masquer (Figure G, #2). Combler
l’ouverture au bout de l’allège à l’aide de mousse polyuréthane
à faible expansion sur environ 2’’(5,08cm) de long (Figure G, #3).
Laisser durcir. Sécuriser le bloc de mousse durci dans l’allège avec
une petite vis à un endroit discret. Retirer le carton et les rubans
à masquer. Couper le surplus de mousse qui excède et peinturer
l’extrémité avec une couleur assortie à l’allège. Installer le montage
au mur puis clouer tel que mentionné dans le point 2 de la section
INFORMATION GÉNÉRALE du guide (Figure G, #4).
Note: Porter une attention particulière à ne pas limiter le mouvement
d’expansion et contraction de l’allège ou du revêtement.