Siding Systems NOVIKSTONETM SK STACKED STONE INSTALLATION GUIDE
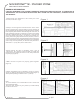
NOVIKSTONETM SK - STACKED STONE INSTALLATION GUIDE GENERAL INFORMATION CAUTION: REMEMBER THAT POLYMER UNDERGOES EXPANSION/CONTRACTION DUE TO VARIATIONS IN TEMPERATURE. THE FOLLOWING INSTRUCTIONS WILL ALLOW FOR THE EXPANSION / CONTRACTION OF THE MATERIAL. 1-Always begin the installation at the lowest part of the structure, from left to right. Figure 1 Central hole Installation hole Lateral hole Maximum 16’’ (40,64cm) 2-Always nail through the installation holes.
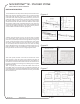
NOVIKSTONETM SK - STACKED STONE INSTALLATION GUIDE INSTALLATION STEPS 1-First install the starter strips at the lowest point of the structure. Make sure that the horizontal starting line is perfectly leveled and square with the wall. Leave a 1 1/2“(3,81cm) gap at each end of the wall when using decorative corners (1). If a floor is against the wall you must leave a gap of 5/8’’(1,59cm) between the starter and the floor (2). If there is no floor, starter strips should be flush with the base of the wall.
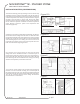
NOVIKSTONETM SK - STACKED STONE INSTALLATION GUIDE INSTALLATION STEPS (CONTINUATION) 4-Install the following panel by hooking it into the starter strip and sliding over the previous panel. Make sure that the tabs on both sides are locked together and spaced equally. If installed at outdoor temperature over 40ºF(5ºC), slide panel to the stoppers (located at the rear panel or at the front, Figure D.0). When resistance is felt, do not force insertion of part. Use the reference line to confirm the position.
NOVIKSTONETM SK - STACKED STONE INSTALLATION GUIDE DECORATIVE CORNERS INSTALLATION 1-The installation of corners begins once you have completed two adjacent walls. -N.B. For proper installation and optimal corner appearance, make sure that the ends of siding panels finish at 3 1/2“(8,89cm) from the corner of the wall and at an equivalent height. Figure G G.1 G.2 G.3 2-For the first corner, insert the hooks into the starter strip (G.1) and be sure to overlap the ends of each row’s panels.