
Installation Instructions


p. 5/5
DIV5217D
2016/03/29
INSTALLATION GUIDE
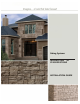
NOVIKSTONE
TM
SK - STACKED STONE
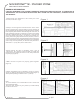
DECORATIVE CORNERS INSTALLATION
INSTALLATION TIP (INSIDE CORNERS)
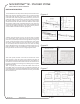
1-Many solutions are possible to finish an inside corner: inside
corner post (A), two J-trims (B) or two NovikTrim1 (C) (Figure J).
It is important to seal the inside corner of the wall prior to
installation the trims.
Figure J
Or
A B C
For details, see the respective installation guide of each product.
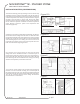
3-For all subsequent corners, insert the hooks into the nailing strip
of the previous corner. Fold back the top of the corner toward the
wall, then nail through the oblong holes. Repeat this step to the
top of the wall. (Figure H)
4-For the last corner only, cut excess from part. On each side
of the corner, make a hole wider than the shaft of the nail,
but smaller than the head. Affix a nailing strip behind these
locations to fasten corners firmly. Fold back the top of the
corner and nail it down. (Figure I)
1-The installation of corners begins once you have completed
two adjacent walls.
-N.B. For proper installation and optimal corner appearance,
make sure that the ends of siding panels finish at 3 1/2“(8,89cm)
from the corner of the wall and at an equivalent height.
2-For the first corner, insert the hooks into the starter strip (G.1)
and be sure to overlap the ends of each row’s panels. Fold back
the top of the part toward the corner of the wall (G.2), then nail
through the oblong holes (G.3). (Figure G)
Figure G
G.1 G.2 G.3
Figure H
H.1
H.2 H.3
2
1
Figure I
Nailing strips